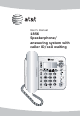
User’s manual 1856 Speakerphone/ answering system with caller ID/call waiting
Congratulations on purchasing your new AT&T product. Before using this AT&T product, please read the Important product information on pages 36-37 of this manual. Please thoroughly read the user’s manual for all the feature operations and troubleshooting information necessary to install and operate your new AT&T product. You can also visit our website at www.telephones.att.com or call 1 (800) 222-3111. In Canada, dial 1 (866) 288-4268.
You must install the power adapter before using the telephone. STOP! See page 5 for easy instructions. For customer service or product information, visit our website at www.telephones.att.com or call 1 (800) 222-3111. In Canada, dial 1 (866) 288-4268. CAUTION: To reduce the risk of fire or injury to persons or damage to the telephone, read and follow these instructions carefully: • • • • • Read and understand all instructions in the user’s manual. Avoid using a telephone during a thunderstorm.
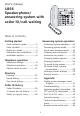
User’s manual 1856 Speakerphone/ answering system with caller ID/call waiting Table of contents Getting started Answering system operation Quick reference guide.........................2 Parts checklist .........................................3 Before you install ..................................4 Telephone base installation.............5 Installation options...............................6 Answering system operation........19 Answering system mode.............. 20 Day & time announcements .........
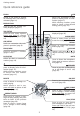
Getting started Quick reference guide FLASH During a call, press to receive an incoming call if call waiting is activated (page 11). CID When the telephone is idle, press to display caller ID information (page 17). While entering numbers, press twice to insert a three-second dialing pause (page 13). DISPLAY DIAL Press to dial the number currently displayed (page 17). REMOVE TAS/SETUP Press to hear setup options. Press and hold to change answering system options (page 24).
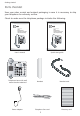
Getting started Parts checklist Save your sales receipt and original packaging in case it is necessary to ship your telephone for warranty service.
Getting started Before you install Choose a central location close to a telephone jack and an electrical outlet not controlled by a wall switch. The telephone can be placed on a flat surface or mounted on a standard wall plate. Avoid placing the telephone base too close to: • Excessive heat sources. • Excessive dust sources such as a workshop or garage. • Excessive moisture. • Extremely low temperature. • Mechanical vibration or shock such as on top of the washing machine or work bench.
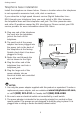
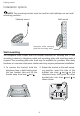
Getting started Telephone base installation Install the telephone as shown below. Choose a location where the telephone is not exposed to excessive heat, cold, dust or moisture. If you subscribe to high-speed Internet service (Digital Subscriber Line DSL) through your telephone lines, you must install a DSL filter between the telephone base and the telephone wall jack. The filter prevents noise and caller ID problems caused by DSL interference.
Getting started Installation options NOTE: The mounting bracket must be used for both tabletop use and wall mounting positions. Wall mount Tabletop mount Telephone outlet mounting plate with mounting studs. Wall mounting The telephone base comes with the bracket mounted for tabletop use. If wall mounting is desired, a telephone outlet wall mounting plate with mounting studs is required.
Getting started Installation options 3. Connect the telephone line cord and power adapter to the jacks on the back of the telephone base. Bundle the telephone line cord, and secure it with a twist tie before placing it inside the bracket. 4. Plug the power adapter into an electrical outlet not controlled by a wall switch. Plug the telephone line cord into a telephone wall jack. To mount the telephone on the wall, position the mounting holes and over the telephone outlet mounting studs.
Telephone operation Telephone settings You can change settings to program how the telephone works. Press CID/SETUP repeatedly until the feature you want is displayed. Press or CID to change settings. Press CID/SETUP again to accept the new setting and move to next feature. Press FLASH at any time to exit. Contrast -3' 3%4 #/.42!34 There are five contrast levels (1-5). Press or CID to adjust screen contrast to maximize readability in different lighting conditions.
Telephone operation Telephone settings Language -3' 7()#( ,!.'5!'% Press or CID to select the language used in all menus and screen displays. You can choose ENGLISH, ESPANOL or FRANCAIS. Home area code/local area codes You can program this phone to recognize one home area code and up to four local area codes. If you simply dial the last seven digits of a telephone number to make a call within your own area code, you should enter your own area code into the telephone as the home area code.
Telephone operation Telephone operation Making and answering calls To make a call, lift the handset or press SPEAKER, then dial a number. Replace the handset or press SPEAKER to hang up. To answer a call, lift the handset, or press to use the speakerphone. SPEAKER Last number redial -3' 2%$)!, The most recently dialed number is displayed when you lift the handset or press SPEAKER. Press REDIAL to dial it.
Telephone operation Options while on calls Volume level. To adjust listening volume -3' While on calls, press listening volume. VOLUME to adjust the There are eight volume levels for the speakerphone, and four levels for the handset. Press or once to increase or lower the listening volume by one level.
Directory Directory Memory capacity -3' The telephone can store up to 12 (three onetouch and nine speed dial) numbers in memory locations for quick dialing. Each memory location can store a number up to 24 digits. Timeouts and error messages Directory card. M1- Mom M2- Bill at work M3- John Smith 1- Betty Johnson 2- Pat Taylor 3- Chris Williams If you pause for too long while creating an entry, the procedure will time out and it will be necessary to start again.
Directory Speed dialing -3' ? %.4%2 .5-"%2 You can enter nine speed dial numbers of up to 24 digits. Each number is stored in a one-digit speed dial location (1-9). To store a number in speed dial 1. Press PROG/MEM. 2. Enter a telephone number (up to 24 digits), or import one by pressing REDIAL. 3. Press PROG/MEM. 4. Press a digit to select a speed dial location (1-9). -3' %.4%2 ,/#!4)/. Press to erase numbers if you make a mistake.
Directory One-touch dialing Telephone numbers called most frequently can be stored in one-touch locations so that they can be dialed with only one key press. -3' ? %.4%2 .5-"%2 You can enter three telephone numbers up to 24 digits. There are three (M1, M2, M3) one-touch keys on your telephone. To store number in one-touch 1. Press PROG/MEM. 2. Enter a telephone number (up to 24 digits), or import one by pressing REDIAL. 3. Press PROG/MEM. 4. Press a one-touch key (M1, M2, M3).
Caller ID history Caller ID history Information about caller ID with call waiting This product has a caller ID function with call waiting feature which works with service from your local telephone company. NEW No: -3' PM 0!4 7),,)!-3 Caller ID with call waiting lets you see the name and telephone number of the caller before answering the telephone, even when on another call. It may be necessary to change your telephone service to use this feature.
Caller ID history Caller ID history How caller ID works If you subscribe to caller ID service provided by your local telephone company, information about each caller will be displayed between the first and second ring. NEW No: PM 0!4 7),,)!-3 -3' -3' #!,,3 .%7 New calls (un-reviewed) Total calls New call (un-reviewed) Time/date of call Repeat call Light on: un-reviewed call(s).
Caller ID history To review the call history To review the call history No: -3' PM #(2)3 4(/-03/. Press or CID to display the most recent call. Press or CID repeatedly to scroll through the list of earlier calls.
Caller ID history Delete or copy an entry -3' ? To copy an entry into memory To copy a displayed number into memory, press PROG/ MEM. The name and time will be removed, and the telephone number will remain in the screen. Press PROG/ MEM again, ENTER LOCATION? will appear in the screen. Enter a memory location number (1-9) or press a onetouch button (M1, M2, M3) to save it. To delete entries -3' $%,%4% !,, Press REMOVE to delete the displayed entry from your caller ID history.
Answering system operation Answering system operation Message capacity -3' Message counter Number of messages (or during playback, message number currently playing). The answering system can record up to 99 messages, depending on the length of each message. Individual messages can be up to three minutes, and total maximum recording time is 19 minutes. Messages will remain available for replay until you delete them. Memory monitor After the last message, you will hear "End of messages.
Answering system operation Answering system mode The answering system’s default factory setting is ON in order to answer and record messages. You can turn the answering system off, but if you do, the answering system will not answer calls or record incoming messages. Press ON/OFF until the system announces “The machine is off.” - OR - To turn the answering system off Press ON/OFF until you hear “The machine is off.” The ON/OFF will be turned off.
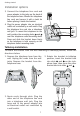
Answering system operation Day & time announcements To set day and time Before playing each message, the answering system announces the day and time the message 1. Press CLOCK RESET, was received. the system will announce the current setting. Before using the answering system, follow the steps on the left to set the day and time, so messages are dated correctly. If the clock is not 2. Press and hold CLOCK RESET, the system set, before playing messages, the system will announce "power failure" each time.
Answering system operation Outgoing announcements Outgoing announcements are the messages callers hear when calls are answered by the answering system. The telephone is pre-programmed with an announcement. If the telephone is set up to record messages, it answers calls with “Hello, please leave a message after the tone.” You can use this announcement, or replace it with a recording of your own voice. -3' ! #!,,3 .%7 To record your outgoing announcement Press and hold SKIP /ANNC.
Answering system operation -3' !/ AO (announce only) is displayed and flashing when announce only is activated. AO stops flashing after an announcement is recorded. 1. Press and hold for one second to enter feature menu. The system will announce "Selected announcement is A. To select a different announcement, press SKIP or REPEAT." TAS/SETUP 2. Press SKIP or REPEAT. The system will announce "Announce only." 3.
Answering system operation Changing feature options 1. Press and hold for one second to enter feature menu. TAS/SETUP 2. 3. 4. Press TAS/SETUP until desired feature is heard (see list at right). Press SKIP or REPEAT until desired selection is heard. Press TAS /SETUP to set selection and move to next menu option. - OR Press PLAY/STOP to set selection and exit menu. When the answering system is on, you can customize how the system operates.
Answering system operation Changing feature options What is priority call code? If a caller enters your priority call code while your announcement is playing, you’ll be alerted with a special tone so you can answer the call. If the call is not answered, you will hear "the machine will now hang up." The code is pre-set to 500. See steps at right to change it. Feature options (Default settings underlined).
Answering system operation Message playback Number of messages (or during playback, message number currently playing). Press PLAY/STOP to listen to only new (unheard) messages. Press and hold PLAY/STOP to listen to all messages (oldest first). Announcements during message playback • Before each message, you will hear the day and time it was received. -3' • After the last message, you will hear “End of messages.” Options during playback • Press VOLUME button to adjust speaker volume.
Answering system operation To record & play memos Elapsed time shown in message window. -3' #!,,3 .%7 Memos are messages you record by yourself. You can record a memo as a reminder to yourself or leave a message for someone else if others in your household use the answering system. Memos are saved, played back and deleted exactly like incoming messages. To record a memo To record a memo. Press REPEAT /MEMO until the answering system beeps. Release the button and then begin speaking.
Answering system operation To record & play a phone conversation While on a call on the handset, you can record a telephone conversation to be stored as an incoming message. Recorded telephone conversations are saved, played back and deleted exactly like incoming messages. Elapsed time shown in message window. To record a phone conversation -3' To record a conversation when you are on a call on the handset. Press and release REPEAT /MEMO, you will hear a beep and then begin recording.
Answering system operation Message counter displays Message window. -3' The message counter usually displays the total number of memos and incoming messages. See the list below for explanations of other displays in this counter. Message counter displays No messages. Number of messages/memos, or message number currently playing (page 26). Current remote access code and priority call code while setting (pages 24-25). Current ringer volume level while adjusting.
Answering system operation Remote access A three-digit security code is required to access your answering system from any touch-tone telephone. This code is 500 by default, see Changing feature options (page 24) to change it. 1. Dial your telephone number from any touch-tone telephone. 2. When the system answers, enter threedigit remote access code (500 unless you have changed it). 3. Enter remote com- Play all messages 1 Press to listen to all messages.
Appendix Display screen messages, tones & lights Screen icons NEW REP No: Ringer is off. -3' #, NEW New call received. REP Repeat call from the same number. No. Call number. ERR Error (current operation has been unsuccessful, try again). MSG# Message number. CL The clock is not set. Alert tones “Beep-Beep-BeepBeep-Beep-BeepBeep” (seven quick beeps). Error tone (current operation has been unsuccessful; try again). “Beep-Beep-Beep” (three quick beeps, repeated).
Appendix Troubleshooting If you have difficulty with your telephone, please try the suggestions below. For Customer Service, visit our website at www. telephones.att.com or call 1 (800) 222-3111. In Canada, dial 1 (866) 288-4268. My telephone does not work at all. • Make sure the power adapter is securely plugged into an outlet not controlled by a wall switch. • Make sure the telephone line cord is plugged firmly into the telephone base and the modular wall jack. • Unplug the telephone’s electrical power.
Appendix Troubleshooting • Test a working telephone at the same telephone jack. If another telephone has the same problem, the problem is in the telephone jack. Contact your local telephone company (charges may apply). • The telephone line cord might be malfunctioning. Try installing a new telephone line cord. I cannot dial out. • First, try all the above suggestions. • If the other telephones in your home are having the same problem, the problem is in the wiring or local service.
Appendix Troubleshooting My display reads • You need to reset the clock (page 21). “power failure.” "Power failure" • You need to set the answering system clock (page 21). prompts. • Caller ID is a subscription service. You must subscribe to My caller ID this service from your local telephone company for this features are not feature to work on your telephone. working properly. • The caller may not be calling from an area which supports caller ID.
Appendix Troubleshooting The answering system does not answer after the correct number of rings. • Make sure the answering system is on. When the answering system is on, the red light on the ON/OFF key should be lit. • If toll saver is activated, the number of rings changes to two or four when there are new messages waiting (page 24). • If the memory is full or if the answering system is off, the system will answer after ten rings.
Appendix Important product information This symbol is to alert you to important operating or servicing instructions that may appear in this user’s manual. Always follow basic safety precautions when using this product to reduce the risk of injury, fire, or electric shock. Safety information • Read and understand all instructions in the user’s manual. Observe all markings on the product. • Avoid using a telephone during a thunderstorm. There may be a slight chance of electric shock from lightning.
Appendix Important product information Especially about corded telephones • Electrical power: The telephone must be connected to a working electrical outlet. The electrical outlet should not be controlled by a wall switch. Calls cannot be made if the telephone base is unplugged or switched off, or if the electrical power is interrupted. • Power adapter: This power adapter is intended to be plugged into a vertical wall outlet or a floor outlet.
Appendix FCC and ACTA information If this equipment was approved for connection to the telephone network prior to July 23, 2001, it complies with Part 68 of the Federal Communications Commission (FCC) rules. If the equipment was approved after that date, it complies with the Part 68 rules and with Technical Requirements for Connection of Equipment to the Telephone Network adopted by the Administrative Council for Terminal Attachments (ACTA). We are required to provide you with the following information. 1.
Appendix FCC and ACTA information 3. Repair instructions If this equipment is malfunctioning, it must be unplugged from the modular jack until the problem has been corrected. Repairs to this telephone equipment can only be made by the manufacturer or its authorized agents. For repair procedures, follow the instructions outlined under the limited warranty. 4.
Appendix Part 15 of FCC rules Some telephone equipment generates, uses, and can radiate radio-frequency energy and, if not installed and used properly, may cause interference to radio and television reception. This product has been tested and found to meet the standards for a class B digital device, as specified in part 15 of the FCC rules. These specifications area designed to provide reasonable protection against such interference in a residential installation.
Appendix Limited warranty The AT&T brand is used under license - any repair, replacement or warranty service, and all questions about this product should be directed to: In the United States of America, visit our website at www.telephones.att.com or call 1 (800) 222-3111. In Canada, dial 1 (866) 288-4268. 1.
Appendix Limited warranty 4.
Appendix Limited warranty 6. What must you return with the PRODUCT to get warranty service? You must: a. Return the entire original package and contents including the PRODUCT to the service location along with a description of the malfunction or difficulty; and b. Include “valid proof of purchase” (sales receipt) identifying the PRODUCT purchased (PRODUCT model) and the date of purchase or receipt; and c. Provide your name, complete and correct mailing address, and telephone number. 7.
Appendix Technical specifications Operation temperature 32°F — 122°F 0°C — 50°C Telephone voltage (AC adapter input) AC120V 60Hz 5W Telephone voltage (AC adapter output) AC6V @350mA 44
Appendix Index A Alert tones, 31 Answering calls, 10 Answering system, 19-30 Q Quick reference guide, 2 R Receiving calls, 10 Ringer volume, 10 C Call history, 8 Call intercept, 20 Call screening, 20 Caller ID, 15 copy an entry into memory, 18 delete entries, 18 dial entries, 17 with call waiting, 8 Contrast, 8 S Screen display messages, 31 Speakerphone, 10 T Technical specifications, 44 Troubleshooting, 32 V Volume control, 11 D Delete entries, 18 Dialing, one-touch dialing, 14 speed dialing, 13 Direc
Appendix Remote access wallet card Use the wallet card below to help you remember commands to control your answering system from any touch tone telephone. Cut along dotted line Action Call your telephone number, then enter your three-digit access code (preset to 500). Remote command Play all messages ................................................... 1 Play new messages................................................ 2 Delete the message...............................................
www.telephones.att.com © 2008 Advanced American Telephones. All rights reserved. AT&T and the AT&T logo are trademarks of AT&T Intellectual Property II, L.P. d/b/a AT&T Intellectual Property licensed to Advanced American Telephones. Printed in China. Issue 6 AT&T 09/08.