2010 ARMADA QUICK REFERENCE GUIDE
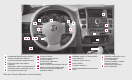
INSTRUMENT BRIGHTNESS CONTROL CRUISE CONTROL STEERING WHEEL TILT ADJUSTMENT* AUXILIARY AUDIO INPUT JACK* VEHICLE INFORMATION DISPLAY POWER LIFTGATE SWITCH (IF SO EQUIPPED)* POWER VENT WINDOWS (IF SO EQUIPPED)* PEDAL POSITION ADJUSTMENT SWITCH HOOD RELEASE* TOW MODE SWITCH (IF SO EQUIPPED) VEHICLE DYNAMIC CONTROL (VDC) OFF SWITCH HEATED SEAT SWITCHES (IF SO EQUIPPED)* LOW TIRE PRESSURE WARNING LIGHT HEADLIGHT AND TURN SIGNAL CONTROL WINDSHIELD WIPER / WASHER SWITCH STEERING WHEEL SWITCHES FOR AUDIO C
TABLE OF CONTENTS Remote Keyless Entry System (if so equipped) . . . . . . . . . . . . . . . .2 NISSAN Intelligent Key™ (if so equipped) . . . . . . . . . . . . . . . . . . .3 Automatic Door Locks . . . . . . . . . . . . . . . . . . . . . . . . . . . . . .4 Windshield Wiper/Washer Switch . . . . . . . . . . . . . . . . . . . . . . .4 Headlight and Turn Signal Control . . . . . . . . . . . . . . . . . . . . . . .5 Steering Wheel Switches for Audio Control/Bluetooth姞 (if so equipped) . . . . . . . . . . . .
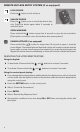
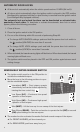
REMOTE KEYLESS ENTRY SYSTEM (if so equipped) LOCK DOORS button to lock all doors. Press the UNLOCK DOORS button once to unlock the driver’s door Press the only. Press the button again within 5 seconds to unlock all doors. OPEN WINDOWS Press and hold the button longer than 3 seconds to open the front windows. (The keyfob is not able to close the windows after opening them.) POWER LIFTGATE (if so equipped) Press and hold the button for longer than 0.5 seconds to open or close the power liftgate.
NISSAN INTELLIGENT KEY™ (if so equipped) The NISSAN Intelligent Key™ allows you to lock or unlock your vehicle, open your lift gate and start the engine. NOTE: It is important to make sure the Intelligent Key is with you (that is, in your pocket or purse). 䡲 The operating range of the door and lift gate lock/unlock function is approximately 31 in (0.8 m). 䡲 Locking the vehicle - Push any door handle Request Switch once. 䡲 Unlocking the vehicle - Push any door handle Request Switch once.
AUTOMATIC DOOR LOCKS 䡲 All doors lock automatically when the vehicle speed reaches 15 MPH (24 km/h). 䡲 All doors unlock automatically when the ignition switch is placed in the OFF position (Intelligent Key equipped vehicles) or when the key is removed from the ignition switch (non-Intelligent Key equipped vehicles). The automatic lock and unlock functions can be deactivated or activated independently of each other.
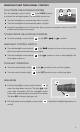
HEADLIGHT AND TURN SIGNAL CONTROL TO ACTIVATE THE AUTOLIGHT SYSTEM: Turn the headlight control switch to the AUTO position to activate the autolight system. The autolight system can: 䡲 Turn the headlights on automatically when it is dark. 䡲 Turn the headlights off automatically when it is light. 䡲 Keep the headlights on for 45 seconds after you place the ignition switch in the OFF position and all doors are closed.
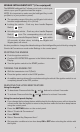
STEERING WHEEL SWITCHES FOR AUDIO CONTROL/ BLUETOOTH姞 (if so equipped) 䡲 Press the MODE button to turn the radio system on. 䡲 To choose Preset A, B, C, Music Box™ (if so equipped), CD, XM姞 (if so equipped), CompactFlash姞 (if so equipped) or DVD (if so equipped), press MODE repeatedly. 䡲 The tuning up or down switch can be used to perform the following: ● Push the switch for less than 1.5 seconds to change to a preset station. ● Push and hold the switch for more than 1.
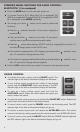
AUTOMATIC CLIMATE CONTROL AUTO BUTTON 䡲 Press the AUTO button . Turn the driver’s side temperature control dial to the desired temperature. This will allow the fan speed, air flow distribution and temperature to be automatically maintained at the selected temperature. 䡲 To disable auto mode, press the MODE button button , press the fan speed control or press the front defroster control button 䡲 Press the DUAL . button to turn the passenger’s side temperature controls on or off.
FAN SPEED CONTROL BUTTONS Press (slower) or (faster) button to control fan speed. Press AUTO to automatically control fan speed. Press OFF to turn the climate control off. DEFROSTING/DEFOGGING FRONT AND SIDE WINDOWS 䡲 Press the defroster control button to turn the system on. The A/C automatically turns on when the defroster mode is selected. 䡲 Turn the driver’s side temperature control dial left or right to set the desired temperature.
REAR CLIMATE CONTROL DIALS To adjust the climate control system for rear seat passengers, use the dials on the overhead console. REAR FAN SPEED CONTROL DIAL REAR TEMPERATURE CONTROL DIAL/REAR CTRL BUTTON Press the REAR CTRL button to transfer rear climate functions to the rear passengers. AIR FLOW/MODE BUTTONS Press to select the following air flow outlets: Air flows from the ceiling and foot vents. Air flows from the ceiling vents. Air flows mainly from the foot vents.
DISC/AUX BUTTON Press the DISC/AUX button to play a CD loaded into the CD player. Press the DISC/AUX button again to play a compatible device such as an MP3 player when it is plugged into the auxiliary jacks located below the climate controls (cable not included). Press the DISC/AUX button again to play a DVD loaded into the DVD player (if so equipped). Press the DISC/AUX button again to play the CompactFlash姞 Drive, if a card is in the drive.
TUNE/FOLDER AND AUDIO KNOB (Bass, Treble, etc.) 䡲 To manually tune the radio, turn the TUNE/FLDR knob. If playing a CD that is formatted with MP3/WMA folders, turn the TUNE/FLDR knob to scroll through the available folders. 䡲 Adjust the Bass, Treble, Fade and Balance by pressing the AUDIO knob until the desired mode appears in the display. Then turn the AUDIO knob to adjust to the desired level. *XM姞 Satellite Radio is only available on vehicles equipped with optional XM姞 satellite subscription service.
MUSIC BOX™ HARD-DISK DRIVE AUDIO SYSTEM (if so equipped) The Music Box hard-disk drive audio system can store songs from CDs being played. The system has a 9.3 gigabyte (GB) storage capacity and can record up to 200 hours (approximately 2,900 songs). RECORDING CDS The system will not record MP3 or WMA files, only regular formatted CDs. 1. Turn on the audio system and insert a CD. 2. Touch the “REC” key. The system starts recording and playing the first track on the CD and REC CD appears on the screen.
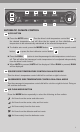
MAINTENANCE ITEMS You can set up to four different maintenance interval items. To display the setting of the maintenance interval, select one of the four “Reminder” keys using the NISSAN controller and press the ENTER button. To set the maintenance interval, select the “Interval” key using the NISSAN controller and press the ENTER button. Use the NISSAN controller to change the interval; press the BACK button to accept the changes.
VEHICLE INFORMATION DISPLAY When the INFO button on the screen: is pressed, the following modes will display 䡲 Warnings (if there are any) 䡲 Range (average distance to empty) Rotate the dial to highlight the desired mode. Press the INFO button to enter the highlighted mode. INSTRUMENT BRIGHTNESS CONTROL/TRIP CHANGE BUTTON 䡲 The instrument brightness control operates when the headlight control switch is in the or position. 䡲 Turn the control to adjust the brightness of the instrument panel lights.
LINK TO KEYFOB 䡲 Within 5 seconds of setting the memory position (indicator light is ON and ignition switch is in the ON position), press the button on the remote. 䡲 A keyfob can be linked to each memory button. 䡲 If memory positioning is re-set to a new location, the keyfob automatically re-links.
FOUR-WHEEL DRIVE (4WD) SHIFT SWITCH (if so equipped) 䡲 This system provides 4 positions so the driver can select the desired drive mode according to driving conditions. 䡲 2WD – Dry, paved roads. 䡲 AUTO – Torque distribution to front and rear wheels will change automatically, depending on road conditions. 䡲 4H – Rocky, sandy or snow-covered roads. 䡲 4LO – When maximum power and traction are required (steep grades, rocky, sandy or muddy roads).
FRONT PASSENGER AIR BAG STATUS LIGHT This vehicle is equipped with the Nissan Advanced Air Bag System. Under some conditions, depending on the type of occupant or object detected in the front passenger seat by the occupant classification sensor, the front passenger air bag is designed to automatically turn OFF. When the front passenger air bag is OFF, the front passenger air bag status light will illuminate.
SONAR SYSTEM OFF SWITCHES (if so equipped) REAR SONAR SYSTEM OFF SWITCH (if so equipped) When backing up, this system will beep to alert you to obstacles within 5.9 ft (1.8 m) of the rear bumper. The system beeps faster as the vehicle gets closer to the obstacle. A continuous tone sounds when an obstacle is less than 10 in (25 cm) away from the bumper. Turn the system off by pushing the rear sonar system OFF switch. Push the switch again to enable the system.
MOONROOF CONTROLS (if so equipped) The ignition switch must be in the ON position to operate the moonroof controls. TILTING THE MOONROOF 䡲 Push the tilt switch to the UP position to tilt the moonroof up. 䡲 Push the tilt switch to the DOWN position to tilt the moonroof down. SLIDING THE MOONROOF 䡲 Push the switch toward the OPEN position 䡲 Push the switch toward the CLOSE position to fully open the moonroof. to fully close the moonroof.
Lumbar support (driver’s seat) The driver’s seat has a lumbar support; adjust it by moving up or down. the lever ADJUSTING AND FOLDING THE 2ND ROW SEAT 䡲 To adjust the seatback, pull up on the lever and lean back. This allows adjustment of the seatback for occupants of different sizes, to help obtain proper seat belt fit. To fold the 2nd row captain’s chair (if so equipped) flat for maximum cargo hauling: 䡲 Remove the 2nd row center console.
TIP UP FOR EASY ENTRY TO THE 3RD ROW 䡲 The 2nd row outboard seats can be tipped forward for easy entry or exit from the 3rd row bench seat. To enter the 3rd row, lift up on the latch located on the upper corner of the seatback on the 2nd row outboard seats and fold the seatback forward at an angle at the seat base. This will release the back of the seat so it may be tipped forward. 䡲 Then, lift up on the lower corner of the seat base and tip the 2nd row outboard seat forward.
HOMELINK姞 UNIVERSAL TRANSCEIVER (if so equipped) SYSTEM OPERATING TIPS 䡲 Garage doors, electrical gates, entry doors, etc. will be activated during programming. To avoid injury, make sure that people and objects are clear of all doors or gates during programming. Your vehicle’s engine should be turned off while programming the HomeLink姞 Transceiver.
7. Quickly within 30 seconds of pressing and releasing the garage door opener program button, firmly press and release the HomeLink姞 button you’ve just programmed. Press and release the HomeLink姞 button up to three times to complete the training. 8. Your HomeLink姞 button should now be programmed. (To program the remaining HomeLink姞 buttons for additional door or gate openers, follow steps 2-8 only.
SKIP (forward) key - Select the SKIP key to skip the chapter(s) of the disc forward. The chapters will advance the number of times the selected. Select the SKIP key is SKIP key, then press and hold the ENTER button for more than 1.5 seconds to fast forward the disc. When the ENTER button is released, the disc will be played normally. To skip the chapter(s) forward, it is also possible to press the button on the keypad of the remote controller.
REAR AUDIO CONTROLS (if so equipped) To lock or unlock audio controls, press the REAR CTRL button on the front radio control panel. VOLUME CONTROL BUTTON – This button allows the rear passengers to adjust the headphone volume. MODE BUTTON – This button allows the rear passengers to change between FM, AM, CD and DVD. SPEAKER CONTROL BUTTON – Press this button to turn the rear speakers off and the headphones on; press again to turn the rear speakers on and the headphones off.
WIRELESS HEADPHONES The wireless headphones include separate buttons for power and volume control. The headphones automatically turn off after 30 seconds if no sound is present. For optimum wireless headphone performance, increase the volume on the rear-seat controller to the maximum level and adjust the wireless headphone volume using the volume control on the wireless headphone. Using a lower volume setting on the rear-seat controller can cause static noise in the wireless headphones.
BLUETOOTH姞 HANDS-FREE PHONE SYSTEM (Without Navigation System – if so equipped) With an overhead microphone and sound transmitted through the audio system speaker, the Bluetooth姞 Hands-Free Phone System utilizes Bluetooth姞 wireless technology and voice recognition to provide handsfree cellular phone communication. SYSTEM OPERATING TIPS 䡲 Close all windows. Surrounding noises may interfere with system operation and performance. 䡲 Press the button on the steering wheel to activate voice recognition.
PAIRING PROCEDURE NOTE: The vehicle must be stationary when pairing the phone. 1. Press the button on the steering wheel and wait for the tone. 2. Say “Setup”. 3. Wait for the tone, then say “Pair phone”. 4. Wait for the tone, then say “New phone”. 5. Initiate pairing from the phone. 䡲 The pairing procedure varies according to each cellular phone model. For detailed pairing instructions and a list of compatible phones, please visit www.nissanusa.com/bluetooth .
䡲 By Bluetooth姞 transfer - Say “Transfer entry”. The system acknowledges the command and asks you to initiate the transfer from the phone handset. The new contact phone number will be transferred from the cellular phone via the Bluetooth姞 communication link. The transfer procedure varies according to each cellular phone. See the cellular phone owner’s manual for details. 7. Say “Store” when you are finished entering numbers. The system confirms the name, location, and number. 8.
BLUETOOTH姞 HANDS-FREE PHONE SYSTEM (Navigation System only – if so equipped) With an overhead microphone and sound transmitted through the audio system speaker, the Bluetooth姞 Hands-Free Phone System utilizes Bluetooth姞 wireless technology, touch-screen, and voice recognition to provide hands-free cellular phone communication. SYSTEM OPERATING TIPS 䡲 Close all windows. Surrounding noises may interfere with system operation and performance.
PAIRING PROCEDURE NOTE: The vehicle must be stationary when pairing the phone. 1. Press the PHONE button on the control panel or press the the steering wheel. button on 2. Touch the “Pair phone” key on the touch-screen. 3. Touch one of the “None (Add New)” keys. 4. Initiate pairing from the phone. 䡲 The pairing procedure for cellular phones varies according to each cellular phone model. For detailed pairing instructions and a list of compatible phones, please visit www.nissanusa.com/bluetooth .
䡲 Transfer via Bluetooth - Transfers an entry from your cellular phone to the vehicle’s phonebook. The sending procedure from the cellular phone varies according to each cellular phone model. See the cellular phone manufacturer’s owner’s manual for more details. MAKING A PHONE CALL To make a call, follow the procedures below: 1. Press the PHONE button on the inbutton on strument panel or the the steering wheel. The “Phone” screen will appear on the display. 2.
䡲 For a 10 digit number, saying the phone number in groups of 3, 3, and 4 digits may improve recognition for some speakers. To use this group dialing method, say only the first 3 digits of the phone number. After the system recognizes the number, it will request the next 3 digits and finally the last 4 digits. 䡲 If a phone number is incorrectly recognized, you can try entering the phone number again using the 3-3-4 group dialing procedure by saying, “CHANGE NUMBER”.
Continue listening to the prompts and respond after the tone until the desired operation is completed. Remember to wait for the tone before speaking. For proper recognition of phone numbers and street names, please review the operating tips below. The commands shown in the menus above are available in Standard Mode. To access an expanded list of commands, please see “Alternate Command Mode” in this guide.
“INTERNATIONAL CALL” COMMAND ONLY 䡲 You can say the entire phone number at once or in groups of any digit length. 䡲 For *, #, and +, say “star”, “pound”, or “plus”, respectively. VOICE COMMAND USAGE Making a Phone Call 1. Push the switch on the steering wheel. The system responds with, “Would you like to access Phone, Navigation, Information, or Help?”. The commands are also displayed on the screen. 2. After the tone, say “PHONE”. 3.
Setting a Destination to a Street Address 1. Push the switch on the steering wheel. 2. The system responds with “Would you like to access Phone, Navigation, Information or Help?”. 3. Say “NAVIGATION”. 4. The system announces, ⬙Please say Address, Places, Home, or Previous Destinations. 5. Say “Address”. 6. Say the name of the state, “California”. 7. Say the name of the city, “Gardena”. 8. Say the name of the street, “Figueroa”. 9. Say the house number.
10. To begin route guidance, say “CALCULATE ROUTE”. To confirm the destination location on the map before proceeding, say “SHOW MAP”. 䡲 To improve recognition accuracy of street names, say the entire street name including Boulevard, Way, North, South, Road, etc., if it is known. 䡲 If a list of choices appears, please say the number from the displayed list. 䡲 If you don’t know the house number when asked, say “No House Number”, and the system will use a default location on the street.
4. Highlight [Alternate Command Mode] and press . 5. To confirm the new mode, push the switch. 6. Verify that the screen changes to the one shown here. 䡲 The system will stop speaking and show all available commands. 䡲 Only the commands shown on the right will remain as reminders. 䡲 Review the new command lists in the Owner’s Manual, as some commands have been replaced.
BASIC FUNCTIONS START-UP SCREEN 䡲 Read the precautions carefully, and touch the “OK” key to accept. NAVIGATION DISPLAY SCREEN 䡲 Displays navigation features and map. DISABLED WHILE DRIVING 䡲 Not all features can be manually operated while the vehicle is in motion. The text for these restricted features turns from white to gray and cannot be selected. Alternatively, the voice recognition system may have a related command that can be used at anytime.
SETTING BUTTON 䡲 Press the SETTING button to change or set navigation preferences. DEST (DESTINATION) BUTTON 䡲 Press the DEST button to display the address book and alternative ways of programming a destination. MAP BUTTON 䡲 Press the MAP button to display the current location map screen. INFO BUTTON 䡲 Press the INFO button to set or view various information that is helpful for using the vehicle safely and comfortably.
ZOOM OUT/IN BUTTONS 䡲 Press the ZOOM OUT button or the ZOOM IN button to increase or decrease the scale of the map display. BACK KEY / BUTTON 䡲 Touch the “Back” key to return to the previous function shown on the navigation display or press the BACK . button VOICE BUTTON 䡲 Press the VOICE button to hear the current navigation situation. SWITCHING THE MAP VIEW 䡲 Press the MAP button . The cur- rent location map screen is displayed. 䡲 Touch the “Map Menu” key. 䡲 Touch the “Map Settings” key.
PLAN VIEW 䡲 Displays the map in a 2-dimensional environment similar to a road map. BIRDVIEW™ 䡲 Displays the map in an elevated perspective. SELECTING A MENU SCREEN 1. To select a preferred menu key, touch the corresponding key on the screen. 2. Depending on the key you selected, a detailed menu screen, a character input screen or a setting screen, etc. is displayed. On the screen displayed, make adjustments, input information, etc. accordingly. 3.
䡲 Ensure the correct Region is selected. To change Region, touch the “Change Region” key and select the appropriate Region. 䡲 Touch the “Street Address” key. A character input screen is displayed. 䡲 Enter the street number of your home, then touch the “OK” key. 䡲 Enter your street name, touch the “OK” key. The map screen is displayed. 䡲 Press the directional buttons to adjust your home location if necessary. After adjusting the location, touch the “ENTER” key.
䡲 Enter the house number; when finished touch the “OK” key. If you do not know the house number, touch the “No House #” key. 䡲 Enter the name of the street. After finishing the entry, touch the “List” key. A list of possible street addresses is displayed. 䡲 Touch the correct address of the destination from the list. You might need to touch the “UP” or “DOWN” key to find the preferred street address key. 䡲 The selected destination is displayed at the center of the map.
SETTING A POINT OF INTEREST AS A DESTINATION 䡲 Press the DEST button . 䡲 Touch the “Points of Interest” key. 䡲 Touch one of the Points of Interest keys. 䡲 Touch the “By Name” key. A character input screen is displayed. 䡲 Enter the facility name to narrow down your search. Touch the “List” key.
䡲 Touch one of the Points of Interest keys from the list. 䡲 The selected destination is displayed at the center of the map. Touch the “Start” key after confirming the location of the displayed destination. The system sets the destination to the selected location and starts calculating a route. BEGINNING ROUTE GUIDANCE After setting a destination and performing route calculation, the suggested route is displayed. 䡲 Touch the “Start” key.
MEMO
MEMO
MEMO
Nissan, the Nissan Brand Symbol, ⬙SHIFT_⬙ tagline, Z and Nissan model names are Nissan trademarks. © 2009 Nissan North America, Inc.