
Instruction manual

8512
E.
Remove lama by turning counter-clockwise.
F.
Push knife support assembly from bottom and remove.
2.
GEAR REPLACEMENT
A.
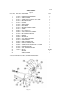
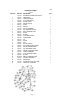
With knife support assembly removed, check gear (Fig. 3 [7]) for wear. If worn, replace.
B.
Remove snap ring (Fig. 3 [6]).
C.
Pry gear off of shaft.
D.
Replace gear in reverse procedures.
3.
BEARING REPLACEMENT
A.
Remove tapered bushing (Fig. 3 [12]).
B.
Press shaft (Fig. 3 [5]) from top of blade support assembly.
C.
Remove shim washers (7120040) if present.
D.
Using a small screwdriver, carefully pry and remove the knife seal (Fig. 3 [13]).
E.
Remove retaining ring (Fig. 3 [11)).
F.
Invert assembly on bench and drive bearings and spacer from back side.
G.
Put new bearing in by reversing above procedure.
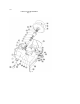
MOTOR REPLACEMENT/OR BELT REPLACEMENT
1. Follow procedure for removing blade support assembly.
2. Remove acorn nuts (Fig. 2 [47]).
3. Remove motor cover (Fig. 2 [45]).
4. Loosen and pull fan (Fig. 2 [48]).
5. Remove belt retainer (Fig. 2 [43]).
6. Remove belt (Fig. 2 [50]).
a. If only replacing belt, put on new belt at this point and reassemble in reverse procedure.
7. For motor replacement, continue disassembly by removing pulley (Fig. 2 [49]).
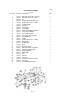
8. Remove two remaining nuts (Fig. 8 [5]).
9. Pull motor (Fig. 8 [1]) from housing.
10.
Connect all wiring to new motor following wiring diagram on page 24 or 25.
11.
Reverse above procedures to complete installation of new motor.
Page 10