Welcome to NeatWorks Welcome to version 4.0 of NeatWorks software. We're happy to announce the following new or enhanced features with this release: • New User Interface: The menus and toolbars have been redesigned to make the application faster and easier to use. • Quick Scan Center: Using a batch-type scanning process, you can quickly and easily scan documents, receipts, business cards, and even create PDF files without first launching the NeatWorks application.
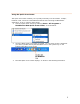
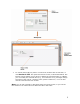
Using the Quick Scan Center The Quick Scan Center enables you to quickly and easily scan documents, receipts, business cards, and even create PDF files without first launching the NeatWorks application. To do so, perform these steps: 1. Start the Quick Scan Center by selecting Start > All Programs > NeatWorks>Neat Quick Scan Center, as shown below: 2.
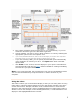
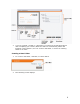
4. 5. 6. The system will detect the document type for you automatically, or you can select the document type in the Document Type field. Choose whether you want to scan in black & white or in color by selecting the appropriate option in the Color Options area. If you are using the NeatDesk ADF scanner, which can scan two-sided images, you'll be able to select single-sided or double-sided scanning in the Scan Options field. Otherwise, the default setting is one-sided. 7. 8.
Note: You can drag and drop misclassified items between bins if desired. For example, if a document accidently scanned as a receipt, you can drag it from the receipt bin into the document bin. NeatWorks will now recognize it as a document instead of as a receipt.
1. To review and modify any item in an Inbox bin, double click on that item, or click Review & File. This opens the Review screen, as illustrated below. The Review screen enables you to adjust or delete the scanned image. In addition, you can modify the scanned data (e.g., for a business card, you might change the name of the contact, company name, phone number etc.). You can also choose to file the item now or later.
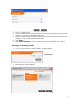
2. If you've scanned a receipt or a document, you will have several filing options after completing your review. (Business cards are automatically filed in the Business Card organizer.) You can create a new folder, or choose an existing folder for an item. Creating a New Folder 1. To create a new folder, click New, as shown below: 2.
3. 4. 5. 6. 7. Type in a folder name. Select a folder type by clicking the down arrow and choosing from the list that displays, or type in the desired folder type. Select a folder label by clicking the down arrow and choosing from the list that displays, or type in the desired folder label. Click Save. Click File Selected to save the scanned item into the folder you created. Choosing an Existing Folder 1. You can also choose an existing folder, as shown below: 2.
3. 4. 5. Choose the desired folder by clicking on it. The selected folder will be highlighted in orange. You can sort by Folder Name, Folder Type, and Folder Label. If only one item is in the bin, click Review and File. If you have multiple items in the bin, select those you want to file by highlighting them and click File Selected. You can now scan additional items if desired by clicking the Scan or PDF buttons on the upper right side of the screen.
an electronic version of a physical filing receptacle for receipts, like a drawer in a filing cabinet, for example. You can use folders to organize receipts into any type of group you like. For example, you can create a folder to track business expenses or a home improvement project. Three Folder Types have been included to help you get started: • Business Expenses (e.g., office supplies) • Expense Report (e.g., sales trips) • Personal Expenses (e.g.
• • • • • • • • • • Creating a New Folder Selecting Grid Rows Viewing Multiple Folders Simultaneously Editing Cells in a Folder Adding Comments to a Folder Deleting a Folder Clearing Folder Rows Creating Expense Reports Splitting a Receipt Across Multiple Folders Moving a Split Receipt Row to Another Folder Creating a New Folder To get started, you will need to create a new folder.
pin icon in the Pin column to "pin" multiple folders (or choose Pin All Folders from the Edit menu to quickly pin all folders). Editing Cells in a Folder You can edit folder cells anytime you need to modify the information in them. To do so: 1. 2. Click the cell you want to modify. Edit the cell information as needed, keeping in mind the following: • Information in the Number, Date Created, Last Modified, User and all Total columns (such as Total Amount) is generated automatically and cannot be edited.
• • To add information to a field, click in the field and begin typing, use the dropdown menus, or click the radio buttons. Cells containing comments will display a small red triangle in the upper right corner of the cell. Deleting a Folder You can delete a folder whenever you no longer need it. To do so: 1. Select the folder(s) you want to delete. 2. Click the Delete link on the upper right side of the Folder grid. 3. When prompted, click on Yes to confirm the deletion.
Creating Expense Reports Creating an Expense Report in NeatWorks is easy. In NeatWorks, an Expense Report is a folder whose Folder Type has been assigned to the Expense Report category. If you've already scanned the receipts that you want to use in an Expense Report, just choose Expense Report in the Folder Type column. To add additional receipts to an expense report, be sure to select that folder when filing them.
5. Click on the OK button. The receipt will be split into the designated number of items and each item will be shown in its own row. An identifying number will automatically be generated in the Split ID column of the Receipts Grid so you can easily identify which items belong to the split receipt. Moving a Split Receipt to Another Folder You can also move a split receipt to a different folder. To do so: 1. Select the receipt row(s) you want to move. 2.
• The PDF is selectable, which means you can select, copy, and paste text from the PDF into a text editor such as Microsoft Word or Notepad. • You can save the PDF as other document types. • Finally, the PDF creation process is quick and easy--you don't have to choose from various print options, and the PDF always prints one image per page.
• Using Scan To PDF Using Scan To PDF As mentioned in How do I use Export To PDF and Scan To PDF?, you can use Scan To PDF to create PDFs. "on the fly" as you scan. This option is accessed by selecting the PDF button on the upper right side of any organizer screen; by selecting Scan > Scan To PDF; or by clicking the PDF button in the Neat Quick Scan screen. To scan using Scan To PDF, do the following: 1. Feed an item into the scanner. 2. Either click the PDF button, or select Scan > Scan To PDF. 3.
you can export single or multiple records within the same grid but you cannot export records from different grids (e.g. Folders and Receipts) at the same time. 2. Click Export > PDF (Searchable) on the toolbar 3. A dialog box will open, prompting you make or confirm your selection of all visible receipts in the selected folder(s) or the selected receipt(s). Note: Be sure to remember where you save this item so you can find it easily, later. 4.
3. The Export Choices dialog box will open, as shown below. 4. Under the Select Range heading, click the Selected Receipts button to export only those rows selected in the Receipts Grid or leave Selected Folder (All Receipts) selected to export the entire folder. 5. Under the Select Output heading, choose whether you want Columns and Images, Columns Only, or Images Only to be exported. (The default is Columns and Images.) 6.
9. Under Image Scaling, choose either Scale To Fit or Crop To Fit. 10. Click Preview to preview the exported data file. 11. Click Export to export the data file. 12. Use the Save In dropdown list to navigate to the folder in which you want to save the exported file. 13. In the File name field, type a name for the exported file. 14. In the Save as type dropdown list, leave the default file type suggested. 15. Click Save.
5. Under the Set Orientation heading, choose a page orientation. 6. Under the Set Output heading, select your output options. 7. Click Preview to preview the exported data file. 8. Click Export to export the data file. 9. Use the Save In dropdown list to navigate to the folder in which you want to save the exported file. 10. In the Save As dialog box, type a file name. 11. In the Save as type dropdown list, leave the default file type suggested. 12. Click Save.
• 3. If NeatWorks is already running, choose Import > Receipt Folder File from the toolbar, navigate to the folder containing the .nrx file and select it. The imported folder row(s) appears in the upper grid (.nrx file can contain one or more folders of receipts). The receipts contained in those folders will be visible in the lower grid. Emailing a Folder The Email Folder link is the fastest way to send a NeatWorks folder to another NeatWorks user.
5. Type a file name in the Provide a File Name dialog box or confirm or edit the file name already in the field (if applicable) and choose whether to compress file. 6. Click Continue. 7. Complete the email message and click Send. Your default email program will launch and a new message opens. The To field of the new message will be populated with the contacts selected in the previous step; if you did not choose any Quick contacts, you can simply type an email address.
4. Use the Save In dropdown list to navigate to the folder in which you want to save the exported file. 5. In the File Name dialog box, type a new file name, or accept the default name suggested. 6. Leave Receipt or Document Folder Files (*.nrx or *.nrf) or Zip Files (*.zip) as the file type in the Save as type dropdown list and click on Save. Exporting to Excel Before exporting to Excel, you must first create a plan that describes how your NeatWorks data will flow into the Excel program.
4. Under the Step 2 heading, specify an MS Excel Template. The template can be blank or it can contain information (such as a company logo or column header names). The file can have either a .xlt or .xls file extension. To specify an existing template file: If an Excel Template file already exists, specify its location by typing the explicit path or by using the Browse button to navigate to the .xlt or .xls file, and select it.
Click the Include Receipt Header Row checkbox to export NeatWorks column header names to Excel. 7. Click the Image Details tab to choose a preferred image size (small, medium, or large). The Images Per Row field will adjust automatically. Under the Step 4 heading, define a column-to-column map between NeatWorks and MS Excel. Unmapped columns appear on the left, mapped columns appear on the right. Use the Map: dropdown list to choose among Receipt columns (default), Folder columns, or User Profile fields.
Under the Unmapped Fields heading, the Amount (by category) field allows for cross mapping by category. For example, you can map the total amount for all receipts that are tagged as "airline." Under the Mapped Fields heading, both the Amount and Category fields require mapping. To view a summary of all mapping values, click the View Summary of All Mappings button. 8. Click OK to save the map and close the dialog box. You are now ready to export NeatWorks data into an Excel worksheet.
Updating an Excel Map Name You can update an Excel map name whenever you like. To do so: 1. Click the Excel Map dropdown box. 2. Tap any key on the keyboard to open the Update Excel Map dialog box.
3. Edit the name in the Excel Map Name field and click Update. Exporting to an Excel Map Once you have created an Excel map, you can export your data to Excel. To do so: 1. Select the receipt(s) or folder(s) you want to export. 2. From the Toolbar, choose Export > Excel. The Export Setup dialog box opens (shown below). 3. Under the Step 1 heading, select the information to export. 4. Under the Step 2 heading, select an Excel map to use.
Exporting to CSV (Comma Separated Values) Exporting to CSV is a good way to get your data into an easy to use format. For example, you could export to CSV if you wanted an easy way to get your data into a simple Excel format that you could then manipulate without building an Excel map. Or, you could export your data to CSV and then import those contacts or receipts into programs not directly supported through other export processes. To export to CSV, do the following: 1.
6. If you've selected Columns and Images or Columns in step 5, make additional column selections under the Column Options heading and skip to step 8. 7. If you've selected Columns and Images or Images Only in step 5, make additional image selections under the Image Options heading. 8. Under the Select Formatting heading, choose whether to include a cover page, comments, or page numbers. (By default, all options are checked to be included.) 9.
Exporting QIF Files to Quicken 2004 (and Earlier) If you work with Quicken and want to export your information to there, as QIF file(s), just do the following: 1. Select the receipt(s) or folder(s) you want to export. 2. From the toolbar, Choose Export > QIF (Quicken). 3. Do one of the following: 4. To export all of the receipts in the selected folder, click the Selected Folder (All Receipts) radio button.
that .QIF file into NeatWorks using the File -> Import menu, and you'll be able to display a list of your Quicken accounts inside the NeatWorks software. After you have imported those Quicken accounts, you may use the export option inside NeatWorks, and choose a destination account for your transactions inside Quicken. This will create a modified version of our standard .QIF output, which will allow you to bring transactions into checking, credit card or savings accounts. When you import this .
4. Click on Continue. 5. Navigate to the desired destination location on your computer, type a name for the file, and then click on Save. The exported file will be saved with the .qif extension. 6. Start Quicken and select the newly created Quicken Cash Account from the Cash Flow Center. 7. Choose File > Import > QIF. 8. Navigate to the folder containing the file you exported in step 5. When the import is complete, you can move the transactions into any other Quicken account you wish.
Exporting to QuickBooks You can quickly export multiple types of receipts into multiple accounts in one simple step. These exports appear in your Quick Books ‘Bills’ section. NeatWorks makes it quick and easy to connect ‘Category’ and “Payment’ type to your QuickBooks Chart of Accounts. Note for Vista users only: In order to use QuickBooks 2007 with Windows Vista, you must have the latest QuickBooks updates installed.
• • 3. To export all of the receipts in the selected folder, click the All visible receipts in the selected folder(s) radio button. To export only the receipts that are currently selected, click the Selected Receipts radio button. Click Next. If you chose QuickBooks (Direct): 4. The QuickBooks Direct Export Wizard screen displays and shows you a summary of the data you selected. You must then select a Company file to export to. 5. Click Browse, and NeatWorks will locate the company file.
If you chose QuickBooks (iif): 1. The Export Setup screen displays: 2. 3. 4. 5. Complete the Debt Account and Credit Account fields. Click the appropriate radio dial (Receipt Vendor or User Name). Click Continue. Navigate to the desired location on your computer, type a name for the file, and then click on Save. The exported file will be saved with the appropriate extension.
• Using the Report Window Toolbar • Running a Report • Saving a Report Using the Report Window Toolbar The report window provides a toolbar for easy navigation, printing, and copying. The toolbar is pictured below. There are several ways to navigate within a report: Use the Previous Page and Next Page buttons to move consecutively • between pages. • Type a number in the Current Page Number field and press Enter.
4. Under the Step 2 heading, define the Period End date criteria to narrow the scope of the report. (Type dates in MM/DD/YYYY format, or click on the dropdown menu to select from a calendar.) 5. Under the Step 3 heading, select the preferred detail level (summary or detailed). Detailed reports provide line item information for each receipt. 6. Click on Run Report to close the Reporting Wizard dialog box and run the report. After you run a report, it opens in its own separate window.
Saving a Report To save a report, do the following: 1. Select a file type from the Save/Export Report As dropdown list. 2. Click Go. 3. Navigate to the folder you want to save the file in. 4. Type a name in the File name field. 5. Click Save. Can I personalize columns and fields? NeatWorks allows you the flexibility of being able to modify column headings in the folder and receipts grids as well as field names on the User Profiles tab (Information Tabs).
Information Tabs Information tabs include the User Profile, FolderComments, and ReceiptComments. Information tabs allow you to add comments to any of your folders or receipts, and the comments section will actually change depending on the folder or receipt selected. In other words, the fields on the tabs change, depending on what is selected in the grids above.
• Alternatively, to auto-resize the column to its default width, again position the cursor on the line between two column headings, and when you get the double-arrow cursor, just double-click with your mouse to auto-resize it. Modifying a Column or Field Name If the default column or field name is not specific enough for your needs, you can modify it by doing the following: 1. From the Toolbar, choose Personalize > Column/Field Names. 2.
Working With Receipts The goal of this section is to help you learn how to work with receipts. We'll cover how to edit, sort, clear, delete, split, email, export, import and personalize receipt information.
• How do I scan a receipt? • What can I do with my receipt images? • How can I work with receipt rows? • Where is my information? • Can I split, sort, and print receipts? • How do I import and export receipts? • Why should I run a receipt report? • Can I edit vendor names and lists? • Can I personalize columns and fields? • Using the Scanning and Imaging Troubleshooter How do I scan a receipt? When you scan a receipt and it is filed in a folder, a new row is added to the Receipts Grid.
3. Place a receipt in the scanner and scan 4. Verify data and add a vendor name 5. Adjust your image Create or Select a Folder After scanning a receipt (see Using the Quick Scan Center), you need to select the "container" into which your receipts will be scanned, stored, and organized. In NeatWorks, all receipts are filed into Folders. A Folder is simply an electronic version of a physical filing cabinet. You can create and use folders to track a variety of expenses.
• Transaction date • Total amount • Payment type • State sales tax (USA) • Vendor name • Category • PST/QST and GST/HST sales tax (Canada) After each scan you will want to review and verify the data. To modify any of the information, click Review and File in the Inbox. You can also click in a grid cell when in the Receipts organizer and edit as necessary. Adding a vendor name NeatWorks has a built-in vendor database of over 1500 popular stores, restaurants, and hotels.
2. The Image Adjuster screen displays: Step A: Rotate Your Image If the image shown in the Image Manager needs to be rotated: • Click the Rotate Clockwise or Rotate Counter-clockwise buttons in the top left corner of the Adjust Image screen as needed. Step B: Manually Crop the Image NeatWorks automatically crops scanned images; however, in certain cases you may wish to manually re-crop the image. To do so: 1. Position your mouse pointer over the top left corner of the receipt image.
2. Click and press the left mouse button, dragging the cropping tool across the image area you wish to crop. 3. When you’ve boxed in the area you wish to keep, release the left mouse button. 4. Click the Crop button in the top middle area of the window. Tip: If you cropped the image to the wrong size, click the Reset button. Note: Clicking the Reset button will undo all changes you’ve made to the image (including lightening, darkening, and rotation).
• Changing the order of multiple scanned images • Importing an image as a new receipt • Combining receipts • Printing a receipt image • Deleting a receipt image • Saving a receipt as a graphic file • Emailing receipts Rotating the Receipt Image If you scan a receipt and want to view it from a different orientation, you can rotate the image, much as you would in any other image-editing tool.
1. 2. In the Receipts Grid, select the receipt you want to zoom in or out on. In the Receipt Image area, click the zoom in/zoom out icons. Viewing a Receipt in Full Screen Mode If you want to see a much larger view of your receipt image, you can view the image in full screen mode. To do so: 1. Click the icon on the upper right side of the Receipts Image area. 2. A full screen image of the receipt displays. You can change your view by clicking the appropriate icon(s). 3.
If you already have an image stored on your computer and would like to add it to a receipts row, you can do the following: 1. In the Receipts grid, select the receipt to which you want to add another image. 2. From the Toolbar, choose Import > Image to Current Receipt. 3. Navigate to the folder on your computer that contains the image and select it. 4. Click Open. Combining Receipts You can group related receipts by combining them. To do so: 1.
2. Click Delete on the upper right side of the grid. 3. When prompted, click Yes to confirm the deletion or No to cancel the deletion. Saving a Receipt as a Graphic File NeatWorks alllows you to save a receipt as a graphic file, such as a JPEG, GIF, BMP, PNG, or TIF. To save a receipt as a graphic file, do the following: 1. In the Receipts Grid, select the receipt you want to save as a graphic file (JPEG, GIF, BMP, PNG, or TIF). You can save single or multi-page receipts.
5. On the Confirm File Export screen, type a file name in the Provide a File Name dialog box or confirm or edit the file name already in the field (if applicable) and choose whether to compress the file. 6. Click Continue. Your default email program will launch and a new message opens. The To field of the new message will be populated with the contacts selected in the previous step; if you did not choose any Quick contacts, then type an email address.
• To select multiple adjacent rows, click in the first row you want to select, then hold down the Shift key and click in the last row you want to select. • To select multiple non-adjacent rows, click in the first row you want to select, then hold down the Ctrl key and click in each row you want to select. Editing Receipt Row Cells Anytime you need to modify information in a receipt row, you can do so by editing your receipt row cells as follows: 1.
For example, if you've clicked in a cell in the Amount column, the heading reads Additional Field Info: Receipt - Amount. 2. Enter comments and other info as needed, keeping in mind the following: • To add information to a field, click in the field and begin typing. • Cells containing comments display a small red triangle in the upper right corner of the cell (as shown below). Adding a New Receipt Row Each time a receipt is filed, a new row is added to the Receipts Grid.
Use the following table when moving receipts from the Receipt Organizer and pasting them into the Document Organizer, or when pasting documents into the Receipt Organizer: Deleting a Receipt Row If you no longer need a receipt, you can delete the receipt row by doing the following: 1. In the Receipts Grid, select the row(s) you want to delete. 2. Click the Delete link on the upper right side of the Receipts Grid. 3. When prompted, click on Yes to confirm the deletion.
Viewing Receipts Together from Multiple Folders If you need to simultaneously view receipts in multiple folders, you can do so by "pinning" those folders. This is useful when you want to quickly total receipts from different folders. To view receipts together from multiple folders: Click the pin icon (pictured below) in the Pin column to "pin" multiple folders, • or Choose Edit > Pin All Folders to quickly pin all folders.
If you want to search for any and all receipts from "Business XYZ," but aren't sure how many receipts you have, when you started working with that company, or even how the company's name is spelled, you should use the Search feature to retrieve any and all related search results. That is, if you're searching for a vast or unknown amount of information, you'll increase your chances of finding all pertinent information by using the Search feature.
Note: The search engine recognizes certain fields within each organizer, and is programmed to easily retrieve information from these fields when searched upon. Listed below are the recognized fields for each organizer. In addition, the search engine will look for and retrieve information in your scanned images.
• Vendor For more information on Search, see Searching with the Wildcard. Searching with the Wildcard The wildcard lets you search for terms with missing pieces but still find matches. For example, if you're unsure whether you've spelled a word correctly, you can use the wildcard to find the closest match and any other related results. The symbol for the wildcard is an asterisk: * To conduct a wildcard search: 1. Click in the white box to the left of the Search button, as shown in the image below. 2.
2. 3. 4. 5. 6. Choose whether you want to search your receipts or folders by selecting the appropriate radio dial. Click the dropdown menu and select whether to use single or multiple criteria for your search. Click the dropdown menu and choose the criteria you wish to use. If you selected multiple in step 3, a new area displays on the screen. Each new criteria you select adds another item to this area. Specify results with a value higher than your desired amount. Click Search. Business Cards 1.
4. 5. 6. Click the dropdown menu and choose the criteria you wish to use. If you selected multiple in step 3, a new area displays on the screen. Each new criteria you select adds another item to this area. Enter any desired value. Click Search. Can I print, sort, and split receipts? NeatWorks allows for easy printing, sorting and splitting of receipts.
• 1 or 4 Images Per Page: shrinks images to fit on a quarter page (use when reading receipt text is not required) Formatting Options • Cover Page: includes user profile information and expense summary information • Comments: includes folder and receipt comments • Paper Size: choose between standard (8.
Sorting Receipt Rows Rows in the Receipts Grid can be sorted by simply clicking on a column heading. Keep in mind the following: • A small arrowhead in the top right corner of a column heading identifies the column the rows are currently sorted by. • An "up" arrowhead (pictured below) indicates ascending sort order (A-Z, oldest date to newest date). • A "down" arrowhead (pictured below) indicates descending sort order (Z-A, newest date to oldest date).
Splitting a Receipt into Multiple Transactions The Split Receipts command lets you expense portions of a receipt to different clients or projects. For example, if the lodging costs of your hotel bill are to be paid by the client, but any meals or business expenses are to be reimbursed by your company, you can split the bill into two or more transactions. A separate row is created for each portion of the split transaction and you can then choose the appropriate expense type for each row. 1.
• • Type a number, OR Use the up/down arrows to change the current number. Note: The maximum number of transactions is 10. The number indicated here dictates the number of items listed in the Step 2 area. 4. In the Step 2 area of the Split Receipts dialog box, do one of the following: • Click Split Equally to split the amount total equally among the items. • Type a number or use the up/down arrows to change the current number in the Amount field.
How do I import and export receipts? Importing Receipts It's easy to import receipt folder(s) that have been emailed to you from other NeatWorks users. 1. First, download the .nrx (or .zip) file, taking note of where you are storing it. 2. Next, do one of the following: • Navigate to the folder containing the .nrx file and double-click on the file's icon.
reference images to receipt rows). By default, all options are checked to be included. 9. Under Image Scaling, choose either Scale To Fit or Crop To Fit. 10. Click Preview to preview the exported data file. 11. Click Export to export the data file. 12. Use the Save In dropdown list to navigate to the folder in which you want to save the exported file. 13. In the File name field, type a name for the exported file. 14. In the Save as type dropdown list, leave the default file type suggested. 15. Click Save.
How do I run a receipt report? You can run receipts reports whenever want to see your information organized to highlight certain relationships. For example, the Reports > Receipt Reports menu offers a variety of summary reports you can run: Spending by Client; Category; Payment Type; Project; Vendor or Payment Class (by Billable, Paid by Co., Personal, Reimbursable, or Bill Paid); and client (Business & Personal View only). Reports are run on all receipts in the database.
Running a Report To run a receipt report, do the following: 1. On the toolbar, select Reports > Receipt Reports. 2. Next, select a report type. The Reporting Wizard dialog box opens (shown at the bottom of this page). 3. Under the Step 1 heading, select the Folder Type(s) to include in the report. 4. Under the Step 2 heading, define the date criteria according to Receipt Date to narrow the scope of the report. (Type dates in MM/DD/YYYY format, or click on the dropdown menu to select from a calendar.
Saving a Report To save a report, do the following: 1. Select a file type from the Save/Export Report As dropdown list. 2. Click Go. 3. Navigate to the folder you want to save the file in. 4. Type a name in the File name field. 5. Click Save.
Can I edit vendor names and other lists? Yes, NeatWorks makes it easy for you to edit vendor names and other lists, and this section will help you with the following, related tasks: • Add an item to a list • Edit an item in a list • Delete an item in a list Overview of Vendor Names and lists You can edit the values in the dropdown lists for the following columns: • Folder Type • Folder Label • Vendor • Project • Purpose • Location • Client • Category Note: The Folder Type, Vendor, and
Adding an Item to a List Anytime you want to add an item to a list, just go to the Personalize menu and do the following: 1. From the Toolbar, choose Personalize > Lists. 2. Under the Step 1: Select a List heading, select the list you want to add an item to. 3. Click the Add button. 4. Type the new list item into the pop-up window and click Save. 5. Click on OK to apply the changes and close the dialog box. The new item will appear in the dropdown list of the appropriate column.
Editing an Item in a List Anytime you want to edit an item in a list, just go to the Personalize menu and do the following: 1. From the Toolbar, choose Personalize > Lists. 2. Under the Step 1: Select a List heading, select the list containing the item you wish to edit. 3. Under the Step 2: Select List Items heading, click on the name of the list item you wish to edit. 4. Click the Edit button. 5. Type the new list item into the popup window and click Save. 6.
Can I personalize columns and fields? You can personalize columns and fields in the Receipts Grid by showing/hiding columns, moving columns, resizing column widths, or modifying a column or field name.
• To manually resize column widths, position the cursor on the line between two column headings, and when you get the double-arrow cursor, press and drag your mouse to the right or left. • Alternatively, to auto-resize the column to its default width, again position the cursor on the line between two column headings, and when you get the double-arrow cursor, just double-click with your mouse to auto-resize it.
What follows is a comprehensive list of column and field names in the Receipt Organizer: 76
Understanding and Modifying User Rules The NeatWorks program employs a few simple user rules that help to automate the scanning process and customize your own experience of the software. These rules can be personalized to suit your needs. There are four main categories of user rules: Auto-Populate Rules: If checked, when a new row is created its cells are automatically populated with the values from the previous row.
2. Modify rules as desired, keeping in mind the following: • To disable a rule, remove the checkmark in the corresponding checkbox. • To enable a rule, add the checkmark in the corresponding checkbox. • To change the default payment type, make a selection from the dropdown menu. (Cash is the default.) • To change the tip percentage used, check the field and then type a number in the box or use the up and down arrows to change the amount.
The Attached column in the Receipts Grid indicates whether a scanned receipt image is associated with that receipt row, as shown below: Assigning Tax Categories If you use NeatWorks for tax purposes, it's a good idea to get in the habit of assigning tax categories to documents or receipts anytime you scan a new item. This way, you're taking steps to organize your tax information ahead of time, possibly saving yourself a lot of work during tax season.
Quick Tip section will display a helpful description of the tax category you have selected and a link to the appropriate IRS website. Using the Business Card Organizer The goal of this section is to provide you with a better understanding of the Business Card Organizer. We describe how to work with business card images; and how to edit, sort, delete, print, import, and export contact information.
Exploring the Business Card Organizer Window To access the Business Card Organizer, click on the Business Cards tab. The Business Card Organizer is easy to navigate once you become familiar with its various screen areas. Each area is described below. • The Contacts Grid allows you to create and manage Contacts. By default, not all columns are displayed in the Contacts Grid. You can choose to show or hide columns as needed.
• Deleting a Contact • Sorting the Contacts Grid • Printing a Contact • Adding an Action Item for a Contact Selecting a Contact Row Selecting rows in NeatWorks is very similar to selecting rows in other programs that use spreadsheet-type layouts: • To select a single row, click any cell in the row. • To select multiple adjacent rows, click in the first row you want to select, then hold down the Shift key and click in the last row you want to select.
Adding a Contact without Scanning a Business Card You do not need to scan a business card in order to add a contact to the Contacts Grid. To add a contact without scanning a business card, please do the following: 1. From the toolbar, choose New. 2. Type the contact's information in the Contact Information area or directly in the Contacts Grid cells. The new contact will be saved automatically. Deleting a Contact You can always delete a business card image if need be. To do so: 1.
3. When prompted, click on Yes to confirm the deletion. Working with Deleted Contacts • To view the Deleted Contacts window, choose Tools > Go To Deleted Items. • To restore one or more deleted contacts, first view the Deleted Contacts window, then select the contact(s) and click on Restore. • To permanently erase one or more deleted contacts, first view the Deleted Contacts window, then select the contact(s) and click on Delete. • To close the Deleted Contacts window, click on the Close button.
Multiple Sort Order The Sort dialog box can be used to sort by more than one column. 1. To sort the Contacts Grid by multiple columns, from the Tools menu, choose Sort Contacts. 2. In the Sort dialog box, select a column heading from the Sort by dropdown list, and then choose subsequent columns from the two Then by dropdown lists. 3. Click on OK to perform the sort. Printing a Contact NeatWorks allows you to print contacts as necessary. To do so: 1.
• In the Select Range area, choose whether to include all visible contacts or selected contacts. • Click the appropriate orientation button (Landscape or Portrait). • In the Set Output area, choose whether to include full contact info and images, contact info only, or images only. 3. Click Print. 4. In the Print dialog box, click OK. Adding an Action Item for a Contact You may want to add an action item to a contact if, for example, you want to remind yourself to email a contact at a later date.
3. Type a note in the Notes field.Note: Each note is associated with a specific cell. Be sure that you have selected the cell associated with the note you want to change. Marking a Contact as a Quick Contact Marking a contact as a quick contact adds that contact to the list, thereby streamlining the email process. 1. In the Contacts Grid, select the contact with whom you want to work. 2. Click the checkbox in the Quick Contact column of the Contacts Grid.
• Rotating a Business Card Image • Zooming a Business Card Image • Viewing a Business Card Image in Full Screen • Deleting a Business Card Image • Saving a Business Card Image as a Graphic File Saving Contact Information NeatWorks automatically saves all contact information as soon as it's scanned or edited. There is no Save button (or menu command) because saving is done for you by the program.
1. In the Contacts Grid, select the contact you want to work with. 2. Click the icon on the upper right side of the Contact Image area. 3. Click the X (top right corner) to return to normal view. Deleting a Business Card Image You can always delete a business card image if need be. To do so: 1. In the Contacts Grid, select the contact you want to work with. 2. Click the delete icon in the Contact Image area. 3. When prompted, click Yes to confirm the deletion.
Using Find Contacts The Find Contacts panel stretches across the top of the Business Organizer, making it quick and easy to find contacts fast. You can use Find Contacts to locate a contact by Last Name, First Name, or Company Name. 1. Choose Last Name, First Name, or Company Name from the Find by dropdown list. 2. Click on the letter or number that the contact's first name, last name, or company name begins with or click on ALL to view all of your contacts.
4. With your cursor still in the Search box, you can press Enter. 5. Your search results will then appear in the grid in which you're working. Note: It is a good practice to start your search with a clean slate (or a clean grid) by selecting Edit > Clear All Grids prior to conducting your search. Clearing the grid does not erase any data. Note: The search engine recognizes certain fields within each organizer, and is programmed to easily retrieve information from these fields when searched upon.
• Project • Payment type • Tax ID • Tax category • User • Vendor For more information on Search, see Searching with the Wildcard. Searching with the Wildcard The wildcard lets you search for terms with missing pieces but still find matches. For example, if you're unsure whether you've spelled a word correctly, you can use the wildcard to find the closest match and any other related results. The symbol for the wildcard is an asterisk: * To conduct a wildcard search: 1.
• Exporting Contacts to PDF or RTF (MS Word) • Exporting to CSV (Comma Separated Values) Exchanging Contacts with other NeatWorks Users It's easy to exchange contacts with other NeatWorks users. To import contacts from a NeatWorks file: 1. Open the email containing the NeatWorks file and save the .nrt (or .zip) file to your computer. 2. From the Toolbar, choose Import > Contact File. To export contacts to a NeatWorks file: 1. In the Contacts Grid, select the Contact(s) you wish to sync.
• If you are currently managing your contacts with Outlook, choose Outlook. 2. If you choose Plaxo: • Type your Plaxo login and password. Click the Test button to validate your login and password (you will need to be online). Click the Save and Close button. NeatWorks will remember your login and password, so you won't have to type them again. If you chose MS Outlook: • 3. • Verify the default selections under the Direction of Sync and Contacts to Sync headings.
Syncing your contacts with Plaxo requires that you have an internet connection, and that you run the Config Sync Wizard. If you have not yet run this wizard, please refer to the topic, Choosing to Sync with Plaxo or MS Outlook. When you are ready to sync and whenever you need to sync again, just click Sync with Plaxo.
1. Before syncing contacts with MS Outlook for the first time, be sure to verify the sync settings by choosing Configure Sync with Outlook from the Tools menu. 2. Specify the Direction of Sync. • The default setting syncs all contacts in NeatWorks to Outlook. This means that, during the sync, NeatWorks contacts that are not already in Outlook will be copied into Outlook. However, Outlook contacts will not be copied into NeatWorks.
Keep in mind that syncing does not delete contacts in NeatWorks or Outlook. For example, if you delete a contact in Outlook after running Outlook Sync, the contact will not be deleted in NeatWorks the next time you run the sync. Also, if you delete a contact in NeatWorks after running Outlook Exchanges, the contact will not be deleted in Outlook the next time you run the sync. Note for MS Office 2007 users • Please make sure you have categories assigned for any contacts you wish to sync with NeatWorks.
NeatWorks to Outlook Field Mappings The following table highlights the NeatWorks to Outlook field mappings: 99
Exchanging Contacts Using vCards To sync a small number of contacts with MS Outlook or to export to other contact management applications, simply export them as vCards. To export a contact as a vCard: 1. In the Contacts Grid, select the Contact(s) you wish to export. (Hold down the Shift key to select multiple contacts.) 2. From the Toolbar, choose Export > vCard File. If you select more than one contact, you will be prompted to export them as a single vCard or as separate files. 3.
4. Under the Select Range heading, click the Selected Contacts button to export only those rows selected in the Contacts Grid or leave All Contacts in Grid selected to export all of your contacts. 5. Under the Set Orientation heading, choose a page orientation. 6. Under the Set Output heading, select your output options. 7. Click Preview to preview the exported data file. 8. Click Export to export the data file. 9.
NeatWorks allows you to export your contacts to CSV. To do so: 1. Select the Contact(s) you want to export. 2. From the Toolbar, choose Export. 3. From the Export submenu, choose CSV. 4. Under the Select Range heading, click the Selected Contacts button to export only those rows selected in the Contacts Grid or leave All Contacts in Grid selected to export all of your contacts. 5. Click Export to export the data file. 6.
Columns within the Contacts Grid can be placed in any order you wish. To move a column, simply drag its heading to the new location. Resizing Column Widths Columns within the Contacts Grid can be resized by doing one of the following: • From the Tools menu, choose Auto-Size Column Widths. • Position the cursor on the line between two column headings and drag left or right. Alternatively, double-click to auto-resize.
filed a document in the Document Organizer, a new row is added to the Documents Grid, where you can also add and edit information in each document row. You can also add comments to a row. The goal of this section is to help you learn how to work with the Document Organizer. You'll gain a better understanding of the document scanning process, how to work with document images, and how to edit, sort, clear, delete, combine, email, export, and import Document Organizer row information.
What can I do with my document images? Once you scan your document, there are many ways to work with the image.
If you scan a document and want to view it from a different orientation, you can rotate the image, much as you would in any other image-editing tool. You can do so by using the Quick Scan Center, or the image viewer in the Documents organizer. To rotate a document image: 1. In the Documents Grid, select the document you want to rotate. 2. In the Image Viewer, click the Rotate Clockwise or Rotate Counter Clockwise icon. Repeat as necessary until the scan is upright. 3.
If you already have an image stored on your computer and would like to add it to a documents folder, you can do the following: 1. In the Folders Grid, click on the folder you want to import a document into. 2. From the Toolbar, choose Import > Image as New Document. 3. Navigate to the folder on your computer containing the image and select it. 4. Click Open. 5. If there are no folders in the upper grid, a new folder will automatically be created.
Separating a Multi-Page Document If you have a very long document and either want to make it into a new document or make it into individual documents, you can do so as follows: 1. In the Documents Grid, select the multi-page document you want to separate 2. Go to Edit > Separate Multi-Page Document 3.
Deleting a Document Image You can always delete a document image if need be. To do so: 1. In the Documents Grid, select the document you want to delete. 2. Right click in In the Image Viewer. 3. Click Delete Current Image. 4. When prompted, click Yes to confirm the deletion or No to cancel the deletion. Saving a Document as a Graphic File NeatWorks allows you to save a documents as a graphic file, such as a JPEG, GIF, BMP, PNG, or TIF. To save a document as a graphic file, do the following: 1.
3. Select a Quick Contact if applicable. 4. Type a file name in the Provide a File Name dialog box or confirm or edit the file name already in the field (if applicable) and choose whether to compress file. 5. Click Continue. Your default email program will launch and a new message opens. The To field of the new message will be populated with the contacts selected in the previous step; if you did not choose any Quick contacts, then type an email address.
• Selecting Document Rows • Viewing Documents Together From Multiple Folders • Editing Document Row Cells • Adding Comments to Document Rows • Adding a New Document Row • Moving a Document Row to Another Folder • Moving a Document Row to the Receipt Organizer • Deleting a Document Row • Sorting Document Rows • Multiple Sort Order • Clearing Document Rows Selecting Document Rows Selecting rows in NeatWorks is very similar to selecting rows in other programs that use spreadsheet-type lay
Anytime you need to modify information in a document row, you can do so by editing your document row cells as follows: 1. In the Documents Grid, click in the cell you want to modify. 2. Add information as needed, keeping in mind the following: • To add text, click in a cell and start typing.
2. From the Toolbar, choose New > Document. 3. Add information in the appropriate columns of the new document row. (If necessary, see Editing Document Row Cells found previously in this section.) Moving a Document Row to Another Folder If you ever need to recategorize a document because you feel it belongs in a different folder, you can move the document row to that folder. To do so: 1. Select the document row(s) you want to move. 2. Click the Move link on the upper right side of the grid. 3.
Deleting a Document Row If you no longer need a document, you can delete the document row by doing the following: 1. In the Documents Grid, select the row(s) you want to delete. 2. Select the Delete link from the upper right side of the grid. 3. When prompted, click on Yes to confirm the deletion. Working with Deleted Documents • To view the Deleted Documents window, choose Tools > Go To Deleted Items > Documents.
• A small arrowhead in the top right corner of a column heading identifies the column the rows are currently sorted by. • An "up" arrowhead (pictured below) indicates ascending sort order (A-Z, oldest date to newest date). • A "down" arrowhead (pictured below) indicates descending sort order (Z-A, newest date to oldest date). • Click once on a column heading to sort in ascending order; click again to sort in descending order. • The default sort order for rows is by Date Created (descending).
Clearing Documents Rows The Clear All Grids command (under the Edit menu) clears all rows in both the folder and documents grids. This would be useful if you were finished reviewing a set of folders and documents and wanted to "clear the slate" to work with a different set of folders and documents.
Finding Missing Key Data in Folders and Documents • To find folders that are missing Period End values, choose Tools> Find Folders Missing Key Data. • To find documents that are missing Document Title or Document Date, choose Tools > Find Documents Missing Key Data. How do I print documents? NeatWorks allows you to print documents as necessary. To do so: 1. In the Documents Grid, select the document you want to print. 2. From the Toolbar, choose Print. 3.
Column Options • Current Column Width: leaves column widths equal to how they are sized in the grid • Auto Size Column Width: makes a column as wide as the longest entry it holds • Wrap Text: lets rows double in height to accommodate text overruns (use in conjunction with Current Column Width) Alternating Line Colors: makes reading across long rows easier Image Options • 1 or 4 Images Per Page: shrinks images to fit on a quarter page (use when reading receipt text is not required) Formatting Options • Co
Moving Columns Columns within the Documents Grid can be placed in any order you wish. To move a column, simply drag its heading to the new location. The Folder Number and Attached columns cannot be moved. Resizing Column Widths Columns within the Documents Grid can be resized by doing one of the following: • From the Tools menu, choose Auto-Size Column Widths > Document Columns. • Position the cursor on the line between two column headings and drag left or right.
What follows is a comprehensive list of column and field names in the Document Organizer: 120
Understanding the Attached Column Icons The Attached column in the Documents Grid indicates whether a scanned document image is associated with that document row, as shown below: Assigning Tax Categories If you use NeatWorks for tax purposes, it's a good idea to get in the habit of assigning tax categories to documents or receipts anytime you scan a new item. This way, you're taking steps to organize your tax information ahead of time, possibly saving yourself a lot of work during tax season.
appears in the Additional Field Info section at the bottom of your screen. The Quick Tip section will display a helpful description of the tax category you have selected and a link to the appropriate IRS website.
Exporting Documents to other Format Types To export documents to other format types, you can do the following: 1. Select the documents(s) or folder(s) you want to export. 2. Choose Export from the Toolbar. 3. From the Export submenu, choose an export format. The Export Choices dialog box opens. Note: For PDF, choose Export > PDF (Report). 4.
comments, paper size, page numbers, and/or image captions (that reference images to receipt rows). By default, all options are checked to be included. 8. Under Image Options, choose either Scale To Fit or Crop To Fit. 9. Click Preview to preview the exported data file. 10. Click Export to export the data file. 11. Use the Save In dropdown list to navigate to the folder in which you want to save the exported file. 12. In the File name field, type a name for the exported file. 13.
The goal of this section is to help you gain a better understanding of the Tax Organizer module; learn how to assign receipts and documents to Tax Categories; and learn to generate and modify reports.
How do I assign receipts to Tax Categories? To track receipts or other documents using the Tax Organizer, a Receipt Date and Tax Category must be assigned to all information you wish to include.
Showing and Hiding Tax Categories NeatWorks comes preloaded with over 100 common Tax Categories. However, to keep the list of categories manageable, not all of the categories are visible by default. To show a tax category: 1. In the Receipt Organizer, click any Tax Category cell within the Receipt Grid. 2. Click on the Show/Hide Tax Items button. 3. In the left column, select the Tax Category you wish to make visible. (To select multiple items, hold down the Ctrl key.
To hide a tax category: 1. In the Receipt Organizer, click any Tax Category cell within the Receipt Grid. 2. Click on the Show/Hide Tax Items button. 3. In the right column, select the Tax Category you wish to hide. (To select multiple items, hold down the Ctrl key. To select multiple consecutive items, hold down the Shift key.) 4. Click the Hide button.
Adding Comments The Additional Field Info area provides space for you to add your own notes about a selected receipt as well as additional information about the selected Tax Category. To add comments: 1. In the Receipt Organizer, select a value in the Tax Category column. 2. In the Additional Field Info area, type a note in the Comments field. For more information, see Adding Comments to Receipts.
format, which can then be imported into TurboTax and other popular tax preparation programs. What can I do with tax reports? The Tax Organizer allows you to generate and keep open multiple reports.
If you want to see specific portions of your report more easily, you can always zoom in or out of it. To increase or decrease the magnification of the report: • In the report toolbar, use the Zoom In and Zoom Out buttons. • Or, type a number in the Zoom Combo field and choose a percentage from the Zoom Combo dropdown list. Navigating in a Report To navigate within a report: • In the reports toolbar, use the Next Page and Previous Page buttons to move consecutively between pages.
Viewing Corresponding Receipts NeatWorks allows you to easily view all receipts associated with a given tax report in the Receipt Organizer. To view corresponding receipts: 1. Click the View Receipts from report button. • The Receipt Organizer opens. • The lower grid will be populated with all associated receipts sorted in the same order in which they appear in the tax report. A multi-column sort order is automatically applied to this grid. 2.
• The lower grid will be populated with all associated documents sorted in the same order in which they appear in the tax report. A multi-column sort order is automatically applied to this grid. 2. To revert to standard sorting, simply click any column heading. 3. To reapply the multi-column sort order, return to the Tax Organizer and click the View Documents from report button again. T 4.
Click the checkbox next to a name in the Quick Contacts list (if appropriate) and then click OK, or • T T T T Click on OK. • T T 4. Type a name for the file and click Continue. 5. Your email program opens. Type an email address in the To field (if necessary). 6. Type a subject in the Subject field. 7. Click Send. T T T T T T Backing Up and Restoring the Database T T Backing up and restoring the database is easy in NeatWorks.
Backing Up the Database Manually T T When the database reminder prompts you to perform a backup, choose Tools > Database > Backup. Browse to the appropriate location on your hard drive and T T save the back up file with the default .nrbak file extension. You can also back up the NeatWorks database anytime you wish by following these same steps.
• Beneath that radio button, you’ll see three steps that allow you to customize your backup options. T T In Step 1, choose a location for the database backup directory by clicking Browse and selecting a file path. Note: We recommend creating a folder called “NeatWorks Backup” in the “My Documents” folder on your computer, and selecting that path as your backup location. 3. T T T T T T Select the number of backup files you want to save.
Restoring the Database T T Before restoring the database you can check whether the backup file you plan to restore is compatible with your current version by choosing Tools > Database > Check Backup File Version. T T T 1. T Navigate to the location where the database file is stored and click open. If this backup file is not compatible with your version, please contact Customer Support. T T 2. From the Tools menu, choose Database > Restore.
• • Calibrating your Neat Mobile scanner Calibrating your Neat ADF Scanner HU UH HU UH Cleaning T • • T Cleaning your Neat Mobile Scanner Cleaning your Neat ADF Scanner HU UH HU UH Calibrating the Neat ADF Scanner T T To calibrate the Neat ADF Scanner, do the following: 1. Remove the calibration paper from the Welcome Kit. Note: Be sure to use the calibration paper, and not the cleaning paper.
3. Load the calibration sheet into the scanner as shown in the image above, and click Calibrate. • If you can't find your calibration sheet, you can print a new one by clicking Print Calibration Sheet, shown in the bottom left corner of the Calibration dialog box above. If you can't print from your computer, you can also click Restore Default Calibration Values, in the bottom left corner of the dialog box.
3. Open the scanner by pushing the lever down on the front right side. 4. Clean the feed roller & paper pad. • Gently push the paper pad mechanism to the left and lift it gently until you feel resistance.
• Squeeze both sides of the paper pad mechanism and gently pull it out. (Figure 2c) • Clean the paper pad mechanism. Be careful not to bend the metal tab. • Wipe the feed roller from side to side and then rotate it. Repeat until its entire surface is cleaned. (Figure 2d) • Replace the paper pad mechanism. Be sure you hear the paper pad mechanism ‘click’ back into place. 5. Clean the lower glass imager. • Gently wipe over the length of the glass image.
2. On the Quick Scan Center screen, click Calibrate. The following dialog box will appear: 3. Load the calibration sheet into the scanner as shown in the image above, and click Calibrate. T T • T T If you can't find your calibration sheet, you can print a new one by clicking Print Calibration Sheet, shown in the bottom left corner of the Calibration dialog box above.
How do I clean the scanner? Keeping your scanner clean is an important part of scanner maintenance and should not be overlooked. Dust and other obstructions on the scanner lens can cause streaks on scanned images and potentially impact the accuracy of the scanned images. The cleaning process will remove flecks of dust or small pieces of paper that have been caught in the scanner, which will in turn improve the quality of your scans.
Note: During the cleaning process, the cleaning paper will move back and forth through the scanner for approximately 25 seconds before pulling the paper through all the way. T T 4. During cleaning, you will see a message that says: "Please wait-cleaning in progress." When cleaning is complete, you will receive a message that says the scanner has been successfully cleaned. You may then click OK.
Example: T T Solution: Recalibrate T T From the Quick Scan Center, click Calibrate and follow the on-screen instructions. T T T T T T Problem: No Auto-rotation DescriptionClear images are not automatically rotated. T T T T T Solution: Recalibrate T T From the Quick Scan Center, click Calibrate and follow the on-screen instructions. T T T T Problem: Little Data Population in the Receipt Grid DescriptionOnly one field on average is being recognized even on clean, typical receipts.
System -> Advanced -> Performance Settings -> Data Execution Prevention. T T Problem: Wide Black Band Through Image T T Example SolutionScanner is likely defective, call Technical Support at 1-866-NEAT-REC T T T T T T (1.866.632.8732). From outside the United States, call 1-215-382-3300. T Where can I find support and get updates? T T In addition to the help system, there are other ways to learn more about this program.