DVD recorder PRV-LX1 Operating Instructions
CAUTION RISK OF ELECTRIC SHOCK DO NOT OPEN The lightning flash with arrowhead, within an equilateral triangle, is intended to alert the user to the presence of uninsulated "dangerous voltage" within the product's enclosure that may be of sufficient magnitude to constitute a risk of electric shock to persons. CAUTION: TO PREVENT THE RISK OF ELECTRIC SHOCK, DO NOT REMOVE COVER (OR BACK). NO USER-SERVICEABLE PARTS INSIDE. REFER SERVICING TO QUALIFIED SERVICE PERSONNEL.
IMPORTANT SAFETY INSTRUCTIONS READ INSTRUCTIONS — All the safety and operating instructions should be read before the product is operated. RETAIN INSTRUCTIONS — The safety and operating instructions should be retained for future reference. HEED WARNINGS — All warnings on the product and in the operating instructions should be adhered to. FOLLOW INSTRUCTIONS — All operating and use instructions should be followed. CLEANING — The product should be cleaned only with a polishing cloth or a soft dry cloth.
Contents IMPORTANT SAFETY INSTRUCTIONS ...... 2 Precautions .................................................. 5 Preparations for Use: Basic Information ... 8 Features ..................................................... 11 Example of System Composition and Recording Component Setup ............... 12 Names of Parts .......................................... 14 Front Panel Facilities .............................. 14 Rear Panel Facilities ............................... 16 Remote Control Unit .............
Precautions Thank you for buying this Pioneer product. Please read through these operating instructions so you will know how to operate your model properly. 7 Care must be taken not to infringe copyright restrictions under the laws of each country. If this device is used to record copyrighted materials, approval must be obtained from the respective copyright holders. The recording of copyrighted materials without the express approval of the respective copyright holders may result in legal penalties.
Precautions ¶ This unit is equipped with copy prevention technology, and will not permit the unauthorized copying of contents recorded by their copyright holders with copy-prevention signals. ¶ This unit does not support recording of DVD-RW discs in VR mode. As a result, it also does not support CPRM (“copy once”) discs. ¶ This unit features a GNU/Linux system based on a GNU general public licence. The contents of this contract can be found on page 101.
Precautions Cleaning Care of the Unit ∞ Normal cleaning should consist of dry wiping the unit with a soft cloth. In the event of severe soiling, make a dilution of 1 part neutral deutergent in 5 or 6 parts water. Dip a soft cloth in the solution and wring well, then wipe away the dirt, followed by a gentle wiping with a soft dry cloth. ∞ Avoid contact of the unit with alcohol, thinner, benzene, insecticides or other similar chemicals, since they may cause the unit’s labeling or finish to peel.
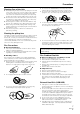
Preparations for Use: Basic Information About DVD-R / DVD-RW Discs DVD Recording Modes ∞ The DVD-R/RW (video mode) discs recorded on this unit can be finalized (see page 43) to allow them to be played* on other standalone DVD players, automobile DVD players, or DVD players installed in computers. Some players, however, may exhibit the following symptoms when an attempt is made to play such discs: ¶ Discs aren’t accepted by the player.
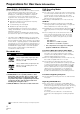
Preparations for Use: Basic Information DVD disc box information When you buy a DVD-Video in the shops, the back of the disc box usually contains various information about the contents of the disc. Below is an example, with an explanation of each section. 1 2 1: English (5.1ch Surround) 2: Spanish (2ch Surround) 1 Audio languages and audio formats DVD-Video discs can contain up to 8 separate soundtracks with a different language on each. The first in the list is the original soundtrack.
Preparations for Use: Basic Information ∞ Stereo Playback: Stereo playback means sound is played back through independent channels from right and left speakers. The soundtracks for DVD video stereo and ordinary music CDs (recorded with 2ch stereo) are played back only from the front speakers, even when 5 surround speakers or sub-woofers are connected.
Features [Product Introduction] The PRV-LX1 (single-DVD-drive/twin-DVD-drive) is a DVD recorder developed by Pioneer for dedicated use in DVD-Video production. The broad range of interface supports built into the PRV-LX1 allows the input of professional mastering media (tapes) using professional component*1 video signals. One of the PRV-LX1’s greatest features is its ability to create DVD-Video discs merely by pressing the REC button, without worrying about the difficult DVD settings ordinarily required.
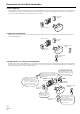
Example of System Composition and Recording Component Setup 7 System Composition Note: By installing the optional SDI AES/EBU input board (PRABD11) in the unit’s expansion slots, the PRV-LX1 can be upgraded to support input of SDI video signals and SDI/AES EBU audio signals. Input Board (optional) * (Must be purchased separately) Video in SDI Audio in Video Monitor * (Must be purchased separately) Note: At present, GUI is not output from the VGA (GUI) output connectors.
Example of System Composition and Recording Component Setup 7 Regarding Recording Time Recording to Hard Disk Drive = About 23-100 hours * The capacity of the hard disk drive usable for recording is about 100 GB; continuous recording can be performed until no more capacity remains, or up to a maximum of 100 hours. Recording to disc media = About 1-6 hours Disc Recording Times • When creating project on a single disc (4.7 GB) without DVD menus. • Create DVD-Video disc after pressing Make Disc button.
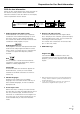
Names of Parts Front Panel Facilities 1 Twin-DVD-drive model or single-DVD-drive model added PRA-DW11 (optional) 2 3 4 5 4 3 5 6 7 26 25 No.
Names of Parts No. 10 Name STOP button (7) 11 PLAY button (3) 12 PAUSE button (8) 13 REC button (¶) 14 15 MOUSE/KEYBOARD connectors STEP FWD button (E) 16 STEP REV button (e) 17 SCAN/SKIP FWD button (¡/¢) 18 SCAN/SKIP REV button (1/4) 19 ENTER button 20 CURSOR buttons (5, 3, ∞, 2) 21 Filter cover (2) 22 FUNCTION button (*4) 23 DISPLAY button 24 Remote control sensor (Î) 25 26 VOLUME knob PHONES jack Function Functions to stop recording or playback.
Names of Parts Rear Panel Facilities 1 2 3 19 4 5 6 20 7 8 9 10 SIGNAL GND 18 No.
Names of Parts *1 Inputs are compatible with signal levels for both BETA and SMPTE (NTSC only). However, since outputs are based on DVD format, they differ from BETA and SMPTE levels. As a result, outputs should be used only for monitoring. See page 34 for input selection methods. *2 LTC is not supported in drop frame mode. *3 SONY is a trademark of Sony Corporation. Frame precision is not guaranteed when this unit is used as a playback unit for editing.
Video Clip Management and Disc Authoring Procedure When recording to either disc or hard disk drive (HDD), the PRV-LX1 manages the video recording clips by units of “project.” When creating a disc from clips recorded on HDD, this project unit is used to perform the disc recording.
Basic Operations [Operation] The various operating settings are performed using the buttons on the main unit’s front panel, as well as the remote control unit and optional mouse/ keyboard. 1 Front panel buttons MOUSE/KEYBOARD jacks 7 Operations Using a Mouse or Keyboard A commercially available keyboard or mouse (with USB connector) can be used to control the main unit for more efficient selection of setting items.
Basic Operations [Function Menu] STATUS section Setting operations are performed on this unit via a dedicated graphical user interface (GUI) called the “Function Menu”. * With a few exceptions, the menu screens shown here represent those appearing on the single-DVDdrive model. As a result, the actual appearance may be slightly different in the case of the twinDVD-drive model.
Basic Operations 2 Press the remote control unit’s SETUP button PLAY STOP REPEAT DISPLAY PAUSE RPT A-B STEP AUDIO SCAN ANGLE SUBTITLE 4 Access from the Keyboard by Assigning a Function key. PREV NEXT Use main unit setting to assign FUNCTION button to F1 key. Function Menu appears when F1 key is pressed.
Functions [Main Unit Setting Functions] 7 System Settings (Operation Details: page 29) • These items allow setting of mouse and keyboard, function keys of a keyboard assignments, network settings, and other defaults. Displaying system information and formatting the hard disk can also be performed here. 1 2 3 4 System Setting: F-Key Set: Network: UPS Setting: 5 Information: 6 HDD Tools: Use to perform settings including keyboard, mouse, and main unit clock.
Functions [Recording Functions] (Operation Details: page 33) • In addition to composite video, S-video, DV and RCA connectors, this unit is equipped with connectors for component video and XLR, thus providing support of connections to professional video components. In this way, RS-422A, IEEE1394, and LTC (linear time code) connectors can be used to support recording compliant with time code information.
Functions [Editing Functions] (Operation Details: page 62, 67) • When recording to HDD, it is possible to change the name of each of multiple recording data (clips), and editing functions including trimming, chapter editing, clip dividing, and title-order editing can be performed. • DVD disc emulation allows you to check editing results before recording them on the hard disk. • Clips in projects on the hard disc, although discs created with the PRV-LX1 can be copied.
Functions [Copy, Import, Backup and Restore Functions] (Operation Details: pages 70, 72, 76) 7 Copy • Disc duplication operations have been optimized by the provision a 4x high-speed (maximum) duplication function. • In addition to copying from HDD to DVD-R/RW, duplication of DVD-R/RW discs is also possible. Notes : ∞ Only one image file can be constructed on the hard disk drive.
Status Confirmation Using Onscreen Display (OSD) By pressing the DISPLAY button on the unit’s front panel or on the remote control unit, the onscreen display (OSD) will be projected on the monitor screen. The OSD permits confirmation of the unit’s current setting status, as as well as recording/playback conditions.
Status Confirmation Using Onscreen Display (OSD) 7 OSD during Recording When the DISPLAY button is pressed during recording, the OSD projects the unit’s recording status and playback condition (during time shift playback), thus allowing confirmation of these items. In the recording mode, the OSD screen is composed of two pages, a simple (reduced clutter) page, and a detailed information page.
Status Confirmation Using Onscreen Display (OSD) 7 OSD during Playback When the DISPLAY button is pressed during playback, the OSD projects the unit’s playback status, allowing confirmation of these items. In the playback mode, the OSD screen is composed of two pages, a simple (reduced clutter) page, and a detailed information page. The first two times the DISPLAY button is pressed, the OSD alternates between the two pages; when the button is pressed a third time, the OSD is turned off.
System Default Settings Select [System] command on the Function Menu’s SET UP section to select initial defaults for the PRVLX1. Mouse/Keyboard This DVD recorder supports use of a mouse and keyboard. The types of mouse and keyboard supported are as follows: Mouse: Generic Keyboard: US type (101-key) Japan type (106-key) To set the keyboard type, go to SET UP section = [System] = [System Settings] = [Keyboard].
System Default Settings Network When using this unit on a network, go to SET UP section = [System] = [Network], and set the [Network] command to “ON”. Then go to SET UP section = [System] = [Network], and set the [DHCP/Manual] command either to use DHCP (Dynamic Host Configuration Protocol) or input the IP address used, together with sub-net mask and Gateway address. If “DHCP” is selected, confirm that a DHCP server in fact exists.
System Default Settings When connecting the UPS to the PRV-LX1, be sure to disconnect the power to the PRV-LX1 first, and use the cord supplied with the UPS to connect the two units. If the connection is made after the PRVLX1 has booted up, the shut-down operation may not occur properly. Before using the unit with a UPS, be sure to consult the operating instructions accompanying the UPS product.
System Default Settings Background Color GUI Language Setting Go to SET UP section = [Operation] = [Video Settings] = [Background Color] to select the background color when the unit is in the idling condition. Use the SET UP section = [Operation] = [Info Language] = [Language] command to change the language used in the information area of the Function Menu and text entry language between English or Japanese.
Recording The recording function involves inputting video/audio signals from a VTR or other video playback device (“external VTR”), converting those signals to data compatible with the DVD video format, and recording that data on the hard disk or a DVD-R/RW disc. A playback video/audio signal is simultaneously output. If the SET UP section [Operation] = [Video Settings] = [Composite Out] is set to “Source Monitor”, the input image will be passed through during recording as well (see page 32).
Recording Selecting Input TV system switch confirmation dialog 1 When [OK] is selected, the TV system changes and a second confirmation dialogue box appears. On the Function Menu, the STATUS section = [V Input] and [A Input] commands indicate the currently selected video and audio input signals. Use the CURSOR and ENTER buttons to change to the connectors for different input signals if desired. With either [V input] or [A input] is designated in “DV”, both video and audio will become DV input.
Recording Selecting Recording Destination The currently selected recording destination (also the playback source) will be displayed on the front panel’s central indicator (DVD1, DVD2, HDD indicator). The [Drive] command on the Function Menu’s STATUS section also indicates the currently selected recording destination/playback source. Use the front panel’s DRIVE SELECT button, or the [Drive] command in the Function Menu’s STATUS section to select the recording destination.
Recording Other Recording Settings Video Encode Rate Settings Function Menu’s SET UP section = [Recording]: This command also allows the following settings: Video Encode Rate: 32 levels Video Filter (NR): 16 levels Audio Encode: Dolby Digital / LPCM(Note1) Audio Level: –48 dB to +14 dB Aspect: 4:3 / 16:9 Setup Level: 0 IRE / 7.
Recording Video Filter Level Setting Use the Video filter to improve image quality when the Video encode rate setting is low or when there is noise in the video source. A higher filter level reduces noise more efficiently but lowers resolution. Set the level where you obtain the greatest amount of noise reduction with the lowest loss of resolution.
Recording Preview Function Starting and Stopping Recording The PREVIEW button on the front panel, or the SET UP section = [Recording] = Preview button makes it possible to check the result of encoding/ decoding of the video/audio input signals without making a recording to DVD discs or hard disks. In the idling condition, press either the PREVIEW button, or on the Function Menu’s SET UP section = [Recording] command, press the Preview button.
Recording Note 3: Be careful when using a keyboard to insert chapter marks, since if the Enter key is held depressed, multiple consecutive chapter marks may be inserted. 2 Automatic Recording RS-422A or IEEE1394 interface protocols can be used to control an external VTR and perform automated recording. 7 Recording Using IN/OUT Points Setting On the Function Menu’s APP section, use the [Auto Capture] = [IN/OUT Point] = [IN/OUT Point] command to set the time code for the IN and OUT points.
Recording When automatic chapter mark insertion has been selected, however, a chapter mark is inserted automatically at regular intervals; in this case, even if “Chapter (Pause)” is designated, no chapter mark will be inserted when the unit enters the REC pause mode. The session from recording start to recording stop will be considered an independent title (clip).
Recording Eject Setting The operation performed at time of eject can be set using the [Eject Setting] command on the SETUP section’s [Operation] = [Control Setting] menu. When set to “Eject”, the disc will be ejected immediately without finalization even during recording. When set to “Finalize&Eject”, when the eject command is received from an external controller at the remote control (RS-422A/IEEE1394), the disc will be finalized, and then ejected.
Recording APP section = [Auto Capture] = [EDL Load/Delete] EDIT section = [DVD Disc] = [Initialize] = [Initialize] APP section = [Auto Capture] = [EDL Save] Initialize confirmation dialog Note 1: Edit lists can be composed outside of the recorder and imported (see page 72 “Inporting Image Data, Edit Lists”). Note 2: If [EDL] is used when target drive is set to HDD, initialize and finalize commands are ignored.
Recording Note 2: However, finalization of DVD-RW discs finalized using the initial PRV-LX1 version (prior to 1.12/1.02) cannot be canceled. EDIT section = [DVD Disc] = [Unfinalize] = [Unfinalize] Unfinalize confirmation dialog Unfinalize progress bar (appears during unfinalization) 3 Removing a disc before finalization A recorded DVD-R/RW disc can be removed before finalization. A disc that has not been finalized can be loaded again for playing or additional recording.
Recording selected titles exceed 4400 MB, reduce the number of titles (see “Title Order Edit” on page 65) or reduce clip size (see “Title Trimming” on page 63). The disc cannot be removed until the Make Disc process is completed. EDIT section = [DVD Disc] = [Finalize] EDIT section = [DVD Disc] = [Make Disc]= [Target] Finalize confirmation dialog Use the EDIT section = [DVD Disc] = [Make Image] command to create image files.
Playing Discs When playing discs on this unit, the program on a loaded DVD-Video disc, or the clips recorded as a project on the hard disk drive are played back and the video/audio signals output to all output connectors. However, when playing DVD-Video discs equipped with copy-guard copy protection, playback signals will not be output to the DV connector nor to other digital video output connectors.
Playing Discs When a DVD disc has been set for fast play, follow the instructions to begin playback automatically upon insertion of the disc. When “DVD1” or “DVD1&2” is designated, “DVD1” is used. To playback discs on drive 2, “DVD2” must be designated as the playback source. During playback, controls on the front panel and remote control unit act to navigate the DVD in accordance with the disc’s commands. button performs the same function as the The remote control unit’s RETURN button.
Playing Discs 7 To search for a desired scene (SEARCH function) [Time Search] [Title Direct Search] During playback: button. 1. During playback, press the Alternately, press the button three times. FRM/TIME TITLE/CHP FRM/TIME TITLE/CHP FRM/TIME 1. Press the button. 2. Use the number buttons to enter the number of the desired title. Example: to select title “3” 3 . Press number button Example: to select title “10” 0 1 Press number buttons = in order. SEARCH button. 3.
Playing Discs 7 Slow playback / button During normal playback, hold the depressed. During slow playback, the playback speed can be and buttons. adjusted by pressing the SLOWER FASTER + = STEP STEP STEP STEP STEP STEP STEP3 - STEP1 - 1/16 - 1/8 - 1/4 - 1/2 - 1/1 Note 1: No sound is produced during slow playback. Note 2: The slow playback function cannot be used on discs displaying the “Operation Inhibited” message.
Playing Discs Playback Monitoring during Recording If time shift playback is enabled on the Function Menu (SET UP section = [Operation] = [HDD Recording] = [Time Shift PLAY]), the PLAY button responds when recording is being made to the hard disk drive. Pressing the PLAY button allows the user to monitor images recorded immediately before. SET UP section = [Operation] = [HDD Recording] = [Time Shift PLAY] Playback may be started within the range 60-324 seconds after beginning recording (Note 1).
Playing Discs Other Playback Settings The Function Menu’s SET UP section = [Playback] commands can be used to input default setups for playback on the PRV-LX1. These setup values cannot be changed during playback. 7 Video Aspect Ratio [Video] = [Aspect] 4:3 (LB) / 4:3 (PS) / 16:9 Choose the aspect ratio setting in accordance with your television monitor. This setting is unnecessary when the unit is connected to a wide monitor.
Playing Discs 7 Audio Language Setting [Language] = [Audio] English / Japanese / Others->Next Menu Use to set the audio language to English, Japanese, or Other (Note). 7 Sub-Title Selection [Language] = [Subtitle] English / Japanese / Others->Next Menu Use to set sub-titles to English, Japanese, or Other (Note). 7 DVD Menu Language Selection [Language] =[DVD Menu] English / Japanese / Others->Next Menu Use to set the DVD-Video menu language to English, Japanese, or Other (Note).
Playing Discs 7 Parental Management Level [Others] = [Parental Level] 1-8, off Some prerecorded DVD-Videos with violence or sexual contents are encoded with parental management levels (low-high). Such discs are so indicated on their jackets or labels. By setting the management level on the PRV-LX1 to a value lower than the disc’s level, the viewing of such discs can be restricted. When “off” is selected, playback will be performed without any restriction.
Playing Discs External Sync Function Other Functions The PRV-LX1 can use an externally input sync signal (black burst) in order to synchronize the output video signal to an external signal (during DVD disc playback). This function allows switching of the video without the need for connecting a time base corrector (TBC) component, thus allowing video switching without distortion (V roll) of the TV monitor’s image.
Playing Discs Regarding Progressive Scan Output This unit allows the output of progressive scan video signals from the component output connector. To turn progressive scan output ON/OFF, press the controls on the front panel: Press these buttons simultaneously. Note 1: Switching is only possible during idling. Note 2: Be sure the unit is connected to a television monitor supporting progressive-scan. Proper image reproduction will not be produced with other monitors.
DVD Menu Editing This unit is equipped with a number of DVD menu layouts that are selected with the Function Menu’s EDIT section = [DVD Menu] command, and associated with a recorded image for convenient production of DVD-Video discs. The constructed menu will be the same TV system (NTSC or PAL) as that currently selected. Opening clip and idle clip can be set only for HDD projects. A total of 1GB (about 10 minutes at highest rate) can be set.
DVD Menu Editing DVD Menu Selection Thumbnail Selection When editing a menu, first use the Function Menu’s EDIT section = [DVD Menu] = [Menu Design] = [Design Select] command to choose a basic button layout pattern from the DVD menu layout displayed on the screen. Use the 5/∞ buttons to select the layout pattern type, the 3 button to change the number of buttons, and the ENTER button or the 2 button to confirm the selection.
DVD Menu Editing Button Text Selecting Opening Clip When button text is selected, use the EDIT section = [DVD Menu] = [Menu Design] = [Button Text] command to select the format from the following choices: Title (chapter) Number/Name Title (chapter) Number Title (chapter) Name No text Using the [DVD Menu] = [Navigation Cmd] = [Introduction Clip] command on the Function Menu’s EDIT section, you can select the first clip to be played when a disc is inserted.
DVD Menu Editing Setting an Idle Clip An idle clip (a clip played automatically after a specified waiting time from the menu display mode) can be set by using the [DVD Menu] = [Navigation Cmd] = [Idle Clip] command on the EDIT section of the Function Menu. The clip is played repeatedly until the ENTER key is pressed to return to the menu display. The waiting time can be set with the [Waiting Time] command. Note 1: The idle clip must be set to the same TV system as that on the menu.
DVD Menu Editing Customizing the DVD Menu Using the Function Menu’s EDIT section = [DVD Menu] = [Menu Modification] command, it is possible to change the background image and highlight colors of the DVD menu currently being edited.
DVD Menu Editing The EDIT section = [DVD Menu] = [Menu Modification] = [Disc Name] command can be used to insert a name (up to 32 characters long) into the DVD menu. The actual number of characters that can be embedded in the menu will differ depending on the menu design. Further, depending on design, excessive characters may drop out when too many are embedded. Be sure to use the preview function or the disc emulation to confirm the menu appearance.
DVD Menu Editing DVD Menu Preview With the Function Menu’s EDIT section = [DVD Menu] command displayed, press the Preview button to display the DVD menu currently being edited. If no recorded image exists corresponding to a button on the DVD menu, no thumbnail will be extracted for that button, and it will instead appear with the default background image. During preview display of the DVD menu, the CURSOR buttons can be used to move the button highlights.
Title Editing / Chapter Editing When recording to hard disk drive, the names given to the multiple recorded image data (clips) can be changed. Other editing processes supported include trimming, chapter editing, clip dividing, and title order editing. DVD disc emulation can also be performed in order to confirm editing results.
Title Editing / Chapter Editing Title Trimming When you wish to cut out the first or last part of a clip, or to extract the middle part of a clip, use the Function Menu’s EDIT section = [Title] = [Target Clip] command to select the clip you wish to edit, then use the EDIT section’s [Title] = [Editing] = [Trimming Clip] command to select “Go To Video”. The control bar displayed in conjunction with the clip’s playback can be used to designate IN/OUT points for parts to be deleted.
Title Editing / Chapter Editing Chapter Editing Select a clip edited with the Function Menu’s EDIT section = [Title] = [Target Clip] command; by selecting “Go To Video” on the the EDIT section = [Title] = [Editing] = [Chapter Points] command, the selected clip’s chapter mark position can be changed. Chapter mark insert EDIT section = [Title] = [Editing] = [Chapter Points] For this edit, use the MARK and DEL buttons on the control bar displayed in conjunction with the clip’s playback.
Title Editing / Chapter Editing While playing back the selected clip, use the SELECT button on the displayed control bar to designate the point at which you wish to divide the clip. Clip division will begin when the SAVE button is pressed, and when completed, the display will return to the Function Menu. If the CANCEL button is pressed instead, the clip division will be canceled and the display will return to the Function Menu.
Title Editing / Chapter Editing Recording to DVD Disc Projects edited on hard disk drive can be recorded to DVD-Video disc by using the EDIT section = [DVD Disc] = [Make Disc] command. By using the EDIT section = [DVD Disc] = [Make Disc] = [Target] command, the destination drive used for the recording is designated as “DVD1”. If an additional expansion drive has been added, “DVD2” or “DVD1&2” can also be selected. Discs cannot be removed until the [Make Disc] processing has been completed.
Project Editing This recorder manages recorded image data (clips) by the unit of “project.” A single project can preserve multiple clips, and so long as the project is not changed, the numerous clips are preserved as a continuous series within the project. It is possible to include both NTSC and PAL clips within a single project.
Project Editing Recorded data is also managed as a project when recording directly to DVD disc, but editing is not possible in this case. By using the EDIT section = [Project] = [Record/ Name] = [Record To] command to select “DVD & HDD”, the recorded images will be preserved on the hard disk drive even after finalizing and removal of the DVD, thus allowing later editing if desired. Note 3: When a disc is removed before finalizing, the data recorded so far remains on the hard disk.
Project Editing The copied clip will be appended to the end of the project. You can choose whether to record the copied clip as the title. However, if 99 titles have already been recorded, the clip cannot be recorded as another title. An asterisk (*) will be appended to the front of the name of the copied clip. If the addition of “*” makes the clip name 33 onebyte characters or longer, the last characters are automatically truncated.
Disc Duplication This unit provides a function for duplicating discs. Disc-to-disc duplication can be performed by connecting another DVD drive. This function can be done on a single drive by creating an image file from a disc and using this file to create a new disc. Image files imported via FTP (uploading) can also be used to create discs (uploaded image files are saved to the imagefiles folder). See page 72 for information on FTP connection.
Disc Duplication Creating Image Files from a Disc Creating Discs from Image Files Use the Function Menu’s APP section = [Cpy/ Impt/Bkup] = [Disc Image Copy] = [Source] command to specify the disc to be used in creating an image file. Use the [Input Image Name] command to enter the file name. The file is saved under the entered file name to the imagefiles folder, a folder that can be accessed via FTP. The disc cannot be removed until the image file has been created.
Importing Image Data, Edit Lists This function allows the importing of image data from CD/DVD discs, or a web browser with FTP connection from a computer linked to an online network. These images can be then stored in the recorder’s menu library for use as DVD menu layout images and DVD menu background images. Edit list files can be similarly imported. When using FTP to download images from the Internet, go to the SET UP section = [System] = [Network] command and confirm that network is set to “ON”.
Importing Image Data, Edit Lists Select the “ALL” to import all files. Using APP section = [Cpy/Impt/Bkup] = [Menu Import] = [Type] to select layout image APP section = [Cpy/Impt/Bkup] = [EDL Import] = [Source File] DVD menu layout image files are added to the DVD menu layout library selected with the Function Menu’s EDIT section = [DVD Menu] = [Menu Design] = [Design Select] command.
Importing Image Data, Edit Lists Edit List File Format Edit list files are text files with the “.edl” filename extension. Composition is as follows: Header: Entry: PIONEER-DVDRec-EDL 002 ENCODING=XXX Number Operation Type Parameter 1 Parameter 2 Parameter 3 The number of parameters differs depending on the type of operation involved. Numbers are consecutive numerals beginning from 001. Use a single-byte space (0x20) or tab (0x09) between [PIONEER-DVDRec-EDL] and [002].
Importing Image Data, Edit Lists ■ Designating a Title Name Number NNN Operation Type T-N Parameter 1 Title name The title name will be reflected in the title currently being recorded, or a previously recorded title. ■ Designating a Chapter Name Number NNN Operation Type C-N Parameter 1 Chapter name The chapter name will be reflected in the name of the chapter currently being recorded. Note 1: If [EDL] is used when target drive is set to HDD, initialize and finalize commands are ignored.
Backing Up/Restoring USB HDDs Projects, image files, menu libraries, EDL data and System settings on the internal hard disk (HDD) can be backed up on an external hard disk (USB HDD) and data backed up on the external hard disk can be restored to the internal hard disk. Projects and other data backed up on the USB HDD can be deleted to free up space on the hard disk (Note 2). Note 1: To prevent failure during backing up or restoring data, avoid simultaneous use of FTP and the USB HDD during these processes.
Backing Up/Restoring USB HDDs Restoring Use the APP section = [Cpy/Impt/Bkup] = [Restore/Del] command to restore data. Use the [Type] and [Target] commands to select the data types and files to be restored and press the Restore button to start. Select “ALL” on [Target] command to process all files. Note: The Delete and Format functions provided with the unit do not allow you to completely delete all data on a hard disk.
Recording Time 7 Recording time with Dolby Digital (DVD, Hard Disk) Dolby Digital Video Recording time (time: min)(*1) Transfer rate Video resolution level Total DVD Video Audio rate Hard disk NTSC PAL (Mbps) (Mbps) (Kbps) disc Audio sampling frequency 32 0:58 22:45 9.900 9.644 256 720x480 720x576 16bit, 48kHz 31 1:01 23:53 9.426 9.169 256 720x480 720x576 16bit, 48kHz 30 1:06 25:44 8.750 8.494 256 720x480 720x576 16bit, 48kHz 29 1:10 27:35 8.164 7.
Recording Time 7 Recording time with Linear PCM (DVD, Hard Disk) Dolby Digital Video Recording time (time: min)(*1) Transfer rate Video resolution level Total DVD Video Audio rate Hard disk NTSC PAL (Mbps) (Mbps) (Kbps) disc Audio sampling frequency 32 1:02 23:59 9.444 7.908 1536 720x480 720x576 16bit, 48kHz 31 1:02 23:59 9.444 7.908 1536 720x480 720x576 16bit, 48kHz 30 1:02 23:59 9.444 7.908 1536 720x480 720x576 16bit, 48kHz 29 1:02 23:59 9.444 7.
Function Menu Table EDIT DVD Menu Menu Setting Menu Edit to Selected Project at top menu Display object for DVD menu editing. Menu TV System NTSC Display currently set TV mode. PAL Menu Type/Font Menu Type Title Menu Select DVD menu type. Chapter Menu No Menu Title & Chapter Font Helvetica Select character font for DVD menu. Times Courier J-Font Mincho Select Japanese font for DVD menu. Gothic Menu Design Design Select Select Button Layout Select menu design including button type.
Function Menu Table EDIT DVD Menu Navigation Cmd -Waiting Time Del/Init Library Type 4min 3min 2min 1min 30sec Sets time until beginning idle clip playback. Background Select type to delete. Layout Project Record/Name Design Select Select Background or Layout Select library to delete and press the Delete button to delete it. Name Selected Project at top menu Display name of currently selected project. Protect Disabled Prevent erasure of clips in projects.
Function Menu Table EDIT Title Title Selection Clip 1 Clip 2 CLEAR/ALL CLEAR/UP/DOWN/ CLIP LIST Display the clip with the assigned title and edit in order. Clip 3 Clip 4 Clip 5 Next Page DVD Disc Finalize Finalize Selected Drive DVD finalize. Initialize Initialize Quick Format Use Quick Format to initialize DVDRW disc. Full Blank Erase all DVD-RW contents. Unfinalize Unfinalize Selected Drive Canceling finalization of DVD-RW.
Function Menu Table APP Cpy/Impt/Bkup Image Copy/Del Destination DVD1 DVD2 Select the destination of the file to be created. DVD1&2 Menu Import Type Source Background Select type of background image. Layout Select type of menu layout image. Import Directory Select source for importing of background image/menu layout image. DVD1 DVD2 Source File ALL xxxx.bmp Select background image/menu layout image for import. xxxx.jpg EDL Import Source Import Directory Select source for edit list import.
Function Menu Table SET UP System System Settings F-Key Set 1-6 Time Zone –12 to +13, City Name Select time zone. Date(mm/dd/yyyy) xx/xx/2xxx Set date. Time(hh:mm:ss) xx:xx:xx Set time. F-Key Enable F-Key Only Select key combinations for function key operation.
Function Menu Table SET UP Operation Control Settings Port RS-422A Select external control port. Disabled IEEE1394 (*6) Time Code RS-422A Select time code input. LTC IEEE1394 (*6) Eject Settings Eject Select Eject command operation. Fainalize & Eject Video Settings External Sync OSD Disabled Enabled Select external sync signal for playback. Enabled Enable/disable OSD display.
Function Menu Table SET UP Recording Others Auto Chapter Manual 3 min 5 min Select method for inserting chapter mark in title. When Manual is selected, chapter marks are inserted with ENTER button. 10 min 15 min 30 min 60 min REC Button REC Start Select REC button function. Standby ->REC Playback Video Aspect 4:3(LB) 4:3(PS) Select video aspect ratio during playback. 16:9 Still Mode Auto Select still display mode.
Function Menu Table STATUS Drive HDD DVD1 DVD2 Display currently selected recording destination/playback source. Also change recording destination/ playback source. DVD1&2 Project [new]h03mmdd_xx Display currently selected project. Also change project. Project List V Input Composite S-Video Display currently selected video input. Also change video input. Component(Beta) (*9) Component(SMPTE) (*9) DV SDI (*10) A Input RCA XLR Display currently selected audio input. Also change audio input.
Shortcut Key Information Shortcut key Function Ctrl + P Play Ctrl + L Ctrl + S Pause Stop Ctrl + N Scan Fwd Ctrl + B Ctrl + Shift + N Scan Rev Skip Fwd Ctrl + Shift + B Ctrl + . > Skip Rev Step Fwd Ctrl + , < Ctrl + Shift + . > Step Rev Slow Fwd (During playback, initiates slow playback.) Ctrl + Shift + , < Ctrl + M Slow Rev (During playback, initiates slow reverse playback.
Message Display 7 Messages displayed in dialogue box during Function Menu operations Item Message Comment TV System Switch TV System Switches TV system mode. When [OK] is pressed, TV system is switched temporarily. TV System After 10 seconds, TV System will return to previous When [OK] is pressed, TV system setting is maintained. Either mode. press [Cancel] or wait 10 seconds to return to former setting. Network Network Error, Check Connection. Check Ethernet cable connection.
Message Display Item Message Comment Copy This will overwrite any existing copied image. This operation will overwrite hard disk image files. Copy Invalid target file name. See “About File Names” (page 94). Copy Copy data failed. Attempt to copy data failed. Import No file to import. No import files. Import Do you really want to overwrite ***** The ***** file is overwritten. Import Does it overwrite all files when the same file exists ? All files with the same name are overwritten.
Message Display Item Message Comment PROJECT-CopyClip Is this clip to be added as a title? Confirm whether you wish to add the copied clip as a title or not. PROJECT Not enough space in HDD. No free space left on the hard disk. Delete projects no longer needed to provide enough space for recording. Make Disc Data size is over 4.7GBytes. The current project title capacity exceeds 4.7 GB.
Message Display Item Message Comment Delete Library Please select Layout/Background before delete. Select layout/background image to delete. Delete Library Do you really want to delete ****** The ****** file will be deleted. Backup / Restore Cannot restore the current project. Restore was attempted for the current project. A current project cannot be restored. Backup / Restore Do you really want to overwrite ***** The ****** file is overwritten.
Message Display Item REC IN-OUT REC EDL REC Message Comment Cannot record to different condition discs. Simultaneous recording to two discs is possible only if they contain identical data. No Video Input. No video input is connected. Check inputs. Confirm TV system of the video input. Check input signal's TV system mode and mode set on Function Menu. Stopped automatically from Rec-Pause for the system protection.
Message Display 7 Messages Displayed in the dialog/OSD or Main Unit Display during Playback Operation Item DVD-Video playback HDD playback Message Comment Incompatible disc region number. This disc has a region code which cannot be played on this player. Operation cannot be performed. This command is not supported with current playback condition. Operation is not permitted. The operation is not permitted with this disc. No title on the disc. The current disc has no playable titles. Unknown disc.
TROUBLESHOOTING Incorrect operations can be mistaken as malfunctions. If you believe the unit is not operating correctly, consult the chart below. Sometimes incorrect operation may be due to a malfunction in another component. If the problem is not fixed, check the other components used with the player. If the problem still persists, contact your nearest Pioneer authorized service center or dealer for service. Symptom Cause/Remedy Reference page No power ¶ Connect power cord to outlet.
TROUBLESHOOTING Symptom Cause/Remedy Cannot playback on DVD player / other DVD recorders. ¶ When discs recorded in video mode are to be played back on other players, be sure to finalize them after recording (however, some discs may be unplayable on other players even after finalization). Image stops during playback, or commands are disabled. Main unit command buttons don’t work. ¶ Press the EJECT button once and then start playback again. Can’t output 96 kHz audio in digital.
TROUBLESHOOTING Symptom Cause/Remedy An error occurred and data back up or restore operation from the USB HDD failed. ¶ Errors may in rare cases occur when used with FTP. Do not use FTP during backup or restore operations. During loading of DV, the screen stops, and controls are disabled. ¶ The screen may freeze and controls may fail to respond if the DV link is disconnected. Hold the STANDBY/ON button depressed for 4 seconds or more to set to the standby mode, then turn on the power once again.
Specifications Video input: Composite: S-VIDEO: Component: BNC x 1, 1.0 Vp-p, 75 Ω 4-pin mini DIN x 1 Y: 1.0 Vp-p, 75 Ω C: 0.265 Vp-p (NTSC), 0.300 Vp-p (PAL), 75 Ω BNC x 3 Y: 1.0 Vp-p, 75 Ω B-Y: 0.486/0.700 Vp-p selectable (NTSC), 0.525 Vp-p (PAL), 75 Ω (with 75% color bar) R-Y: 0.486/0.700 Vp-p selectable (NTSC), 0.525 Vp-p (PAL), 75 Ω (with 75% color bar) Video Output: Composite: S-VIDEO: Component: BNC x 1, 1.0 Vp-p, 75 Ω 4P mini DIN x 1 Y: 1.0 Vp-p, 75 Ω C: 0.265 Vp-p (NTSC), 0.
Language Code List Language/Langue Japanese/japonais ( ja ) English/anglais ( en ) French ( fr ) German ( de ) Italian ( it ) Spanish ( es ) Dutch ( nl ) Russian ( ru ) Chinese ( zh ) Korean ( ko ) Greek ( el ) Afar ( aa ) Abkhazian ( ab ) Afrikaans ( af ) Amharic ( am ) Arabic ( ar ) Assamese ( as ) Aymara ( ay ) Azerbaijani ( az ) Bashkir ( ba ) Byelorussian ( be ) Bulgarian ( bg ) Bihari ( bh ) Bislama ( bi ) Bengali ( bn ) Tibetan ( bo ) Breton ( br ) Catalan ( ca ) Corsican ( co ) Czech ( cs ) Welsh (
Country Code List Country Philippines ( ph ) Portugal ( pt ) Russian Federation ( ru ) Singapore ( sg ) Spain ( es ) Sweden ( se ) Switzerland ( ch ) Taiwan ( tw ) Thailand ( th ) United Kingdom ( gb ) USA ( us ) Argentina ( ar ) Australia ( au ) Austria ( at ) Belgium ( be ) Brazil ( br ) Canada ( ca ) Chile ( cl ) China ( cn ) Denmark ( dk ) Finland ( fi ) France ( fr ) Germany ( de ) Hong Kong ( hk ) India ( in ) Indonesia ( id ) Italy ( it ) Japan ( jp ) Korea, Republic of ( kr ) Malaysia ( my ) Mexico
Regarding the GNU General Public License The software programs used on this component include the GNU/Linux system. The GNU/Linux system contains software licensed for use based on the terms of a GNU General Public License. If necessary, the user may request the source code for this licensed software. In this event, please contact the Pioneer Electronics (USA) Inc. Customer Support Division. Details of the GNU General Public License can be found at the GNU website (http://www.gnu.org).
Regarding the GNU General Public License These requirements apply to the modified work as a whole. If identifiable sections of that work are not derived from the Program, and can be reasonably considered independent and separate works in themselves, then this License, and its terms, do not apply to those sections when you distribute them as separate works.
Regarding the GNU General Public License 10.If you wish to incorporate parts of the Program into other free programs whose distribution conditions are different, write to the author to ask for permission. For software which is copyrighted by the Free Software Foundation, write to the Free Software Foundation; we sometimes make exceptions for this.
Pioneer disclaims all responsibility for the integrity of contents recorded on hard disc drives or DVD discs, and for any damages resulting from the loss of such contents. PIONEER CORPORATION Published by Pioneer Corporation. Copyright © 2004 Pioneer Corporation. All rights reserved. 4-1, Meguro 1-Chome, Meguro-ku, Tokyo 153-8654, Japan PIONEER ELECTRONICS (USA) INC. Business Solutions Division: 2265 East 220th Street, Long Beach, CA 90810, U.S.A.