
User Manual
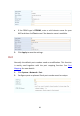
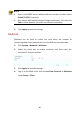
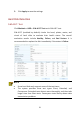
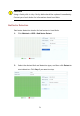
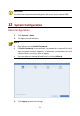
Table Of Contents
- 01-Front cover
- 02-Title page
- 03-Body
- Preface
- Part I Local Operations
- 1 Before You Begin
- 2 Initial Configuration
- Preparation
- Login
- Wizard
- 1. Enable or disable the wizard as needed and then click Next (or click /).
- 2. Select your time zone, set date and time formats, set the system time, and then click Next.
- 3. Complete network configuration, and then click Next.
- 4. Select the devices to add in the list, click Add, and then click Yes to complete configuration.
- 3 Live View
- Live View Status
- Window Toolbar
- Screen Toolbar
- Shortcut Menu
- Sequence Operation
- Zoom
- Image Configuration
- 1. Click the window and then click / on the window toolbar.
- 2. Select a mode from the drop-down list according to the surveillance scenario, and then adjust contrast, hue, saturation and brightness as needed. The settings available may vary with device model.
- 3. Click OK to save the settings and exit.
- Preview Configuration
- 4 Channel Configuration
- Channel Management
- Adding an IP Device
- Option 1
- Option 2
- Option 3
- Option 4
- 1. Click Camera > Camera.
- 2. Click Custom Add.
- 3. Click to select a camera in the list, select Custom from the Protocol drop-down list, and then click the Protocol button.
- 4. In the Protocol window, name the protocol, enter the RTSP port number, select a transmission protocol, input the resource paths, and then click Apply.
- 5. Edit settings in the Add/Modify window as needed, including the IP address, username and password, and then click Add. Check status in the camera list.
- Managing an IP Device
- Sort Cameras
- Upgrading IP Cameras
- Adding an IP Device
- OSD Configuration
- 1. Click Camera > OSD; or click / on the preview window toolbar.
- 2. Select the desired camera and then enter a camera name you want to display on the screen.
- 3. Select date and time formats. Choose to display time and camera name as needed.
- 4. Set font size and color as needed.
- 5. Drag the OSD to the desired position in the preview window on the left.
- 6. (Optional) Click Copy to apply the same settings to other cameras. /
- 7. Click Apply to save the settings.
- Image Configuration
- Privacy Mask Configuration
- 1. Click Camera > Privacy Mask.
- 2. Select the desired camera, select Enable Privacy Mask, click Add Area and then use the mouse to specify areas to mask. Up to four areas are allowed. The areas are differentiated by different colors.
- 3. (Optional) To clear a mask area, click /.
- 4. Click Apply to save the settings.
- Channel Management
- 5 PTZ Control
- PTZ Control Window and PTZ Management Window
- Setting and Calling a Preset
- Setting a Preset Patrol
- 1. In the PTZ Management window, click /. A window is displayed as follows.
- 2. Select a preset from the drop-down list, set the duration (time the camera stays at the preset, unit: second), and then set the rotation speed (1: slowest, 9: fastest). Click OK to save the settings. The preset is added as a keypoint, as shown in t...
- 3. Repeat the above steps to add all presets (keypoints), and adjust the sequence of these presets by clicking / or /. Modify or delete a preset by clicking / or /. Clicking / will delete all the added keypoints.
- 4. After completing the configuration, click Apply to save the settings. Now keypoints for preset patrol 1 is complete.
- 5. Click / right to the drop-down list to start preset patrol 1. To stop, click /.
- Setting a Recorded Patrol
- Setting Auto Guard
- 6 Recording
- Encoding Settings
- Draw or Edit a Schedule
- 1. Click Storage > Recording.
- 2. Select the camera from the list. Schedule is enabled by default. If it is disabled, select to enable it.
- 3. Set Pre-Record and Post-Record as needed.
- 4. (Applicable to some NVR models) To save a redundant copy of recordings, select Enable Redundant Recording and configure a redundant hard disk (see Disk Management for details).
- 5. Click a color icon on the right under the Edit button and then draw a schedule on the left. You may also click Edit and set schedule details in the Edit Schedule window.
- 6. Click Apply.
- 7. (Optional) Click Copy to apply the same settings to other cameras.
- Scheduled Recording
- Motion Detection Recording
- 1. Click Alarm > Motion.
- 2. Select the camera from the list, and then select the check box to enable motion detection.
- 3. In the preview window on the left side, click and drag your mouse to specify a motion detection area (red grid). Use the sliders to adjust detection sensitivity, target object size, and duration.
- 4. Configure motion detection recording: click / right to Trigger Actions, click the Recording tab, select the desired camera, and then click OK.
- 5. (Optional) Configure an arming schedule (time when actions will be triggered): click / right to Arming Schedule and then set time periods as needed.
- 6. Set a recording schedule under Storage > Recording. For the detailed steps, see Draw or Edit a Schedule. Make sure the schedule type is Motion. The set schedule appears in green, which stands for motion detection recording. The following figure sho...
- Alarm Triggered Recording
- 1. Click Alarm > Input/Output > Alarm Input.
- 2. Set alarm input: click / for the desired camera. In the window displayed, select Enable, select N.O. (normally open) or N.C. (normally closed) trigger mode, and then click OK.
- 3. Set alarm triggered recording: click / under Trigger Actions. In the window displayed, click the Recording tab, select the desired camera, and then click OK.
- 4. Set a schedule under Storage > Recording. For the detailed steps, see Draw or Edit a Schedule. Make sure the schedule type is Alarm. The set schedule appears in red, which stands for alarm-triggered recording. The following shows an example.
- Manual Recording
- Holiday Recording
- Holiday Recording
- 1. Click System > Holiday.
- 2. Click the Add button in the lower right corner. The Holiday window is displayed. Complete the settings including the holiday name, start and end dates. By default a holiday is enabled when added and does not repeat.
- 3. Click OK. The holiday appears in the list.
- 4. Click Storage > Recording and then set a recording schedule as described in Draw or Edit a Schedule. Make sure Holiday is selected in the Select Day drop-down list. In the following example, motion detection recording is enabled on the set holiday.
- Holiday Recording
- Other Recording Types
- 7 Playback
- Instant Playback
- Playback Toolbar
- Playback by Camera and Date
- 1. Right-click the mouse and then choose Playback.
- 2. Select the desired camera. By clicking Max. Cameras in the upper right corner you will select the maximum number of cameras allowed.
- 3. Select the desired date on the calendar and then click / to start playback. Double-clicking the date will start playback directly. /
- Playback in Corridor Mode
- Playback by Tag
- Adding a Tag
- Playback by Tag
- 1. In the playback window, select Tag from the drop-down list in the upper left corner.
- 2. Select cameras, set the time period, enter keywords, and then click Search. Search results, if there are any, are displayed with names of cameras and tags.
- 3. Click / for the desired tag to start playback. You may use the Start Before and Stop After drop-down lists to set when the tagged video starts and ends.
- Playback by Event
- Playback by Smart Search
- 1. In the playback window, select Smart from the drop-down list in the upper left corner.
- 2. Click / for the desired camera to start smart playback.
- 3. Click /. The smart search window is displayed. By default, the full screen is the smart search area. To clear all, click /; to restore the full-screen search area, click /.
- 4. Set smart search rules, including detection area and sensitivity.
- 5. Click / to start search. To quit, click /..
- Playback by External File
- File Management
- 1. Click / for the recording you want to lock in the playback window. Locked files will not be overwritten when storage is used up.
- 2. Click / and then click the Locked File tab to view the locked file. To unlock a file, click /, and the icon changes to /. To back up a file, select the file and then click Backup.
- 8 Recording Backup
- Normal Backup
- 1. Click Backup > Recording. All cameras are selected by default.
- 2. Set search conditions and then click Search. Search results are displayed.
- 3. Select the desired recording(s) and then click Backup.
- 4. Select a partition.
- 5. Set the destination in the USB storage device and then click Backup. The recording(s) will be saved to the specified directory.
- Video Clip Backup
- 1. Open the playback window. For the detailed steps, see Playback.
- 2. After playback starts, click / and / on the playback toolbar to clip videos.
- 3. Click / and then click the Video Clip tab to view video clips.
- 4. Select the desired video clip(s) and then click Backup.
- 5. Select a destination in the USB storage device and then click Backup. The selected video clips are saved to the specified directory.
- Normal Backup
- 9 Alarm
- Alarm Input and Output
- Alarm Input
- 1. Click Alarm > Input/Output > Alarm Input.
- 2. Click / for the desired camera. In the Alarm Input window, select Enable to enable alarm input.
- 3. Select the normally open (N.O.) or normally closed (N.C.) trigger mode, and then click OK.
- 4. Click / under Trigger Actions and then set action(s) to trigger. For more details, see Alarm-Triggered Actions.
- 5. Click / under Arming Schedule and then set the time when actions will be triggered.
- Alarm Output
- Alarm Input
- Motion Detection
- 1. Click Alarm > Motion.
- 3. Use the mouse to draw a detection area, and drag the slider to set detection sensitivity, target object size, and duration. The higher the sensitivity, the more likely a moving object will be detected.
- 4. Click / right to Trigger Actions and set action(s) to trigger. For more details, see Alarm-Triggered Actions.
- 5. (Optional) Click / right to Arming Schedule and then set the time when actions will be triggered.
- 6. Click Apply to save the settings.
- 7. (Optional) Click Copy to apply the same settings to other cameras.
- Tampering Detection
- 1. Click Alarm > Tampering.
- 3. Click / right to Trigger Actions and set action(s) to trigger. For more details, see Alarm-Triggered Actions.
- 4. (Optional) Click / right to Arming Schedule and then set the time when actions will be triggered.
- 5. (Optional) Click Copy to apply the same settings to other cameras.
- 6. Click Apply to save the settings.
- Video Loss
- 1. Click Alarm > Video Loss. To disable video loss alarm for a channel, click /, which then changes to /.
- 2. Click / under Trigger Actions and set action(s) to trigger. For more details, see Alarm-Triggered Actions.
- 3. Click / under Arming Schedule and then set the time when actions will be triggered.
- 4. (Optional) Click Copy to apply the same settings to other cameras.
- Alert
- Buzzer
- Alarm-Triggered Actions
- Manual Alarm
- Alarm Input and Output
- 10 Network Configuration
- TCP/IP
- PPPoE
- P2P
- 1. Click System > Network > P2P.
- 2. P2P is enabled by default.
- 3. To add the NVR to cloud at the cloud website: log in to your account at www.star4live.com and then add the NVR by entering the register code and device name.
- 4. To add the NVR to cloud using the app: scan the QR code with the app. You need to download and install the app on your mobile phone first. Contact your dealer for details.
- 5. Click Apply to save the settings.
- DDNS
- Port
- Port Mapping
- Multicast
- 11 Disk Configuration
- Disk Management
- 1. Click Storage > Hard Disk.
- 2. To add a disk, click Add. In the dialog box displayed, select disk usage (recording or backup) and disk type (currently NAS only), enter the server address and directory, and then click Add. Up to eight NAS disks are allowed.
- 3. To edit disk property, click /, and then modify disk usage (recording or backup) and disk property (Read/Write, Read Only or Redundant) as needed.
- 4. To format a disk, select the disk and then click Format. A confirmation message appears. Click Yes.
- Space Allocation
- Advanced Configuration
- Hard Disk Detection
- Disk Management
- 12 System Configuration
- Basic Configuration
- Time Configuration
- Time
- 1. Click System > Time > Time.
- 2. Select the correct time zone, and then set date and time formats and the system time. The following shows an example.
- 3. To use Network Time Protocol (NTP), enable auto update, set the address and port number of the NTP server, and the update interval.
- 4. Click Apply to save the settings.
- DST
- Time Synchronization
- Time
- User Configuration
- 1. Click System > User.
- 2. To add a user, click Add, and then set the username, user type, password and permissions as needed.
- 3. Set the unlock pattern, then click OK.
- 4. To edit or delete a user, click / or / as needed. If you change the password for a user, the new password takes effect at the user's next login.
- Security Configuration
- 13 System Maintenance
- System Information
- Network Information
- Log Query
- 1. Click Maintain > Log.
- 2. Set query conditions, including the start and end times, main type and sub type.
- 3. Click Query.
- 4. If / is displayed under Play, you may click / to view the recording that started one minute before the alarm time and ended ten minutes after the alarm time. / means this functions is not available.
- 5. To export logs to an external storage device, click Export, set the export destination and format, and then click Backup.
- Import/Export
- System Import/Export
- 1. Click Maintain > Import/Export.
- 2. To export device configurations, specify the destination directory and then click Export. A .xml file will be created in the specified directory when export is completed.
- 3. To import device configurations, double-click the target folder containing the .xml file, select the file, and then click Import.
- Diagnosis Info
- System Import/Export
- System Restoration
- Automatic Maintenance
- System Upgrade
- 14 Shutdown
- Part II Web-Based Operations
- 1 Before You Begin
- 2 Login
- 3 Live View
- 4 Playback
- 5 Configuration
- Appendix A Acronyms
- Appendix B FAQs

72
CAUTION!
The detection stops automatically when the error count reaches 100.
12 System Configuration
Basic Configuration
1. Click System > Basic.
2. Configure the parameters.
NOTE!
Only admin can set Enable Password.
If Enable Password is not selected, no password is required for local
login at system startup. However, a username and password are still
required when you log in after a logout.
You may also set startup Wizard here by clicking Wizard.
3. Click Apply to save the settings.