micro cd system with MP3 Merrimack, New Hampshire 03054 Customer Service 800-846-3000 www.brookstone.
512574 Micro System w/MP3 Doc. Size: 5"W x 4.
512574_INS_MicroSysw/MP3 PG 9/13/05 2:43 PM Page 5 MICRO CD SYSTEM WITH MP3 34 512574 Micro System w/MP3 Doc. Size: 5"W x 4.75"H Output at 100% Prints 1/0 Black Brookstone makes life better. Our Micro CD System with MP3 delivers amazing acoustical range— and fits just about anywhere. Twin, full-range speakers and a powerful, 33-watt subwoofer produce rich, clear, room-filling sound, taking your music into another dimension.
512574_INS_MicroSysw/MP3 PG 9/13/05 2:43 PM Page 7 CAUTION SPECIFICATIONS • TO REDUCE THE RISK OF ELECTRIC SHOCK, DO NOT REMOVE COVER OR BACK. THERE ARE NO USER-SERVICEABLE PARTS INSIDE. REFER SERVICING TO QUALIFIED SERVICE PERSONNEL. • TO REDUCE THE RISK OF FIRE OR ELECTRIC SHOCK, DO NOT EXPOSE THIS UNIT TO RAIN OR MOISTURE. Remote control uses one CR2025 button cell battery (included). 512574 Micro System w/MP3 Doc. Size: 5"W x 4.
9/13/05 2:43 PM Page 9 CARE AND MAINTENANCE System Wipe the housing gently with a soft, dry cloth. If the unit is heavily stained or soiled, wipe with a moistened cloth. To avoid damage, do not use any cleaning agents or abrasive cleaners. Speakers Wipe the speakers gently with a clean, damp cloth. To avoid damage, do not use any cleaning agents or abrasive cleaners. CD Lens When the lens gets dirty, malfunctions may occur. The lens should be cleaned using a commercially available camera lens cleaner.
9/13/05 2:43 PM Page 11 8. WALL OR CEILING MOUNTING The unit should be mounted to a wall or ceiling only as recommended by the manufacturer. 9. VENTILATION The unit should be situated so that its location or position does not interfere with its proper ventilation.
9/13/05 2:43 PM Page 13 Setting Radio Stations into Memory You may store up to three FM stations and three AM stations in channel memory. 1. Press INPUT on the unit or remote to select FM or AM mode. The AM INDICATOR or FM INDICATOR illuminates on the unit. 2. Press - FOLDER/ or + FOLDER/ to select the desired station. 3. Press and hold PRESET 1, PRESET 2 or PRESET 3 on the unit or 1, 2, or 3 on the remote for three seconds. The unit beeps and the desired preset number appears on the unit’s display.
9/13/05 2:43 PM Page 15 FIGURE 1 EXAMPLE OF ANTENNA GROUNDING PER THE NATIONAL ELECTRICAL CODE ANTENNA LEAD IN WIRE GROUND CLAMPS ANTENNA DISCHARGE UNIT (NEC SECTION 810-20) ELECTRIC C SERVICE EQUIPMENT GROUNDING CONDUCTORS (NEC SECTION 810-21) GROUND CLAMPS NEC - NATIONAL ELECTRICAL CODE POWER SERVICE GROUNDING ELECTRODE SYSTEM (NEC ART 250, PART H) Playing the Radio 1. Press INPUT on the unit or remote to select FM or AM mode. The AM INDICATOR or FM INDICATOR illuminates on the unit. 2.
/13/05 2:43 PM Page 17 Muting Sound 1. Press MUTE on the remote control to silence audio output. MUTE appears on the display. 2. Press MUTE again to cancel this function and regain sound. Using Sleep Feature This feature shuts off the system and goes into Standby mode when the selected sleep time has passed. Sleep time can be set from 10-90 minutes. Press SLEEP on the remote control to select the desired sleeping time. Your selection will appear on the display.
9/13/05 2:43 PM Page 19 IMPORTANT This unit may be sensitive to high levels of static electricity. If the unit powers off or the display becomes irregular, reset by unplugging the power cord for a minimum of 15 seconds. BATTERY PRECAUTIONS • Dispose of the old battery properly. Do not dispose of the old battery in a fire. • Do not leave the battery where a child or pet could play with or swallow it. If the battery is swallowed, contact a physician immediately. • The battery may explode if mistreated.
9/13/05 2:43 PM Page 21 Editing Programmed Memory 1. With the CD or MP3 in Stop mode, press PGM on the remote control repeatedly until you reach the track or folder you want to replace. 2. For CDs, press - FOLDER/ or + FOLDER/ to select the track you want to replace. For MP3s, press - FOLDER/ or + FOLDER/ to select the folder you want to replace. Press PGM to confirm your selection. Press - FOLDER/ or + FOLDER/ again to select the track you want to replace. 3. Press PGM again to confirm your selection.
Programming CD and MP3 Play This feature programs the order in which tracks are played. You may program up to 64 CD tracks and 64 MP3 tracks. 1. With the CD or MP3 in Stop mode, press PGM on the remote control. For CDs, 00 P--01 PRGM appears on the display. For MP3s, 000 flashes on the display, and P--01 PRGM appears. 2. Press - FOLDER/ or + FOLDER/ to locate the desired CD track or MP3 folder. 3. Press PGM to confirm your selection. For CDs, 00 P--002 PRGM appears on the display.
512574_INS_MicroSysw/MP3 PG 9/13/05 2:43 PM Page 25 Repeating the Disc Press PLAY MODE on the remote control until RPT ALL appears on the display. Note: To exit this function, press PLAY MODE until RPT ALL disappears from the display. Displaying MP3 ID3 Information During MP3 playback, press DISP on the remote control. The information about the current track displays as follows: File (file name) > Title (track title) > Artist (artist name) > Album (album name).
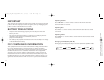
9/13/05 2:43 PM Page 27 • To temporarily stop CD or MP3 play, press ENTER . The playing time flashes on the display. Press ENTER again to resume play. • Play stops automatically after all tracks have been played. The display shows the total number of tracks and folders and the total playing time. 19 to subwoofer dimmer 16 line out r l ant low high 17 aux in 20 21 18 18. TO SUBWOOFER - Jack that connects to the subwoofer. 19. ( ) - Jack that connects to headphones. 20. FM ANTENNA 21.
9/13/05 2:43 PM Page 29 Playing CDs and MP3s 1. With the unit on, press INPUT on the unit or remote control incrementally until the CD INDICATOR illuminates on the unit. 2. Press the CD COMPARTMENT DOOR and it lifts open. 3. Place your desired CD or MP3 into the tray with the label facing up. 4. Close the CD COMPARTMENT DOOR. 5. Press - FOLDER/ or + FOLDER/ on either the main unit or remote control to locate your desired CD or MP3 track.
9/13/05 2:43 PM Page 31 22 29 23 30 24 31 25 32 33 26 34 35 27 36 37 28 Setting the Clock 1. Press and hold CLOCK on the remote control until the minutes begin flashing on the display. 2. Press - FOLDER/ on the main unit or or + FOLDER/ remote control until the correct time displays. 3. Press CLOCK to confirm your selection. Note: The clock only displays in 12-hour mode. PM appears on the display for afternoon/evening hours. AM does not appear for morning hours.
SYSTEM OPERATION Using the Remote Control The remote control is required to set the clock and many other functions on the main unit. To use the remote control, point it at the REMOTE SENSOR on the main unit for control from your listening position. Note: • Even if the remote control is within effective range, operation may be compromised by obstacles between the remote control and the main unit.
SYSTEM SETUP Connecting the Unit 1. Connect one end of the SUBWOOFER CABLE into TO SUBWOOFER on the back of the unit, and the other end into TO CD DECK on the back of the subwoofer. 2. Insert the LEFT SPEAKER CABLE and RIGHT SPEAKER CABLE into L and R on the back of the subwoofer. 3. Insert one end of the DC POWER CORD into DC IN on the back of the subwoofer, and the other end into an electrical outlet. 512574 Micro System w/MP3 Doc. Size: 5"W x 4.75"H Output at 100% Prints 1/0 Black Accessories 44.