
Instructions / Assembly

support@uolfinhome.com
Page: - 2 - / 3
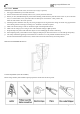
PARTS INCLUDING:
(C) Green ground screw (1)
(D) Mounting plate (1)
(E) Back plate (1)
(F) Glass plate (4)
(G) Screw (8)
(H) Iron lining (1)
(I) Iron tube (1)
(J) Knob nut (2)
(K) Taper pipe (1)
ACCESSORIES ENCLOSED:
(A) Mounting screw (2)
(B) Plastic wire connector (3)
ASSEMBLY & INSTALLATION INSTRUCTIONS:
1. Carefully remove the fixture from the carton and check that all parts and accessories are included as shown
in the above illustration
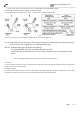
2. Turn off power
Before you start to make installation, NEVER attempt any work without shutting off the electricity until the work is done.
A). Go to the main fuse, or circuit breaker, box in your home. Place the main power switch in the “OFF” position. B).
Place the wall switch in the “OFF” position.
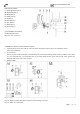
3. Make assembly
Step A1: Unscrew the knob nut (J) from the back plate(E) then gently remove the mounting plate (D).
Step A2: Secure mounting plate (D) to outlet box with mounting screws (A).
Step A3: Make wire connections