
Installation Manual

13.25”
(33.7cm)
The Up Filer™ (Patent US 8,286,808 B1) designed and manufactured by Westerville Design.
www.westervilledesign.com - 303-204-2758
MOUNTING INTO A WALL STUD
If mounting to a stud, use the regular
screws. Pilot holes approximately 3/16”
(.5cm) may be drilled before inserting
the screws.
Leave the screws protruding from the
wall approximately 1/8” (32mm).
MOUNTING TO DRYWALL.
If mounting into an area of drywall
without a stud, use the anchor bolts.
Pre-drill 3/16” (.5cm) holes into the
drywall. Tap the anchor bolts into the
holes until the teeth penetrate the
surface. Tighten the screws clockwise
until denite resistance is felt.
Then turn the screw counter-clockwise
until approximately 1/8” (32mm)
is protruding.
MOUNTING
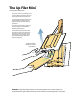
NOTE: While unpackaging and
mounting, handle the rack by the
wooden spine only. Do NOT lift
by holding the metal hangers.
It is best to mount the rack to a wall
stud, however, anchor bolts for
mounting into drywall are included.
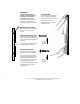
PLACING ON WALL
Place the rack on the wall, aligning
the round holes in the mounting
hardware with the screws in the wall.
Push the spine of the rack
against the wall and pull down
carefully but rmly.
PREPARING WALL LOCATION
Using a level, make two small marks,
exactly 13.25” (33.7cm) apart on
the wall.
Leave about
1/8” (32mm)
protruding.
Leave about
1/8” (32mm)
protruding.