
Overview of Primary Product


Radiant Ready 30E Installation Guide
11
Section 6
Filling and Purging
Note: If your jurisdiction code requires a hard-
plumb port, see the Hard-plumb Port instructions
in Section 11: Customization Options.
Required Equipment
The following equipment is required to properly fill
and purge the system.
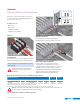
• Two (2) pieces of hose with a ¾" female hose bib
connection to connect to the manifold
• One (1) five-gallon bucket
• One (1) piece of polyethylene pipe and fitting
(included in packaging)
• System fill pump (only if using glycol mixture)
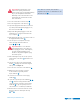
Filling and Purging Procedure
Refer to the steps below for the proper filling and
purging procedure.
1. Before starting the fill and purge procedure,
connect the polyethylene tubing (included in
the packaging) to the temperature and pressure
(T&P) relief valve. Ensure the tubing leads into
a bucket or drain to capture any discharge from
the valve. For the permanent installation, refer to
local codes for the minimum requirements.
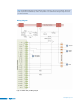
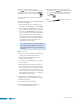
2. Close the isolation valve on top of the boiler
A
and
ensure the automatic air vent is open
B
.
3. Open the isolation valve for the expansion tank
C
.
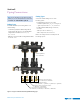
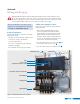
Expansion Tank
Boiler
Boiler Control
Temperature and Pressure Gauge
Temperature and Pressure Relief Valve
Return Manifold
Circulating Pump
Supply Manifold
Automatic Air Vent
Isolation Valves
Expansion Tank
Important! Read through the following Filling and Purging Procedure before starting the process.
This is extremely important as some steps in the process are required to be done quickly and will not
allow time for pausing to read up on the next step. Additionally, a wrong move in the process could
result in a faulty installation where the process must be performed all over again.
A
B
C
Figure 6-1: Radiant Ready 30E Internal Components