
Overview of Primary Product


Radiant Ready 30E Installation Guide
33
Manifold Options
This section details the following manifold options.
• Adding manifold loops
• Moving the manifold out of the cabinet
• Running multiple remote manifolds
• Supplying a submanifold from the primary
(unit) manifold
Adding Loops
It is possible to add up to three (3) additional loops to
the manifold.
Required Components (per additional loop)
• One (1) EP Heating Manifold extension (supply)
(A2670003)
• One (1) EP Heating Manifold extension (return)
(A2670001)
• Two (2) manifold fittings (R20 (female) x ProPEX/
Compression/MLC)
Loop Expansion Process
Refer to the instructions below to add manifold loops.
1. Determine if the system is full of water.
a. If the system is empty, shut off power to the
Radiant Ready 30E and skip ahead to Step 5.
b. If the system is full, continue to Step 2.
2. Shut off power to the Radiant Ready 30E to limit
any potential damage to the heat source and
electrical components when draining water from
the system.
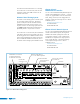
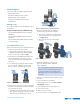
3. Close off all loops by turning the valves clockwise;
this closes off the individual loops and lessens
the time it takes to refill and purge the system.
4. Attach a hose to the hose bib connection and open
the drains on both manifolds to drain as much fluid
as possible from the system.
a. If the fluid is not drained from the system, it will
flow out when removing the end cap. Some fluid
will leak out of the manifold; this is normal.
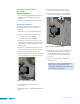
5. Remove the End Caps from the manifolds
(located at the right end of the manifold).
a. There may be a small plastic clip that needs to
slide out of the way so the cap will unthread
(see Figure 11-5).
b. Then rotate the end cap counterclockwise
to remove.
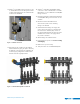
6. Attach the additional loop sections to the
appropriate manifold (Return: A2670001,
Supply: A2670003).
Note: Only eight (8) loops will fit inside the unit
with the cover on. The tubing layout may have
to be altered to add a remote manifold if the
radiant plans call for more than eight (8) loops in
the system.
7. Replace the End Caps and slide the plastic clip back
into place.
8. Connect the tubing to the manifold.
9. Fill and purge the system. See Section 6: Filling
and Purging for details.
10. Open any valves that were previously closed.
11. Check system pressure.
12. Balance loops if neccessary.
13. Turn power back on to the Radiant Ready 30E.
Figure 11-3: Close Off All Loops
Figure 11-5: Remove End Caps
Figure 11-4: Attach a Hose to Hose Bib Connection