
Overview of Primary Product
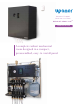


Radiant Ready 30E Installation Guide
5
Section 3
Mounting
After unpacking the Radiant Ready 30E, check the
contents to ensure the following are included. If any
contents are missing or damaged, contact your Uponor
sales representative or distributor for assistance.
Package Contents
• Radiant Ready 30E unit (A3503000)
• Uponor Heat-only Thermostat (A3030101)
• Outdoor Temperature Sensor (A3503015)
• Fastening Hardware
º
Mounting bracket
º
2" Phillips-head wood screws
• 5 feet of 18 AWG LVT wire
• Polyethylene pipe and fitting (for relief valve drain)
Required Tools
• Drill with Phillips-head screwdriver bit
• Level
• Masonry drill bit (for concrete or
block-wall installations)
• Tape measure
Warning: Sheet metal may have sharp
edges; wear gloves when lifting the unit
to prevent injury. Additionally, Uponor
recommends using two people to lift the
unit to mount it into place.
Hanging Requirements
• Ensure mounting location can support the weight
of the unit (119 lbs.).
• Attach the unit onto a structurally sound support or
studs; sheet rock anchors will NOT support the unit.
• When determining the mounting location, ensure
the mounting bracket is at least 48" from the floor.
• Allow at least 14" of clearance to the left side of
the unit; all other sides require 6" of clearance.
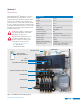
Orientation
Position the unit so the manifold outlets point
toward the ground and the power connections are
on the right.
Mounting Options
Mount the Radiant Ready 30E using one of the
following two options.
Option 1: Wood-framed Wall
(with included 2" fasteners)
1. Measure a minimum of 48" from the floor for the
bracket location.
2. Using a level, mount the bracket into the studs
with the screws provided.
Note: Do not use sheetrock anchors.
3. Lift the Radiant Ready 30E onto the
mounting bracket.
4. Using a level, ensure the unit is level on all
sides before securing the unit to the wall with
the screws provided.
Option 2: Concrete or Block Wall
(with fasteners purchased separately)
1. Measure a minimum of 48" from the floor for
the bracket location and mark the location.
2. Using a level, place the mounting bracket on the
wall at the marked height and mark mounting holes
on the wall.
3. Remove the mounting bracket and drill holes in
the wall with a masonry drill bit and place masonry
anchors (purchased separately) in the holes.
4. Replace the mounting bracket on the wall and
attach with fasteners (purchased separately)
to the wall anchors.
5. Lift the Radiant Ready 30E onto the
mounting bracket.
6. Using a level, ensure the unit is level on all sides
and mark remaining mounting holes on the wall.
7. Remove the unit.
8. Drill holes and place masonry anchors
(purchased separately) in the holes.
9. Lift the unit back onto the mounting
bracket and fasten the unit to the wall
with the remaining fasteners.