
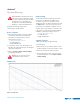
Overview of Primary Product


Radiant Ready 30E Installation Guide
13
Important! The following three steps
must be done quickly, because if the
system pressure gets too high (approximately
30 psi), the Temperature and Pressure
Relief may release. This will result in a loss
of fluid from the system as well as a wet
work environment.
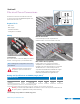
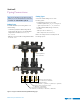
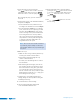
11. Close the return valve on the first loop
G
.
12. Close the supply valve on the first loop
H
.
13. Open both supply and return valves on the next
loop and repeat the filling and purging process,
then close both valves
D
.
14. Repeat the filling and purging process for the
remaining loops, closing the valves after each
loop is complete
D
.
15. After purging the last loop, close the hose valve on
the supply manifold (bottom)
F
.
16. Once the process is complete for all loops,
ensure all supply and return valves are
closed
D
,
G
and
H
.
Important! Failure to close all valves
properly will allow air to enter the loops
(from purging the boiler). If this happens,
the entire purging and filling process
will have to be performed again to purge
air from the system.
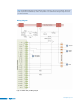
17. After confirming all loops are closed, open the
isolation valve on the boiler
A
that was closed
in Step 2.
18. Open the hose valve on the supply manifold
backup
F
and purge the boiler unit using the
same process in Steps 8-10.
19. Close the hose connection on the drain line
E
.
20. Wait for the system pressure to increase
to the desired level, generally around
12 psi (0.82 bar)
I
.
21. Close the hose connection on the supply
manifold
F
.
22. Open the loops back up on the manifold
D
,
G
and
H
, and, if necessary, add more fluid
(via the open hose connection on the supply
manifold)
F
to get the system pressure to
the desired level — around 12 psi (0.82 bar).
23. Ensure both hose connection valves are closed.
Disconnect the hoses and replace the caps
E
and
F
.
Note: After 2 to 3 weeks, all air should be
purged from the system. Go ahead and close the
automatic air vent
B
.