
Overview of Primary Product


www.uponorpro.com
18
As the system ages, the inhibitors breakdown,
causing the system pH to drop. Consult the glycol
manufacturer for instructions on adding inhibitors to
the system. Note that the system will reach a point
where it will require a complete flush and refill. Ensure
an Uponor-trained installer performs this maintenance.
Propylene-glycol is the only type of glycol Uponor
recommends in a radiant system. When mixing
propylene-glycol with water for a radiant system, there
should not be more than 50% glycol by volume, as
this may also cause damage to the radiant system.
DO NOT use methanol or ethylene glycol.
These fluids may damage the Radiant Ready
30E components.
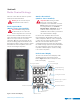
Replacing Pump or Pump
Cartridge Assembly
Refer to the following instructions to properly change
the pump or pump cartridge assembly.
1. Determine if the system is full of water.
a. If the system is empty, shutoff power to the
Radiant Ready 30E and skip to Step 6.
b. If system is full, continue to Step 2.
2. Shut off power to the Radiant Ready 30E to limit
potential damage to the heat source and electrical
components when draining water from the system.
3. Close off all loops by turning the valves clockwise.
Closing off the individual loops lessens the time it
takes to refill and purge the system.
4. Attach hoses to the hose bib connection on the
supply and return manifolds and open the drains on
both manifolds. Drain as much fluid as possible from
the system.
5. If the fluid is not drained from the system, it will
flow out from the pump/pump cartridge when
removed; this is normal.
6. Disconnect the wiring in the pump terminal box
(located on the pump motor).
7. If replacing the entire pump, remove the four (4)
flange bolts (two on each flange). If replacing the
pump cartridge only, remove the four (4) Allen head
screws that secure the cartridge assembly to the
pump volute.
8. Remove the old pump or pump cartridge.
9. Replace with the new pump or pump cartridge.
Note: Make sure the replacement pump is sized
appropriately for the amount of tubing in the
system. The original pump in the Radiant Ready
30E is a Grundfos® UPS15-58F. Over or under
sizing the pump may lead to inefficiency or lack
of flow in the system.
10. When placing the new pump, ensure the direction
of flow will be pumping away from the boiler,
toward the supply manifold.
11. Reconnect the pump and reattach the cartridge
screws or flange bolts.
12. Reconnect the wires to the pump.
13. Fill and purge the unit. (May need to open the
isolation valve.) Refer to Section 6: Filling and
Purging for details.
14. Check for leaks.
15. Open all manifold loops.
16. If the system pressure is below 12 psi (0.82 bar),
add more fluid to the system.
17. Turn power back on to the unit.
18. Balance loops if necessary.
19. Ensure the pump turns back on when there is a
call for heat.
Replacing the Expansion Tank
Refer to the following instructions to properly change
out the expansion tank in the Radiant Ready 30E.
1. Shut off power to the Radiant Ready 30E.
2. Close the isolation valve directly above the
expansion tank.
3. Remove the old expansion tank.
4. Replace with the new expansion tank.
5. Make sure the expansion tank is rated for radiant
applications and is precharged to manufacturer’s
recommendation based on the system design.
6. Make sure the expansion tank is sized appropriately
for the amount of tubing in the system. The original
expansion tank in the Radiant Ready 30E is a
2-gallon Amtrol® expansion tank.
7. Open the isolation valve directly above the
expansion tank.