
Overview of Primary Product


Radiant Ready 30E Installation Guide
19
8. If the system pressure is below 12 psi (0.82 bar),
add more fluid to the system. Refer to Section 6:
Filling and Purging for details.
9. Check for leaks.
10. Turn power back on to the unit.
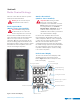
Replacing Fuses Inside the Unit
Refer to the following instructions to properly replace
fuses inside the unit.
1. Turn the power off to the unit.
2. Remove the cover from the boiler.
3. Disconnect the wiring harness that connects the
display on the cover to the electronics in the unit.
4. Locate the fuse to replace.
5. Replace the fuse with the correctly sized fuse.
6. Reconnect the wiring to the display on the cover.
7. Reconnect the cover.
8. Turn power back on to the unit.
9. Check to make sure all systems are working.
Replacing Elements
1. Determine if the system is full of water.
a. If the system is empty, shut power off to the unit
and skip to Step 6.
b. If the system is full, continue to Step 2.
2. Shut off power to the Radiant Ready 30E to limit
potential damage to the heat source and electrical
components when draining water from the system.
3. Close off all loops by turning the valves clockwise.
Closing off the individual loops lessens the time it
takes to refill and purge the system.
4. Attach hoses to the hose bib connection on the
supply and return manifolds and open the drains
on both manifolds. Drain as much fluid as possible
from the system.
5. If the fluid is not drained from the system, it will
flow out from the elements when removed; this
is normal.
6. Remove the boiler cover by removing the four (4)
Phillips-head screws.
7. Disconnect the wiring harness that connects the
display on the cover to the electronics in the unit.
8. Remove wires to heating elements at the left side
of the boiler.
9. Remove the insulation piece.
10. Remove the four (4) bolts securing each
element and slide the element out of the
boiler pressure vessel.
11. Replace with new element (A3503007) and gasket
(A3503008) and fasten with four (4) bolts.
12. Fill and purge the unit. Refer to Section 6:
Filling and Purging for details.
13. Check for leaks.
14. Replace insulation piece.
15. Reconnect electrical wires.
16. Reconnect the wiring harness that connects the
display on the cover to the electronics in the unit.
17. Reinstall the boiler cover and fasten with the four
(4) Phillips-head screws.
18. Open all manifold loops and balance if neccessary.
19. Turn power back on to the unit without any heat
demand from the thermostat(s).
20. Turn on the pump to circulate water through the
system and eliminate residual air that might still
be present. To do so, press the Tool
button for two seconds to access the configuration
field. Then press the Tool
button three
times to select the pump icon
.
21. Press the + button to select ON to activate
the pump.
22. Let the pump run to expel all air bubbles.
23. After purging all air from the system, return the
pump delay to its original setting.
24. Create a heat demand to the unit and check the
operation of the elements.