
Install Instructions


Quik Trak® Design and Installation Manual
7
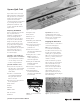
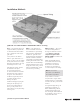
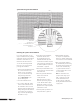
Quik Trak Radiant Wall Installation
How — Starting at the floor level
on the outside wall, install Quik
Trak panels parallel to the floor
at a maximum of six rows high
(42") to avoid interference with
window and picture placement.
Fasten panels to the studs on
both sides of the groove with
1" drywall screws. After installing
the panels, attach
1
⁄2" furring
strips to the remainder of the
stud wall, to provide an even
base for the sheetrock.
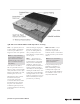
To install the tubing, drill two
5
⁄8" holes in the footer plate
opposite the tubing return. Feed
the supply through the
5
⁄8" hole
and attach to the supply manifold.
Vacuum the grooves. Apply a thin,
1
⁄8" bead of 100% silicone sealant
into the grooves. Firmly press
tubing into the groove. Feed return
to the second
5
⁄8" hole and attach
to the return manifold. Lastly,
attach protector plates (strike
plates) where the tubing crosses
the studs to protect the tubing
from puncture.
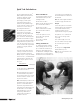
Where — Radiant wall installations
are a low-cost alternative to radiant
floor heating and are often installed
when radiant floor is not viable.
This method is routinely used in
retrofit applications. In addition,
radiant wall installations are most
often used in supplemental heat
situations when the radiant floor
cannot satisfy the heat loss of a
room under design conditions.
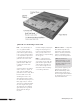
What to look for — Do not install
tubing in an area where pictures
may be hung.
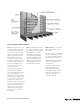
Ensure the supply loop feeds from the
top of the panel and works its way to
the bottom. This will help eliminate
the possibility of air lock in the loop.
Install a minimum of R-19 insulation
in the exterior wall behind the
Quik Trak panels.
In all Quik Trak applications, the
maximum loop length for
5
⁄
16
"
Wirsbo hePEX tubing is 250 ft.,
including leader lengths. Flow rates
for all Quik Trak installations are
calculated to a 20°F
(11.1°C)
temperature differential.