
Install Instructions

www.uponorpro.com
12
Preliminary Layout
After determining the direction of the
Quik Trak panels, design the layout.
1. Mark any areas where
panels will not be installed
(e.g., kitchen cabinets).
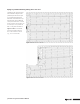
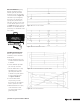
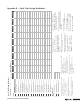
2. From the wall, measure the width
of the Return Panel plus
1
⁄4" for a
total of 7
1
⁄4" (see Distance A).
3. Snap a chalk line to outline
each of the Return Panel walls
(see Figure 12).
4. Determine the starting point
for the supply panel and snap
a chalk line perpendicular to
the other chalk lines using a
square as a guide.
Note: For accurate results, use a
square instead of the wall as a guide.
Panel Installation
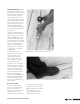
1. Use a circular, power miter or
table saw with a carbide blade to
cut the Quik Trak panels.
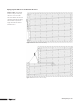
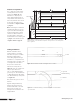
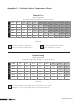
2. Begin by laying the first row of
panels parallel to the chalk line.
3. To improve structural integrity,
stagger the panels in each row so
the seams are not lined up next to
each other. If you have to cut the
last panel in the first row, you can
use the other cut piece to start the
second row. As an alternative, you
may cut a panel in half and begin
the second row. Continue this
staggered pattern throughout the
installation (see Figure 13).
Note: If the finished floor is
hardwood, it may be necessary to
install a vapor barrier below the
panels. Check with the wood floor
installer or manufacturer to determine
the proper location and type of vapor
barrier needed with their product.
No Panels
A
Panel Direction
A
A
No Panels
Panel Direction
Figure 12: Use a Chalk Line to Outline Return Panel Locations
Figure 13: Stagger Panels So Seams Do Not Line Up