
Install Instructions

www.uponorpro.com
14
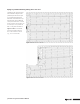
Final Floor Preparation
Use
1
⁄2" plywood or similar product
to fill any small areas not covered
by panels (see Figure 18). This
will make for a completely level
surface. When installing panels on
a suspended wood floor with access
from below, determine the locations
of the supply and return holes to
the manifolds (see Figures 7 and 8
on page 10).
Note: Leader length is crucial when
calculating the number of loops for
a given room. When calculating the
amount of tubing that is required,
remember to add the distance for
the leader length to and from the
manifolds. Refer to the example given
on page 2 of this manual. Also refer
to Figures 7 and 8 on page 10.
Tubing Installation
When the manifold location is
below the subfloor, each supply
and return run requires a
3
⁄8" Metal
Bend Support (A5110375) to
ensure tubing alignment through
the subfloor. To compensate for the
bend in the support, you must create
a rectangular slot in the subfloor.
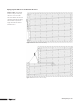
First, use the
5
⁄8" drill bit and
drill two holes side by side (see
Figure 19). Then, use a sharp wood
chisel to square off the hole.
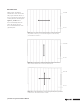
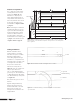
Trim
1
⁄2" of the aluminum backing
out of the groove. This will allow the
3
⁄8" Metal Bend Support (A5110375)
to be flush with the top of the panels
(see Figure 20).
Next, vacuum the groove to remove
all debris.
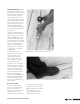
Begin the tubing installation by
attaching the supply side to the
manifold. If the leader comes from
under the floor, feed the loop
through the floor and attach to the
supply manifold.
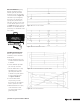
Fill in Areas
5
/8" Hole
Panel
Groove
½"
½" Quik Trak
¾" Subfloor
Aluminum Backing
Figure 19: Drill Two Holes to Create a Rectangler Slot in the Subfloor
Figure 18: When installing the panels in a room with an alcove or bay area, remember
to allow enough room for the Return Trak panels. Fill any areas not covered with panels
with
1
⁄2" plywood.
Figure 20: Trim Aluminum Backing to Allow Bend Support to be Flush with the
Top of the Panels