
Instructions / Assembly


7
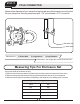
4. The set comes with 2 clamps per pole.
One being attached 2” below frame,
while the other being attached 2” above
the end of the lower pole.
5. Insert the plastic bracket, then clasp the
trampoline leg into the clamp. Secure
tightly with steel brackets and nuts.
6. Now you can have the upper part of the
pole inserted into the lower part that is
already attached to the leg.
7. Repeat the steps above to have all your
enclosure poles connected securely to
your trampoline legs.
Cover all the poles with the PVC Sleeve
(Item T).
8. After connecting all enclosure poles insert the pole caps, if you have an inside type net use
part number E1 and for outside type Net use E2. If you are using the curved poles, use the pole
caps provided.
For inside type net E-1 For outside type net E-2
After you installed the poles you should install the enclosure net. For instructions how to install the
enclosure net see next page for the inside type model and the outside type. Choose the one applies to
your purchase.
2 inches
2 inches
For curved poles
E1
E1
E1
E1 E1
E1
E1
E1
E2
E2
E2
E2
E2
E2
E2
E2