Mod. 1723 DS 1723-002 LBT 20299 KIT VIDEOCITOFONICO A 2 FILI MONO E BIFAMILIARE 7” VIVAVOCE A COLORI ONE- AND TWO-USER KIT WITH PANEL AND COLOUR 7” HANDS-FREE MONITOR KIT VIDEO 2 FILS MONO/BI-FAMILLE 7” MAINS-LIBRES COULEUR KIT VIDEOINTERFÓNICO DE 2 HILOS MONO Y BIFAMILIAR 7” MANOS LIBRES COLOR 2-DRAHT-VIDEOANLAGEN-KIT FÜR EIN- UND ZWEIFAMILIENHÄUSER MIT FREISPRECHFUNKTION UND 7“-FARBBILDSCHIRM KIT HANDENVRIJE 7”, 2-DRAADSE KLEUREN-VIDEO-INTERCOM VOOR EEN EN TWEE WONINGEN Sch. / Ref.
ITALIANO INDICE DESCRIZIONE DEI COMPONENTI ........................................................................................................................ 2 FUNZIONALITÀ ..................................................................................................................................................... 3 1.1 COME ACCENDERE LO SCHERMO E ACCEDERE ALLE VARIE FUNZIONI .................................................. 3 1.2 COME SPEGNERE LO SCHERMO.......................................
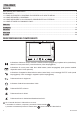
FUNZIONALITÀ 1.1 COME ACCENDERE LO SCHERMO E ACCEDERE ALLE VARIE FUNZIONI • Toccare lo schermo in un punto qualsiasi, oppure • Premere il pulsante in basso al centro del videocitofono. La Home Page è composta da due videate: Cliccare per accedere alla seconda schermata: Dalla Home Page è possibile accedere alle seguenti funzioni: Visualizzare le immagini riprese dalla telecamera del posto esterno o, se presenti (opzionali), del secondo posto esterno e delle telecamere aggiuntive.
Accedere alla videata della Domotica Yokis. Registrare un messaggio audio per l’interno. Attivare e disattivare l’allarme. Attivare e disattivare la funzione ‘Apriporta Automatico’. Attivare e disattivare la funzione di ‘Segreteria Videocitofonica’. Attivare la funzione ‘Pulizia Schermo’. Tornare alla ‘Home Page’. Accedere alla lista delle videoclip salvate. Accedere alla lista dei messaggi audio per l’interno. Accedere alla lista dei log di accessi e allarmi. Accedere alla pagina ‘Info’.
Cancellare la segnalazione di nuova posta nella buca delle lettere. Abilitare e disabilitare il messaggio all’esterno. Silenziare la chiamata ed ogni altra segnalazione acustica al videocitofono. Variare il livello di luminosità o i parametri video del videocitofono. Variare i volumi audio del videocitofono. 1.2 COME SPEGNERE LO SCHERMO Per spegnere lo schermo premere il tasto 1.3 del videocitofono o attendere il timeout di 60 secondi.
Ciclare su altre telecamere eventualmente presenti nell’impianto Registrare una videoclip del visitatore Modificare il formato immagine da 4:3 a 16:9 o viceversa Regolare il video, in termini di luminosità, contrasto e saturazione Regolare l’intensità sonora dell’altoparlante (e – volendo – abilitare / disabilitare il ‘click’ di feedback al tocco del display Disabilitare / riabilitare il proprio microfono (opzione attiva solo dopo aver risposto) o Terminare la conversazione Premendo il tasto 1.
Si aprirà la seguente schermata: Toccare la riga ‘Bottone’ per cambiare il pulsante da schedulare, inserire l’ora e i giorni della settimana in cui si vuole eseguire la programmazione e se si desidera eseguirla una volta soltanto. Salvare le impostazioni toccando . Si ritorna alla schermata precedente. Da qui è possibile abilitare e disabilitare una schedulazione precedentemente configurata. Per maggiori informazioni inquadrare il QR Code seguente con la fotocamera del proprio smartphone o tablet.
ENGLISH INDEX DESCRIPTION OF COMPONENTS ........................................................................................................................ 8 FUNCTIONS ..................................................................................................................................................... 9 1.1 HOW TO SWITCH ON THE DISPLAY AND ACCESS THE VARIOUS FUNCTIONS ......................................... 9 1.2 HOW TO SWITCH OFF THE DISPLAY ...........................................
FUNCTIONS 1.1 HOW TO SWITCH ON THE DISPLAY AND ACCESS THE VARIOUS FUNCTIONS • Touch the display in any point, or • Press the button in the bottom centre of the video door phone. The Home Page consists of two screen pages: Click to access the second screen page: The following functions can be accessed on the Home Page: View the images framed by the door unit camera or the second door unit camera and additional cameras (optional).
Go to the Domotica Yokis page Record an audio message for the apartment. Arm and disarm the alarm. Switch the ‘Auto Door Opener’ function on and off. Switch the ‘Auto Recording’ function on and off. Activate the ‘Clean Screen’ function. Go back to the ‘Home Page’. Go to the list of the saved video clips. Go to the list of audio messages for the apartment. Go to the list of access and alarm logs. Go to the ‘Info’ page. Adjust video door phone settings. Adjust current time and settings.
Delete the new main indication in the letterbox. Enable and disable external message. Mute call and all other auditory tones of the video door phone. Vary the brightness level or the video door phone parameters. Vary the audio volumes of the video door phone. 1.2 HOW TO SWITCH OFF THE DISPLAY To switch off the display, press the button 1.3 of the video door phone or wait for the 60-second timeout.
Cycle other cameras present in the system Record a video clip of the visitor Change the image format from 4:3 to 16:9 or vice versa Adjust the video brightness, contrast and saturation Adjust the speaker sound intensity (and if you wish enable/disable the feedback click when the display is touched) Mute/reactivate your microphone (option available after replying only) or End the conversation during a call to end it. The video door phone will switch off. Press the button 1.
The following page will appear: Touch the ‘Button’ line to change the button to be scheduled, enter the time and the days of the week you want to schedule or if you want to perform it just once. Save the settings by touching . Go back to the previous page. From here you can enable and disable a previously configured scheduling.
FRANÇAIS SOMMAIRE DESCRIPTION DES COMPOSANTS .................................................................................................................... 14 FONCTIONNALITES .............................................................................................................................................. 15 1.1 COMMENT ALLUMER L’ECRAN ET ACCEDER AUX DIFFERENTES FONCTIONS ...................................... 15 1.2 COMMENT ETEINDRE L’ECRAN .................................................
FONCTIONNALITES 1.1 COMMENT ALLUMER L’ECRAN ET ACCEDER AUX DIFFERENTES FONCTIONS • Toucher l’écran à n’importe quel endroit ou • Appuyer sur la touche en bas au milieu du moniteur.
Accéder à l’écran de la Domotique Yokis. Enregistrer un message audio en interne. Activer/désactiver l’alarme. Activer/désactiver la fonction ‘Ouverture de porte automatique’. Activer/désactiver la fonction ‘Enregistrement’. Activer la fonction ‘Nettoyage d’écran’. Revenir à la page d’accueil. Accéder à la liste des clips vidéo enregistrés. Accéder à la liste des messages audio en interne. Accéder à la liste du journal des accès et des alarmes. Accéder à la page ‘Infos’.
Effacer l’indication de présence de courrier dans la boîte aux lettres. Autoriser/exclure le message vers l’extérieur. Couper la sonnerie d’appel et tout autre signal sonore du moniteur. Modifier le niveau de luminosité ou les paramètres vidéo du moniteur. Modifier les volumes audio du moniteur. 1.2 COMMENT ETEINDRE L’ECRAN Pour éteindre l’écran, appuyer sur la touche 1.3 du moniteur ou attendre le temps de 60 secondes.
Commuter sur d’autres caméras éventuellement présentes dans l’installation Enregistrer un clip vidéo du visiteur Modifier le format de l’image de 4:3 à 16:9, ou vice versa Régler la luminosité, le contraste et la saturation de l’écran Régler le volume du haut-parleur (et, en l‘occurrence, autoriser/exclure le « clic » de confirmation lorsqu’on touche l’écran) Exclure/réactiver son propre microphone (option active uniquement après avoir répondu) ou Terminer la conversation En appuyant sur la touche 1.
L’écran suivant s’affichera : Toucher la ligne ‘Bouton’ pour modifier le bouton à programmer, saisir l’heure et les jours de la semaine d’exécution de la programmation et si on souhaite l’exécuter une seule fois. Enregistrer les paramètres en touchant . L’on revient à l’écran précédent, d’où il est possible d’autoriser/exclure une programmation préalablement configurée. Pour plus d’informations, scanner le Code QR ci-dessous à l’aide de la fonction caméra d’un smartphone ou d’une tablette.
ESPAÑOL ÍNDICE DESCRIPCIÓN DE LOS COMPONENTES ........................................................................................................... 20 FUNCIONES ................................................................................................................................................... 21 1.1 CÓMO ENCENDER LA PANTALLA Y ACCEDER A LAS DISTINTAS FUNCIONES ....................................... 21 1.2 CÓMO APAGAR LA PANTALLA .........................................................
FUNCIONES 1.1 CÓMO ENCENDER LA PANTALLA Y ACCEDER A LAS DISTINTAS FUNCIONES • Tocar la pantalla en un punto cualquiera, o • Accionar el pulsador presente abajo, en el centro del videointerfono.
Acceder a la pantalla de Domótica Yokis. Grabar un mensaje audio para el interno. Activar y desactivar la alarma. Activar y desactivar la función “Apertura autom.”. Activar y desactivar la función “Grab. automática”. Activar la función “Limpieza pantalla”. Volver a la “Página principal” Acceder a la lista de videoclips guardados. Acceder a la lista de mensajes de audio para el interno. Acceder a la lista de los registros de accesos y alarmas. Acceder a la página ‘Info’.
Cancelar la indicación de nuevo correo en el buzón. Habilitar y deshabilitar el mensaje al exterior. Silenciar la llamada y cualquier otra indicación acústica al videointerfono. Variar el nivel de brillo o parámetros vídeo del videointerfono. Variar los volúmenes audio del videointerfono. 1.2 CÓMO APAGAR LA PANTALLA Para apagar la pantalla, accionar el pulsador 1.3 del videointerfono o esperar que transcurran 60 segundos.
Ver cíclicamente otras cámaras presentes en el sistema Grabar un videoclip del visitante Modificar el formato imagen de 4:3 a 16:9, o viceversa Ajustar el brillo, contraste y saturación del vídeo Ajustar la intensidad sonora del altavoz (y – si se quisiera - habilitar / deshabilitar el ‘clic’ de confirmación cuando se toca la pantalla Desactivar/reactivar el propio micrófono (opción activa sólo después de responder) o Terminar la conversación Accionando el pulsado 1.
Se abre la siguiente pantalla: Tocar la línea ‘Pulsador’ para cambiar el pulsador a programar, introducir la hora y los días de la semana en los que se quiere ejecutar la programación y si se quiere que se ejecute solamente una vez. Guardar las configuraciones tocando . Se vuelve a la pantalla anterior. Desde aquí es posible habilitar o deshabilitar una programación previamente configurada. Para mayor información, encuadrar el código QR siguiente con la cámara del smartphone o la tableta.
DEUTSCH INHALT BESCHREIBUNG DER BESTANDTEILE .............................................................................................................. 26 FUNKTIONEN ................................................................................................................................................... 27 1.1 EINSCHALTEN DES BILDSCHIRMS UND ZUGRIFF AUF DIE UNTERSCHIEDLICHEN FUNKTIONEN ........ 27 1.2 AUSSCHALTEN DES BILDSCHIRMS ..................................................................
FUNKTIONEN 1.1 EINSCHALTEN DES BILDSCHIRMS UND ZUGRIFF AUF DIE UNTERSCHIEDLICHEN FUNKTIONEN • Den Bildschirm an einer beliebigen Stelle berühren, bzw. • die Taste unten in der Mitte der Videosprechanlage betätigen.
Vornehmen eines Intercom-Anrufs an andere Teilnehmer derselben Wohnung oder zwischen Teilnehmern verschiedener Wohnungen. Zugang zur Ansicht der Home Automation Yokis. Aufzeichnen einer Audionachricht für die Innenstelle. Aktivieren und Deaktivieren des Alarms. Aktivieren und Deaktivieren der Funktion ‘Autom Türöffner’. Aktivieren und Deaktivieren der Funktion ‘Auto Aufzeichn’. Aktivieren der Funktion ‘Bildschirmreinig’. Rückkehr zur ‘Homepage’ Zugriff auf die Liste der gespeicherten Videoclips.
Anzeigen der aktuellen Uhrzeit und Änderung ihrer Einstellungen. Anzeigen der aktuellen Temperatur (nur wenn die externe Sensoroption installiert ist) und Ändern einiger ihrer Einstellungen. Löschen der Anzeige neuer Post im Briefkasten. Aktivieren und Deaktivieren der Nachricht an die Außenstelle. Stummschaltung des Videosprechanlage. Anrufs und jeder anderen akustischen Meldung an die Ändern des Helligkeitsniveaus oder der Videoparameter der Videosprechanlage.
Das Tor der eventuellen Zufahrt öffnen Eine Hilfsfunktion aktivieren, zum Beispiel das Einschalten des Treppenhauslichts Zyklisch auf andere eventuell in der Anlage vorhandene Kameras wechseln Einen Videoclip des Besuchers aufzeichnen Das Bildformat von 4:3 auf 16:9 ändern oder umgekehrt Das Video hinsichtlich Helligkeit, Kontrast und Sättigung einstellen Die Lautstärke des Lautsprechers einstellen (und, wenn man möchte, den Klick des Feedbacks beim Berühren des Displays aktivieren / deaktivieren) Sein Mi
Automation der Videosprechanlage und dann betätigen. Die folgende Ansicht öffnet sich: Die Zeile Taste berühren, um die zu programmierende Taste zu ändern, dann die Uhrzeit und die Wochentage, an denen die Programmierung erfolgen soll und ob sie nur einmal erfolgen soll eingeben. Die Einstellungen durch Berühren von speichern. Sie kehren zur vorigen Ansicht zurück. Von hier aus kann eine zuvor konfigurierte Programmierung aktiviert und deaktiviert werden.
VLAAMS INHOUDSOPGAVE BESCHRIJVING VAN DE COMPONENTEN ......................................................................................................... 32 FUNCTIES ................................................................................................................................................... 33 1.1 HET SCHERM INSCHAKELEN EN DE DIVERSE FUNCTIES GEBRUIKEN .................................................... 33 1.2 HET SCHERM UITSCHAKELEN ..............................................
FUNCTIES 1.1 HET SCHERM INSCHAKELEN EN DE DIVERSE FUNCTIES GEBRUIKEN • Raak het scherm op een willekeurig punt aan of • Druk op de toets onderaan in het midden van de video-intercom. De Home-pagina bestaat uit twee schermpagina’s: Druk op om de tweede pagina te openen: Op de homepagina beschikt u over de volgende functies: De beelden van de camera op de buitenpost weergeven of, indien aanwezig (optioneel), van de tweede buitenpost en de extra camera’s.
De Domotica Yokis-pagina openen. Een vocale post-it registreren voor de binnenpost. Het alarm in- en uitschakelen. De functie ‘Aut. deuropener’ in- en uitschakelen. De functie ‘Autom. registratie’ in- en uitschakelen. De functie ‘Scherm reinigen’ inschakelen. Terugkeren naar de ‘Home -pagina’. De lijst van opgeslagen video’s openen. De lijst van vocale post-it’s voor de binnenpost openen. De lijst van toegangen en alarmmeldingen openen. De pagina ‘Info’ openen.
De waarschuwing voor nieuwe post in de brievenbus verwijderen. Bericht voor de buitenpost in- en uitschakelen. Geluiden van oproepen en elk ander geluid van de video-intercom uitschakelen. De lichtsterkte of de videoparameters wijzigen van de video-intercom. De geluidssterkte wijzigen van de video-intercom. 1.2 HET SCHERM UITSCHAKELEN Druk om het scherm uit te schakelen op de toets 1.3 van de video-intercom of wacht 60 seconden.
Overschakelen naar andere eventueel in het systeem aanwezige camera’s Een video-opname maken van de bezoeker Het beeldformaat wijzigen van 4:3 in 16:9 of andersom De lichtsterkte, het contrast of de verzadiging van de videobeelden regelen De geluidssterkte van de luidsprekers regelen (en – indien u dit wenst - het feedback-klikgeluid bij elke aanraking van het scherm in- of uitschakelen) De microfoon in- of uitschakelen (deze optie werkt pas nadat u de oproep heeft beantwoord) o Het gesprek beëindigen Al
De volgende pagina verschijnt: Raak de lijn ‘Toets’ aan om de te programmeren knop te selecteren, voer het uur in en de dagen van de week waarop u de functie wenst te laten werken en of dit slechts één keer moet gebeuren. Sla de instellingen op met . Op het scherm keert de vorige pagina terug. Hier kunt u een reeds geconfigureerd actieprogramma in- en uitschakelen. Houd de camera van uw smartphone of tablet bij de volgende QR-code voor meer informatie.
DS1723-002
DS1723-002 39
DS 1723-002 URMET S.p.A. 10154 TORINO (ITALY) VIA BOLOGNA 188/C Telef. +39 011.24.00.000 (RIC. AUT.) Fax +39 011.24.00.300 - 323 LBT 20299 Area tecnica servizio clienti +39 011.23.39.810 http://www.urmet.com e-mail: info@urmet.