USB 4200 OWNER’S MANUAL Mobile Video System DVD/VCD/CD/MP3 PLAYER WITH AM/FM-STEREO DIGITAL PLL TUNING RADIO ANTI-THEFT FLIP DOWN DETACHABLE PANEL © Copyright USBLASTER Europe B.V.
CONTENTS Safety Information ...........................................................................…..3 Disc Notes …………………………………………………………………….4 Installation ......................................................................................……..5 Electric Connection ......................................................................…......8 Remote Control..............................................................................……....9 Basic Operation ............................................
SAFETY INFORMATION CAUTION: THIS DVD PLAYER IS A CLASS I LASER PRODUCT. HOWEVER THIS DVD PLAYER USES A VISIBLE/INVISIBLE LASER BEAM WHICH COULD CAUSE HAZARDOUS RADIATION EXPOSURE IF DIRECTED. BE SURE TO OPERATE THE DVD PLAYER CORRECTLY AS INSTRUCTED. USE OF CONTROLS OR ADJUSTMENTS OR PERFORMANCE OF PROCEDURES OTHER THAN THOSE SPECIFIED HEREIN MAY RESULT IN HAZARDOUS RADIATION EXPOSURE. DO NOT OPEN COVERS AND - DO NOT REPAIR YOURSELF. REFER SERVICING TO QUALIFIED PERSONNEL.
DISC NOTES Disc formats supported by this player DVD 12 cm disc (Single-sided disc only) Video CD 12 cm disc CD 12 cm disc MP3 12 cm disc Discs which cannot be played with this player l DVD-ROM l DVD-R/DVD-RAM l CDV l CD-G Handling and Cleaning l Dirt, dust, scratches and warping disc will cause mis operation. l Do not place stickers or make scratches on discs. l Do not warp discs. A disc should always be kept in its case when not in use to prevent from damaging.
INSTALLATION Notes: Choose the mounting location where the unit will not interfere with the normal driving function of the driver. Before finally installing the unit, connect the wiring temporarily and make sure it is all connected up properly and the unit and the system work properly. Use only the parts included with the unit to ensure proper installation. The use of unauthorized parts can cause malfunctions.
INSTALLATION © Copyright USBLASTER Europe B.V.
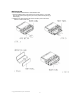
INSTALLATION HOW TO REMOVE AND INSTALL THE FRONT PANL 1. Press the OPEN button to flip down the front panel (see fig.1), then take away the front panel (see fig.2) and put it in the protective case (see fig.3) safe keeping. 2. Install the front panel back into its bracket and then push it back to the position for playing (see fig.4). © Copyright USBLASTER Europe B.V.
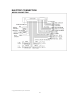
ELECTRIC CONNECTION WIRING CONNECTION © Copyright USBLASTER Europe B.V.
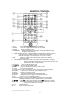
REMOTE CONTROL 1. 2. 3. 4. CLK Press it to change the display to clock display MODE Press it to change between radio or disc model SETUP Display the SETUP menu. OSD(BAND) Display statistical disc information during playback(TO change the band in radio stations) 5. ST/MO (AUDIO) Press it to select STEREO or MONO (IN disc stations ,press it to changing of the AUDIO soundtrack on multi-audio soundtrack DVD disc. Changing of the sound mode of the vcd / cd disc) 6.
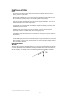
REMOTE CONTROL Preparing the Remote Control Inserting the Batteries 1.Open the battery compartment cover. 2.Insert the new batteries. Make sure that the positive and negative terminals of the batteries are oriented indicated. 3.Close the cover Using the Remote Control Face the remote control towards the player front face IR mark (remote control signal receiver). Operation angle: About +30 degree in each the direction of the front of the IR mark.
BASIC OPERATION ON/OFF [PWR BOTTON](19) Press it to turn on the unit. Press it again to turn off. OPEN [ OPEN BOTTON](1) Press it to flip down the front panel then you can insert the cd disc into the cd compartment SET THE CLOCK [CLK BUTTON ](17) Press it to change the display to clock display. Press it again to return to previous display. In clock display, press and hold for about 2 seconds until the hour display flashes.
BASIC OPERATION RADIO OPERATION BAND [BAND BUTTON](18) In RADIO mode, press the BAND button on the front panel or on the remote controller to select your desired radio band and word which band is selected will be displayed on LCD.
BASIC OPERATION DISC OPERATION Most of the disc operations are controlled by the remote controller. Ejecting a Disc [ Press (EJECT) button] button on the back of the front panel to eject the disc. Stopping Play -Brief press the (Stop) button to stop the unit playback, when press the ,it can continuous normal playback. button Rapid Forward/Rapid Reverse When long Pressing the / or T-UP/T-DN button (more than 2 seconds ) during play.
BASIC OPERATION On-Screen Display Function Press the OSD button during playback to display the contents of the current disc on the screen. Example: DVD: (1) Press OSD for the first time: TITLE 01/03 CHAPTER 002/025 P: 00:00:25 TITLE ELAPSED Title Number, Total Title Number, Chapter Number, Total Chapter Number of this Title of the disc currently being played will be shown on the screen, along with the elapsed time.
BASIC OPERATION Multi-audio Language Function DVD: Press AUDIO during playback. Each time the button is pressed, number of the audio soundtrack language changes on sequential order. Notes: -The language number is different according to the disc. -Some disc only contain one language soundtrack. -When no different language soundtrack are recorded will be display at screen left top corner. VCD: Press AUDIO during playback.
SETUP INITIAL SETUP SETUP MENU --- MAIN PAGE--GENERAL SETUP SPEAKER SEUP AUDIO SETUP PREFERENCES EXIT SETUP 1.Press SETUP in the stop mode.(Press the stop button twice to ensure the player under STOP mode.) 2.The initial SETUP menu is displayed. 3.Select the preferred item by using the / buttons. 4.Press ENTER buttons. a. GENERAL SETUP This setup page includes all the item of TV display & audio output feature. The detail please refer to GENERAL SETUP MENU. b.
SETUP --- GENERAL PAGE --TV DISPLAY TV DISPLAY PIC MODE AUTO HI-RES ANGLE MARK OSD LANG --- GENERAL PAGE --- N-FLICKER PIC MODE ANGLE MARK OSD LANG CAPTIONS CAPTIONS SCR SAVER SCR SAVER MAIN PAGE MAIN PAGE ENGLISH PIC mode setup Select AUTO, the player PIC mode will depend on DVD disc. Select HI-RES format for best image resolution. Select N-FLICKER format on format on image or picture under noise affect.
SETUP AUDIO SETUP --- GENERAL PAGE --- --- AUDIO SETUP --- TV DISPLAY ANALOG PIC MODE ANGLE MARK OSD LANG OP MODE SPDIF/RAW LPCM OUTPUT SPDIF/PCM DYNAMIC CAPTIONS SCR SAVER ON OFF MAIN PAGE MAIN PAGE SCR SAVER setup Select the SCR SAVER output ON/OFF. SPEAKER SETUP --- SPEAKER SETUP PAGE ----- SPEAKER LT/RT PAGE --STEREO MAIN PAGE This is to activate the audio output from DOLBY AC3 5.1 DOWNMIX to 2 channel mode. Select the preferred SPEAKER connection by using the cursor buttons.
SETUP --- AUDIO SETUP--OP MODE LPCM OUTPUT DYNAMIC LPCM 96K MAIN PAGE LPCM OUTPUT Select the LPCM OUTPUT between LPCM 48K and LPCM 96K. --- AUDIO SETUP --FULL OP MODE LPCM OUTPUT 6/8 DYNAMIC 4/8 2/8 OFF MAIN PAGE Dynamic Range Control Select DRC and adjust the dynamic range of a Dolby Digital encoded program. There are 8 steps between full compression and off compression.
--- PREFERENCES PAGE --- --- PREFERENCES PAGE --- TV TYPE TV TYPE 1G AUDIO AUDIO 2 SUBTITLE ENGLISH SUBTITLE 3PG DISC MENU FRENCH DISC MENU 4PG13 PARENTAL SPANISH PARENTAL 5 PASSWORD CHINESE PASSWORD 6PG-R DEFAULTS JAPANESE DEFAULTS 7NC-17 SMART NAV SMART NAV 8 ADULT MAIN PAGE MAIN PAGE NO PARENTAL SUBTITLE language setup Select the preferred SUBTITLE language by using the cursor buttons.
SETUP DEFAULTS TABLE --- PREFERENCES PAGE --- General Setup TV TYPE TV Display PIC Mode AUDIO Angle Mark SUBTITLE OSD Language DISC MENU PARENTAL PASSWORD DEFAULTS Normal/PS AUTO ON English Captions OFF SCR Saver OFF Speaker Setup Downmix Stereo Audio Setup Audio Out Analog OP Mode Line Out RESET Dynamic SMART NAV LPCM Out MAIN PAGE Preferences TV Type Audio LPCM 96K AUTO English English DISC Menu Parental Password Smart NAV DEFAULTS Select reset to become factory initial set
SPECIFICATIONS USB 4200 Supply Voltage: Current Consumption: Signal System: Discs Played: Audio Signal Output: Characteristics: Frequency Coverage: IF: Sensitivity (S/N = 30 dB): 12V DC (11V-15V) Less than10 A Compositive video 1.
TROUBLE SHOOTING Before going through the check list, check wiring connection. If any of the problems persist after check list has been made, consult your nearest service dealer. Symptom Cause The car ignition switch is not on. The fuse is blown. Presence of disc inside the player. Inserting the disc in reverse direction. The disc is extremely dirty or defectiv e. Temperature inside the car is too high. Condensation. Volume is in minimum. The operation keys do not work.