
Operation Manual


USB 7011
Professional 19” 4-Channel Mixer
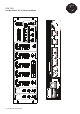
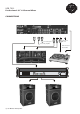
CONNECTIONS
(57,35,36)
Before plugging in the power cord, make sure that the VOLTAGE SELECTOR switch is set to the
correct voltage. And that the POWER switch is in the off position, the POWER LED will be off now.
NOTE: This product is double insulated and not intended to be grounded
(51,52,53)
The usb 7011 is supplied with 4 sets of amp output jacks. The MAIN OUTPUT jacks ( balanced and
unbalanced ) to connect to your main amplifier.
(49)
The REC OUTPUT jacks can be used to connect the mixer to the record input of your recorder
enabling you to record your mix.
(50)
The BOOTH OUTPUT jacks allow you to hook up an additional amplifier.
(1) The MIC 1 and Mic 1 Link input (found on the front panel and rear panel) accepts a 6.3 MM
JACK or XLR connector.
(5) The MIC 2 input (found on the front panel) accepts XLR connectors. All accept balanced and
unbalanced microphones.
(39,42,45)
On the rear panel are 3 stereo PHONO/LINE inputs
(40,43,46,47,48)
5 stereo LINE input.
(38,39)
The PHONO/LINE SWITCH enables you to set the input to phono or Line.
(41,42)
The PHONO/LINE SWITCH enables you to set the input to Phono or Line.
(45,46)
The PHONE/LINE SWITCH enables you to set the input to phono or Line.
The phono inputs will accept only Turntables with a magnetic cartridge. 3 GROUND SCREW
(on the rear panel) for You to ground your turntables is located on the rear panel. The ste-
reo line inputs will accept any line level input such as a CD player. a cassette player, etc.
(33)
Headphones can be plugged into the front panel mounted HEADPHONE jack
OPERATION
(35)
POWER ON: Once you have made all the equipment connections to Your mixer, press the POWER
SWITCH . The power will turn on And the POWER LED will glow RED.
(9,39,40,10)
CHANNEL 1: Switch allows you to select the PHONO l/LINE 1 or the LINE 2 input. The CHANNEL
SLIDE controls the input level of this channel.
© US Blaster Europe BV