
Installation guide

4
4
Windows Installation
Step 1. Connect Microfilters (If Necessary)
If there are no microfilters included in your package and your ISP did not provide
any, skip to Step 2 of these installation instructions.
If microfilters are required, install one on each telephone device (telephones,
answering machines, and fax machines) that shares the same phone line as the
ADSL signal.
A microfilter is a small device used to lessen the amount of interference between
ADSL signals and telephone signals. Microfilters only need to be used if the
ADSL modem and a telephone device are sharing the same phone line. If
microfilters are not used, you may experience background noise on your
telephone while data is being transmitted. Data transmissions may experience
interruption by telephone calls if a microfilter is not used.
Connect Microfilters to Telephone Devices
To install the microfilter, plug the phone into the microfilter, and then plug the
microfilter into the telephone wall jack. Do not install a microfilter on the cable
that connects your modem to the telephone jack unless your microfilter has a
connection for both the telephone and the ADSL device.
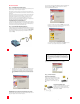
Step 2. Install the ADSL USB/Ethernet Modem
To install the U.S. Robotics SureConnect ADSL USB/Ethernet Modem, insert the
Installation CD-ROM into the CD-ROM drive of your computer. If the installation
does not start automatically, go to your desktop and double-click My Computer,
double-click the drive letter associated with your CD-ROM drive, and then
double-click Setup.
5
5
The U.S. Robotics SureConnect ADSL USB/Ethernet Modem Installer Welcome
window will display; click Next to continue installing the U.S. Robotics
SureConnect ADSL USB/Ethernet Modem.
• Select the connection type (USB or Ethernet) you will be utilizing to
connect the modem to your computer; click Next. If you are running
Windows 95 or NT 4.0 you will not have the option to select. In those
operating systems you must connect via Ethernet.
• You will then be prompted to select a location to install the files. If
you would like to change the default location, click Browse to select a
new folder. If you accept the default location, click Next.
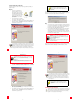
6
6
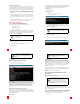
• A qualification test will run to verify that your system meets the mini-
mum requirements for installation. The Results screen will display
those items in your configuration that passed with a green flag and
the ones that failed with a red flag. If your system passed the qualifi-
cation, click Next and the necessary files will be copied to your sys-
tem.
If you are notified that your system has failed the qualification test, click the
View Report button to identify which component(s) failed. Once you have
identified which component(s) failed, refer to the “Troubleshooting” section of
this Quick Installation Guide for further instructions.
7
7
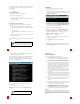
For USB Users Only: The necessary files will be copied to your system. Select
your Internet Service Provider (ISP) from the list and click Next.
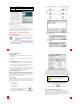
Step 3. Connect the Cables
Connect the Power Adapter
Be sure to only use the included power supply.
Connect the power adapter cord to the “10VDC”
jack at the rear of the modem. Connect the
power adapter to a standard wall outlet. Click
Next.
Connect the Telephone Cable
Connect one end of the included telephone cable to
the telephone port on the back of your modem
labeled “ADSL” and connect the other end into the
telephone jack. Click Next.
Windows 95
Some Windows 95 users may require a necessary Windows component (Win-
sock 2) to be installed at this time. Click Next to launch the installation of this
component, and follow the on-screen instructions. Once the installation is com-
plete, you will need to restart the U.S. Robotics
SureConnect ADSL USB/Ethernet
Modem installation.