U.S. Robotics 802.11g 54Mbps Router USER GUIDE rev 1.0 9-04 R24.0769.
Trademarks: Other product and company names are trademarks or registered trademarks of their respective holders.
TABLE OF CONTENTS About the 802.11g 54Mbps Router . . . . . . . . . . . . 1 LED Indicators . . . . . . . . . . . . . . . . . . . . . . . . . . . . . . . . . . . . . . 1 Front and Rear Panels . . . . . . . . . . . . . . . . . . . . . . . . . . . . . . . . 2 System Requirements . . . . . . . . . . . . . . . . . . . . . . . . . . . . . . . . 3 Installing the 802.11g 54Mbps Router . . . . . . . . . . 4 Basic Installation Procedure . . . . . . . . . . . . . . . . . . . . . . . 4 Configuring the 802.
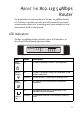
ABOUT THE 802.11g 54Mbps Router Congratulations on your purchase of the 802.11g 54Mbps Router. U.S. Robotics is proud to provide you with a powerful yet simple communication device for connecting your home network or local area network (LAN) to the Internet. LED Indicators The 802.11g 54Mbps Router includes status LED indicators, as described in the following figure and table. 802.11g 54Mbps Router 100 100 10 10 1 2 3 4 LED Status Description PWR (Green) On The 802.
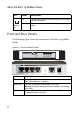
About the 802.11g 54Mbps Router LED LAN1-4 Status Description On The indicated LAN port has established a valid 10 Mbps network connection. Flashing The indicated LAN port is transmitting or receiving traffic. 10 Front and Rear Panels The following figure shows the components of the 802.11g 54Mbps Router: Figure 1. Front and Rear Panels 802.11g 54Mbps Router 100 100 10 10 1 2 3 4 Item Description LEDs Power, WLAN, WAN and LAN port status indicators. (See “LED Indicators” on page 1.
Item Description Reset Button Use this button to reset the power and restore the default factory settings. Fast Ethernet ports (RJ-45). Connect devices (such as a PC, hub or switch) on your local area network to these ports. (LAN) Ports System Requirements You must have an ISP that meets the following minimum requirements: • Internet access from your local telephone company or Internet Service Provider (ISP) using a DSL modem or cable modem.
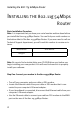
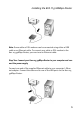
Installing the 802.11g 54Mbps Router INSTALLING THE 802.11g 54Mbps Router Basic Installation Procedure Note: It is important that you have your serial number written down before you install the 802.11g 54Mbps Router. You can find your serial number on the bottom label of the 802.11g 54Mbps Router. If you ever need to call our Technical Support department, you will need this number to receive assistance.
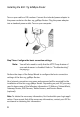
Installing the 802.11g 54Mbps Router Note: Some cable or DSL modems can be connected using either a USB cable or an Ethernet cable. To connect your cable or DSL modem to the 802.11g 54Mbps Router, you must use an Ethernet cable. Step Two: Connect your 802.11g 54Mbps Router to your computer and connect the power supply Connect one end of the supplied Ethernet cable to your computer’s Ethernet adapter. Connect the other end to one of the LAN ports on the 802.11g 54Mbps Router.
Installing the 802.11g 54Mbps Router Turn on your cable or DSL modem. Connect the included power adapter to the power socket on the 802.11g 54Mbps Router. Plug the power adapter into a standard power outlet. Turn on your computer. Step Three: Configure the basic connection settings Note: You will also need to verify that the HTTP Proxy feature of your web browser is disabled. Refer to “Troubleshooting” on page 57.
Installing the 802.11g 54Mbps Router 1. Launch a Web browser. In the location or address line of your Web browser, type http://192.168.2.1 to access the Web User Interface. After the connection is established, you will see the Web User Interface. The default password is admin. Click Login. When you access the Web User Interface, click the Setup Wizard. Note: If you are prompted to connect to the Internet, you may need to select Try Again or Connect, depending on your Internet browser. 2. 3.
Installing the 802.11g 54Mbps Router When you are finished configuring the basic connection settings, you should now have Internet access. Launch a Web browser and register your product at www.usr.com/productreg If the page loads, you are finished with the installation procedure. If the page does not load, refer to the Troubleshooting section. Note: Refer to“Configuring the 802.11g 54Mbps Router” on page 9 for more detailed configuration information.
Configuring the 802.11g 54Mbps Router CONFIGURING THE 802.11G 54MBPS ROUTER The 802.11g 54Mbps Router can be configured by Windows Internet Explorer 5.5 or above. Using the Web User Interface, you can configure the 802.11g 54Mbps Router and view statistics to monitor network activity. Before you attempt to log into the web-based administration, please verify the following. 1. Your browser is configured properly (see below). 2. Disable any firewall or security software that may be running. 3.
Configuring the 802.11g 54Mbps Router The home page displays the Setup Wizard and Advanced Setup options. The 802.11g 54Mbps Router’s user interface features a Setup Wizard and an Advanced Setup section. Use the Setup Wizard if you want to quickly set up the 802.11g 54Mbps Router for use with a cable modem or DSL modem.
Setup Wizard Setup Wizard Time Zone Click on the Setup Wizard picture. The first item in the Setup Wizard is Time Zone setup. For accurate timing of client filtering and log events, you need to set the time zone. Select your time zone from the drop-down list, and click NEXT.
Broadband Type Select the type of broadband connection you have. Note: If you have any questions regarding what type of service you have, check with your Internet Service Provider for more information. For a cable modem connection see the following page.
Cable Modem or xDSL Router Your Internet Service Provider may have given you a host name. If so, enter it into the field. Your connection may require you to clone your MAC address. If required, enter the MAC address of the network adapter that was used to setup your cable connection. Then click Clone MAC address. Click Finish to complete the setup. The Status page will be displayed, allowing you to view the connection status, as well as other information. See “Status” on page 56 for details.
Configuring the 802.11g 54Mbps Router PPPoE xDSL Enter the PPPoE User Name and Password assigned by your Service Provider. The Service Name is normally optional, but may be required by some service providers. Leave the Maximum Transmission Unit (MTU) at the default value (1454) unless your service provider has specified otherwise. Enter a Maximum Idle Time (in minutes) to define a maximum period of time for which the Internet connection is maintained during inactivity.
Setup Wizard Point-to-Point Tunneling Protocol (PPTP) Point-to-Point Tunneling Protocol is a connection method used for xDSL connections in Europe. It can be used to join different physical networks using the Internet as an intermediary. If you have been provided with the information as shown on the screen, enter the PPTP Account name and password, Host Name, Service IP Address, the assigned IP Address, and Subnet Mask.
Configuring the 802.11g 54Mbps Router BigPond If you use the BigPond Internet Service which is available in Australia, enter the User Name, Password and Authentication Service Name for BigPond authentication. Click Finish to complete the setup.
Advanced Setup Advanced Setup Use the Web User Interface to define system parameters, manage and control the 802.11g 54Mbps Router and its ports, or monitor network conditions. The following table outlines the selections available from this program. Menu Description System Sets the local time zone, the password for administrator access, system log server, and the IP address of a PC that will be allowed to manage the 802.11g 54Mbps Router remotely.
Configuring the 802.11g 54Mbps Router System Time Zone Set the time zone and time server for the 802.11g 54Mbps Router. This information is used for log entries and client access control. • Set your local time zone settings Select your time zone from the drop-down list, and set the start and end dates if your area requires daylight savings. To automatically update the 802.11g 54Mbps Router’s internal clock by synchronizing with a public time server over the Internet, choose one of the methods below.
Advanced Setup • Set date and time manually For manually setting the date and time, configure the date by selecting the options from the drop-down list, and enter the digits for the time.
Configuring the 802.11g 54Mbps Router Password Settings Use this menu to restrict access based on a password. For security you should assign your own password before exposing the 802.11g 54Mbps Router to the Internet. (Default: admin) Passwords can contain from 3 to 12 alphanumeric characters and are case sensitive.
Advanced Setup Remote Management Remote Management allows a remote PC to configure, manage, and monitor the 802.11g 54Mbps Router using a standard web browser. Check Enable and set the IP address or IP address range of the remote host. Click APPLY. (Default: Disable) Note: If you select Any IP Address in the Allow Access to field, any host can manage the 802.11g 54Mbps Router. Syslog Server The Syslog Server downloads the 802.
Configuring the 802.11g 54Mbps Router WAN Specify the WAN connection type provided by your Internet Service Provider, then click More Configuration to enter detailed configuration parameters for the selected connection type. Dynamic IP The Host Name is optional, but may be required by some ISPs. The default MAC address is set to the WAN’s physical interface on the 802.11g 54Mbps Router. Use this address when registering for Internet service, and do not change it unless required by your ISP.
Advanced Setup Point-to-Point Over Ethernet (PPPoE) Enter the PPPoE User Name and Password assigned by your Service Provider. The Service Name is normally optional, but may be required by some service providers. The MTU (Maximum Transmission Unit) governs the maximum size of the data packets. Leave this on the default value (1454) unless your service provider has specified otherwise.
Configuring the 802.11g 54Mbps Router Point-to-Point Tunneling Protocol (PPTP) Point-to-Point Tunneling Protocol (PPTP) can be used to join different physical networks using the Internet as an intermediary. Using the above screen allows client PCs to establish a normal PPTP session and provides hassle-free configuration of the PPTP client on each client PC. Enter the PPTP Account, Password, Host Name, and then Service IP Address (usually supplied by your ISP), the assigned IP address, and subnet mask.
Advanced Setup Idle Time, it will be dropped. (Default: 0 minutes) Static IP If your Internet Service Provider has assigned a fixed IP address, enter the assigned address and subnet mask for the 802.11g 54Mbps Router, then enter the gateway address of your ISP. You may need a fixed address if you want to provide Internet services, such as a web server or FTP server.
BigPond BigPond is a service provider in Australia that uses a heartbeat system to maintain the Internet connection. Configure the built-in client with your user name, password and service name to get on line.
DNS Domain Name Servers map numerical IP addresses to the equivalent domain name (e.g., www.usr.com). Your ISP should provide the IP address of one or more domain name servers. Enter those addresses in this screen.
Configuring the 802.11g 54Mbps Router LAN • LAN IP – Use the LAN menu to configure the LAN IP address for the 802.11g 54Mbps Router and to enable the DHCP server for dynamic client address allocation. • Set a period for the lease time if required. For home networks this may be set to Forever, which means there is no time limit on the IP address lease. • IP Address Pool – A dynamic IP address range may be specified (192.168.2.2–254). IP addresses running from 192.168.2.100–199 are the default values.
Advanced Setup Wireless To configure the 802.11g 54Mbps Router as a wireless access point for wireless clients (either stationary or roaming), all you need to do is define the radio channel, the Service Set Identifier (SSID), and encryption options. Channel and SSID You must specify a common radio channel and SSID (Service Set ID) to be used by the 802.11g 54Mbps Router and all of your wireless clients. Be sure you configure all of your clients to the same values. Network Name (SSID): The Service Set ID.
Configuring the 802.11g 54Mbps Router SSID Broadcast: Broadcasting the SSID on the wireless network for easy connection with client PCs. For security reasons, disable SSID broadcast. (Default: Enable) Note: If you disable SSID, it will not show up in your site survey and in order to connect to it, a manual profile will have to be created. Refer to the Navigating the Wireless Configuration Utility section of the 802.11g 54Mbps USB Adapter User Guide on the Installation CD-ROM.
Advanced Setup Note: The available channel settings are limited by local regulations. Security If you are transmitting sensitive data across wireless channels, you should enable Wi-Fi Protected Access (WPA) or Wired Equivalent Privacy (WEP) encryption. Encryption security requires you to use the same protocol set (WPA or WEP) and encryption/decryption keys for the 802.11g 54Mbps Router and all of your wireless clients. For a more secure network, the 802.
Configuring the 802.11g 54Mbps Router summary of wireless security considerations is listed in the following table. Security Client Mechanism Support Implementation Considerations WEP Built-in support on all 802.11b and 802.
Advanced Setup WPA Encryption Type WPA is a stronger wireless security solution than WEP. It uses a combination of 802.1x authentication and broadcast/session keys. • Pre-Shared Key/Passphrase If there is no authentication server on your SOHO network, you can issue the Pre-Shared Key to the clients that connect to the 802.11g 54Mbps Router. Be sure to use the same key for the 802.11g 54Mbps Router and the connected clients. Notes: 1. Manual Pre-Shared Key supports up to 64-Hex characters. 2.
Configuring the 802.11g 54Mbps Router WEP Encryption Type You can choose between standard 40-bit/64-bit or the more robust 128-bit encryption. You may manually enter the keys or automatically generate encryption keys. To manually configure the keys, enter five hexadecimal pairs for each 40/64-bit key, or enter 13 pairs for the single 128-bit key. For automatic 64-bit security, enter a passphrase and click Generate. Four keys will be generated (as shown below).
Advanced Setup If you use encryption, configure the same keys used for the 802.11g 54Mbps Router on each of your wireless clients. Note that Wired Equivalent Privacy (WEP) protects data transmitted between wireless nodes, but does not protect any transmissions over your wired network or over the Internet.
Configuring the 802.11g 54Mbps Router WDS (Wireless Distribution System) The WDS provides a means to extend the range of a Wireless Local Area Network (WLAN). WDS allows an access point to establish a direct link to other access points, and stations to roam freely within the area covered by the WDS. (Default: Disable) Notes: 1. Be sure that all access points with the same WDS links should use the same operation “Mode” (802.11b or 802.11g) and radio “Channel” number. 2.
Advanced Setup To establish a WDS connection between access points, follow the steps below. 1. Select Enable Repeater. 2. Enter the MAC Address that you are trying to create a WDS link to. 3. Click Apply.
Configuring the 802.11g 54Mbps Router NAT - Network Address Translation From this section you can configure the Address Mapping, Virtual Server, and Special Application features that provide control over the TCP/UDP port openings in the router’s firewall. This section can be used to support several Internet based applications such as web, email, FTP, and Telnet. Address Mapping Allows one or more public IP addresses to be shared by multiple internal users.
Advanced Setup Virtual Server If you configure the 802.11g 54Mbps Router as a virtual server, remote users accessing services such as web or FTP at your local site via public IP addresses can be automatically redirected to local servers configured with private IP addresses. In other words, depending on the requested service (TCP/UDP port number), the 802.11g 54Mbps Router redirects the external service request to the appropriate server (located at another internal IP address).
Configuring the 802.11g 54Mbps Router Special Applications Some applications, such as Internet gaming, videoconferencing, Internet telephony and others, require multiple connections. These applications cannot work with Network Address Translation (NAT) enabled. If you need to run applications that require multiple connections, use the following screen to specify the additional public ports to be opened for each application.
Advanced Setup Popular applications requiring multiple ports are listed in the Popular Applications field. From the drop-down list, choose the application and then choose a row number to copy this data into. Note: Choosing a row that already contains data will overwrite the current settings. Example: ID Trigger Port Trigger Type Public Port Public Type Comment 1 6112 UDP 6112 UDP Battle.
Configuring the 802.11g 54Mbps Router Firewall The 802.11g 54Mbps Router firewall can provide access control of connected client PCs, block common hacker attacks, including IP Spoofing, Land Attack, Ping of Death, IP with zero length, Smurf Attack, UDP port loopback, Snork Attack, TCP null scan, and TCP SYN flooding. The firewall does not significantly affect system performance, so we advise leaving it enabled to protect your network users. (Firewall must be enabled in order to access additional settings.
Advanced Setup Note: Click Add PC and define the appropriate settings for client PC services (as shown in the following screen). MAC Filtering Table The MAC Filtering feature of the 802.
Configuring the 802.11g 54Mbps Router MAC (Media Access Control) address of the client machine. This ID is unique to each network adapter. If the MAC address is listed in the table, that client machine will have access to the network. For MAC Address Control, click Yes. This will allow only the listed PCs access to the network. Enter the desired MAC addresses and then click Apply.
Advanced Setup URL Blocking To configure the URL Blocking feature, use the table below to specify the web sites (for example, www.somesite.com) and/or keywords you want to filter on your network. To complete this configuration, you will need to create or modify an access rule in “Access Control” on page 42. To modify an existing rule, click the Edit option next to the rule you want to modify. To create a new rule, click the Add PC option.
Configuring the 802.11g 54Mbps Router Schedule Rule The Schedule Rule feature allows you to configure specific rules based on time and date. These rules can then be used to configure more specific access control. Enable schedule-based Internet access control. 1. Click Add Schedule Rule. 2. Define the settings for the schedule rule (as shown on the following screen). 3. Click OK and then click the APPLY button to save your settings.
Advanced Setup 47
Configuring the 802.11g 54Mbps Router Intrusion Detection 48 • SPI and Anti-DoS (Denial-of-Service) firewall protection (Default: Enable) – The Intrusion Detection Feature limits access for incoming traffic at the WAN port. When the SPI (Stateful Packet Inspection) feature is turned on, all incoming packets will be blocked except for those types marked with a check in the Stateful Packet Inspection section.
Advanced Setup DMZ (Demilitarized Zone) If you have a client PC that cannot run an Internet application properly from behind the firewall, then you can open the client up to unrestricted two-way Internet access. Enter the Public IP address of the DMZ host to this screen. Enter the Client PC IP address for clients that want to connect. Adding a client to the DMZ may expose your local network to a variety of security risks, so only use this option as a last resort.
Configuring the 802.11g 54Mbps Router DDNS (Dynamic DNS) Settings Dynamic DNS (DDNS) provides users on the Internet with a method to tie their domain name to the router or server. DDNS allows your domain name to follow your IP address automatically by having your DNS records changed when your IP address changes. (Default: Disabled) The DDNS service dynamically updates DNS information to a static hostname, provided by the DDNS service provider, as clients’ IP addresses change.
Advanced Setup For using DDNS, click the Enable radio button, select the DDNS Service type, and then enter the user name, pass key (password), host name or server IP, and email address. Mail Exchanger (MX) and Backup MX provides you with flexible email configurations. It allows you to control the delivery of your mail for a specified domain or a subdomain. The Wildcard keeps your hostname pointing to your IP address. The TZO.
Configuring the 802.11g 54Mbps Router 52 • obtain an IP address • convey its capabilities and learn about the presence and capabilities of other devices.
Advanced Setup Tools Use the Tools menu to back up the current configuration, restore a previously saved configuration, restore factory settings, update firmware, and reset the 802.11g 54Mbps Router. Tools - Configuration Tools • Backup Router Settings – Saves the 802.11g 54Mbps Router’s configuration to a file. • Restore Router Settings – Restores settings from a saved backup configuration file. 1. Select the saved file by clicking the Browse button 2. Click the “Restore from config file.
Configuring the 802.11g 54Mbps Router Tools - Firmware Upgrade Use this screen to update the firmware or user interface to the latest version. In the Firmware File field, click Browse to look for the downloaded file. Click APPLY. Check the Status page Information section to confirm that the upgrade process was successful.
Advanced Setup Tools - Reset Click APPLY to reset the 802.11g 54Mbps Router. The reset will be complete when the power LED stops blinking. Note: If you depress the Reset button on the rear panel, the 802.11g 54Mbps Router performs a power reset. If the button is depressed for over five seconds, all the LEDs will illuminate and the factory settings will be restored.
Configuring the 802.11g 54Mbps Router Status The Status screen displays WAN/LAN connection status, firmware, and hardware version numbers, illegal attempts to access your network, as well as information on DHCP clients connected to your network. The following items are included on this screen: Section Description INTERNET Displays WAN connection type and status. Release Click on this button to disconnect from the WAN. Renew Click on this button to establish a connection to the WAN.
Troubleshooting TROUBLESHOOTING The information outlined in this section describes some useful steps for getting your computer and the 802.11g 54Mbps Router online. A. Verify your connection to the 802.11g 54Mbps Router. If you are unable to access the 802.11g 54Mbps Router’s web-based administration pages, then you may not be properly connected or configured. The screen shots in this section were taken on a Windows 2000 machine, but the same steps will apply to Windows 95/98/Me/XP.
Troubleshooting If you have an IP address that starts with 169.254.xxx.xxx then see the next section. If you have another IP address configured, then see section C. (Windows 98 and Me)To determine your TCP/IP configuration status please follow the steps below: 1. Click Windows Start and then Run. 2. Type winipcfg and click OK. Select your 802.11g Wireless USB Adapter and check the IP Address, Subnet Mask, Default Gateway, and DNS server data to make sure they are correct. 3.
Troubleshooting If you have a green lit LED, open up a DOS window as described in the previous section and type ipconfig/renew. If you are still unable to get an IP address from the 802.11g 54Mbps Router, reinstall your network adapter. Refer to your adapter manual for information on how to do this. C. I have another IP Address displayed. If you have another IP address listed then the PC may not be configured for a DHCP connection.
Troubleshooting 3. Then type ipconfig/renew. D. The 10/100 LED does not light after a connection is made. 1. Check that the host computer and the 802.11g 54Mbps Router are both powered on. 2. Be sure the network cable is connected to both devices. 3. Verify that Category 5 cable is used if you are operating at 100 Mbps, and that the length of any cable does not exceed 100 m (328 ft). 4. Check the network card connections. 5. The 10BASE-T/100BASE-TX port, network card, or cable may be defective. E.
Troubleshooting 3. If authentication is being performed through a RADIUS server, ensure that the clients are properly configured on the RADIUS server. 4. If authentication is being performed through IEEE 802.1x, be sure the wireless users have installed and properly configured 802.1x client software. 5.If MAC address filtering is enabled, be sure the client’s address is included in the Access Control table. 6.If wireless clients are roaming between various 802.
Troubleshooting 1. Open Internet Explorer. Click Tools, and then select Internet Options. 2. In the Internet Options window, click the Connections tab. 3. Click the LAN Settings button. 4. Clear all the check boxes and click OK to save these LAN settings changes. 5. Click OK again to close the Internet Options window. Macintosh Internet Explorer 1. Open Internet Explorer. Click Explorer/Preferences. 2. In the Internet Explorer Preferences window, under Network, select Proxies. 3.
Specifications SPECIFICATIONS Below is an outline of the technical specifications for the USR5462. Standards IEEE 802.3 10BASE-T Ethernet IEEE 802.3u 100BASE-TX Fast Ethernet IEEE 802.11b IEEE 802.
Specifications Indicator Panel Power, WLAN, WAN (Link, Activity), LAN (Link/Activity, Speed - 10/100 Mbps) Dimensions 130 x 85 x 32 mm (5.12 x 3.35 x 1.26 in.) Weight 370 g (13.05 oz.) Input Power 12V DC, 1000 mA Maximum Current 0.04 ARMS max. @ 110 V/240 V Power Consumption 5 Watts max.
Specifications EN 61000-3-2/3 EN 61000-4-2/3/4/5/6/8/11 Safety CSA/NRTL (UL1950, CSA 22.2.
Specifications 66
REGULATORY AND WARRANTY 802.11g 54Mbps Router User Guide (Windows 95, 98, 2000, NT, Me, XP, and Macintosh) Regulatory Information FCC Declaration of Conformity This device complies with FCC Rules Part 15. Operation is subject to the following two conditions: This device may not cause harmful interference. This device must accept any interference received, including interference that may cause undesired operation.
documents: EN300 328-2 EN301 489-1 EN301 489-17 EN60950 This equipment is in compliance with the European recommendation 1999/519/ECC, governing the exposure to the electromagnetic radiation. We, U.S. Robotics Corporation, hereby declare that this product is in compliance with the essential requirements and other relevant provisions of Directive 1999/5/EC.
Please contact our support center for an RMA number before sending your product to the repair address. Product sent to the repair address without an RMA number will be returned unopened. In United States: U.S. Robotics c/o Innovate -It 935 McLaughlin San Jose, CA 95122 In Europe: FRS Europe BV. Draaibrugweg 2 1332 AC Almer The Netherlands In Canada: U.S.Robotics Unit-100 13751 Mayfield Place Richmond, B.C.Canada V6V 2G9 802.11g 54Mbps Router User Guide (Windows 95, 98, 2000, NT, Me, XP, and Macintosh) U.S.
rected. 1.10 U.S. ROBOTICS shall not be responsible for any software or other CUSTOMER data or information contained in or stored on this product. 2.0 CUSTOMER OBLIGATIONS 2.1 CUSTOMER assumes full responsibility that this product meets CUSTOMER specifications and requirements. 2.2 CUSTOMER is specifically advised to make a backup copy of all software provided with this product. 2.
sole discretion, repair or replace, using new or reconditioned product or parts, to whatever extent it deems necessary to restore the product or part to operating condition. 4.7 U.S. ROBOTICS will make reasonable effort to ship repaired or replaced product or part to CUSTOMER, at U.S. ROBOTICS expense, not later than TWENTY ONE (21) DAYS after U.S. ROBOTICS receives the authorized CUSTOMER return at an authorised U.S. ROBOTICS Return Centre. 4.8 U.S.
excluded in their entirety, they will be limited to the TWO (2) YEAR duration of this written warranty. This warranty gives CUSTOMER specific legal rights, which may vary depending on local law. 7.0 GOVERNING LAW: This Limited Warranty shall be governed by the laws of the State of Illinois, U.S.A. excluding its conflicts of laws principles and excluding the United Nations Convention on Contracts for the International Sale of Goods. U.S. Robotics Corporation 935 National Parkway Schaumburg, IL, 60173 U.S.
Model Number: USR 5462