STATES ST D E OV T NI USSC E U OWNER’S OPERATION AND INSTRUCTION MANUAL COMPANY WALL MOUNTED PELLET UNIT MODEL 4840 PATENT PENDING SAFETY TESTED TO ASTM 1509-04 & ULC S-627-00 CAUTION! Read All Instructions Carefully Before Starting The Installation or Operating This Heater. Improper Installation Could Void Your Warranty! SAFETY NOTICE: If this heater is not properly installed, a house fire may result. For your safety, follow the installation instructions.
SAFETY PRECAUTIONS IMPORTANT: Read this entire manual before installing and operating this product. Failure to do so may result in property damage, bodily injury, or even death. Proper installation of this heater is crucial for safe and efficient operation. Never use make-shift compromises during the installation. Before installing your heater, you must perform an initial burn in an OUTSIDE environment. Follow the Start-Up Procedure in the Operation section of this manual.
SPECIFICATIONS HEATING SPECIFICATIONS Heat Output1 Heating Capacity2 Fuel Burn Rate3 Burn Time (lowest setting) Hopper Capacity 16,400 BTU/hr. 500 - 1,000 sq. ft. 3/4 - 2 1/2 lbs./hr. 35 hours 28lbs BTU output will vary depending on the quality of fuel. Use PFI listed fuels for the best results. 2 Heating capacity will vary depending on floor plan layout of your home, degree of insulation, and the outside temperature. 3 Pellet size may effect the actual rate of fuel feed and burn times.
ELECTRICAL SPECIFICATIONS Electrical Rating Watts (operational) Watts (igniter running) 110-120 volt, 60Hz, 3.0Amp 175 approximately 425 approximately FUEL CONSIDERATIONS Your Pellet heater is designed to burn certified Premium Hardwood pellets that comply with Association of Pellet Fuel Industries standards. Pellets that are soft, contain excessive amounts of loose sawdust, have been, or are wet, will result in reduced performance. Failure to use proper fuel can affect the longevity of the appliance.
STANDARD INSTALLATION Read this entire manual before you install and use your pellet heater. Failure to follow instructions may result in property damage, bodily injury, or even death! Before installing your heater, you must perform an initial burn in an OUTSIDE environment. Follow the Start-Up Procedure in the Operation section of this manual. Your pellet heater may be installed to code in either a conventional or mobile home (see SPECIAL MOBILE HOME REQUIREMENTS).
WALL INSTALLATION • Select a wall to the exterior of the building. This wall should have the required clearance to combustibles inside and out as mentioned in this manual. Make certain that electrical wires, conduit, water or gas pipes do not pass through the area you have selected. STEP: 1 MOUNT THE WALL PLATE Note: Any material covering the wall (such as sheetrock) must not exceed 5/8” 16 mm). Option 1: Mounting on a wood-stud wall 1. Locate the studs in exterior wall.
VENTING -INSTALLATION VENT TERMINATION CLEARANCES: A. Minimum 4-foot [1.2m] clearance below or beside any door or window that opens. B. Minimum 1-foot [0.3m]clearance above any door or window that opens. C. Minimum 2-foot [0.6m] clearance from any adjacent building. D. Minimum 7-foot [2.1m] clearance from any grade when adjacent to public walkways. E. Minimum 2-foot [0.6m] clearance above any grass, plants, or other combustible materials. F. Minimum 4-foot [1.
VENT INSTALLATION/ASSEMBLY PROCEDURE A source of fresh air shall be provided when required. To ensure this make sure that the intake to the concentric vent system is clear of all obstructions during use. You must use the Duravent FasNSeal Concentric Vent System designed to work with this appliance from United States Stove Company. DO NOT substitute other venting systems. The 3” x 5” horizontal square termination kit (35CVS-KUS) includes: 1. 3” x 5” stove adapter 2.
UNDERSTANDING YOUR HEATER HOW YOUR HEATER WORKS Your pellet heater operates on a timer based auger fuel feed system, that is controlled by a digital circuit board. The fuel is delivered from the auger into a burn pot, which is the vessel where the combustion process takes place. Based upon the heat ranges (1-5), the heater will feed the appropriate amount of fuel to reach a set temperature range. Note that the amount of heat produced by the heater is proportional to the rate of the fuel that is burned.
OPERATION UNIT PREPARATION After properly installing your heater, you will need to attach the electrical cord to the right side blower housing first; then plug it into a 110-volt outlet (an outlet surge protector is highly recommended). PERFORMING AN INITIAL BURN You must perform an initial burn in this appliance before installing it in your home or garage.
OPERATION DAILY OPERATION • Never place your hand near the auger while the heater is in operation. • This unit should be filled when the hopper level drops below 3-inches. • In the event of a power outage, the heater will not function. If the unit was “ON” when the power outage occurred, one of the following will take place: 1. If the heater is still warm, it will resume feeding fuel and continue to operate normally.
MAINTENANCE ASH DISPOSAL Ashes should be placed in a metal container with a tight fitting lid. The closed container of ashes should be placed on a noncombustible floor or on the ground, well away from all combustible materials, pending final disposal. If the ashes are disposed of by burial in soil or otherwise locally dispersed, they should be retained in the closed container until all cinders have been thoroughly cooled. Do not place other waste in the same container.
TROUBLE SHOOTING ERRORS Disconnect the power cord before performing any maintenance! NOTE: Switching the appliance to ”OFF” does not disconnect all power to the electrical components of the heater. Never try to repair or replace any part of the heater unless instructions for doing so are given in this manual or supplied from the factory. All other work should be done by a trained technician.
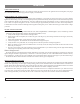
48 46 42 49 50 47 55 58 54 52 56 41 53 57 56 60 51 24 12 8 13 1 14 39 59 15 40 28 16 10 26 9 11 4 7 25 32 27 29 5 20 2 6 22 3 31 61 21 23 17 63 19 66 18 62 64 65 34 35 IN ORDER TO MAINTAIN WARRANTY, COMPONENTS MUST BE REPLACED USING ORIGINAL MANUFACTURERS PARTS PURCHASED THROUGH YOUR DEALER OR DIRECTLY FROM THE APPLIANCE MANUFACTURER. USE OF THIRD PARTY COMPONENTS WILL VOID THE WARRANTY.
Part No.
WIRING DIAGRAM 16 Ussc
HOW TO ORDER REPAIR PARTS This manual will help you obtain efficient, dependable service from your Pellet heater, and enable you to order repair parts correctly. Keep this manual in a safe place for future reference. When writing, always give the full model number which is on the nameplate attached to the heater. 1. The part number 2. The part description 3. The model number: 4.
NOTES 18 Ussc
PLEASE SEAL WITH CLEAR TAPE BEFORE MAILING Warranty Registration Form Please take a moment and properly register your new stove within 10 days of purchase by completing this form. You can also complete this form by visiting us at usstove.
______________________ PLACE STAMP HERE ______________________ ______________________ United States Stove Company 227 Industrial Park Road South Pittsburg, TN 37380 Attn: Registration Form PLEASE SEAL WITH CLEAR TAPE BEFORE MAILING 20 851997 Ussc