
Installation Guide


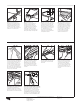


Other Tips
Page 3 of 7
Cutting tees is easiest with metal snips.
First cut the stem, then bend the tee away
from the cut and snip the flanges. Snip
or file off burrs and rough edges. If metal
snips are not available, use a hacksaw to
saw down from the top of the stem, then
file burrs down.
9. Align first main tees — In each row,
trim the first main tee at the wall so that
the slot for the first row of cross tees lines
up at the string. Rest the cut end of the
main tee on the wall angle.
Install all light fixtures and wiring before
the ceiling. Suspend fluorescent light
fixtures from the joists or old ceiling,
never from the ceiling grid unless
additional hanger wires are added for
structural support.
To cut a panel, place it on a flat surface,
finished side up.
To install around obstructions, such as
a post or vent, draw its exact location on
the panel and make the cutout with a
utility knife. To slide a panel over pipes,
cut to opposite sides and install panel in
two pieces.
If a window or stairwell extends above the
ceiling plane, build a valance with 3/4-in.
(19 mm) lumber. Fasten it to walls and joists
or to the old ceiling. Attach wall angles to
the valance as you would to walls.
Trimming for shadow line edge: After
cutting panel to size, fit it into the grid
with cut edge against the wall. Draw a
line on face of panel where it intersects
wall angle. On the line, make a face cut to
match depth of shadow line recess. Then,
cut in from the panel edge to trim
to proper depth.
10. Hang main tees — Pull each hanger
wire through the hanger hole in the tee.
After checking the string line to be sure
the tee is level, bend the wire up and
around itself several times to ensure a
good, tight wrap.
11. Install cross tees — After main tees
are hung, install cross tees. Push cross tee
end through the main tee slot until you hear
a “click.” Where two cross tees intersect in
the same slot, be sure to insert the second
tee to the left of the first.
12. Lay in the ceiling panels — It’s
easiest to begin in one corner of the room
and install panels one row at a time. Tilt
each panel up through the opening and
lower it to rest squarely on all four tees.
Note: Arrows on panel backs should all
point in the same direction!