Compositions ™ Decorative Clouds Installation Guide December 2012
Compositions Decorative Clouds Installation Guide ™ Description USG Compositions™ are decorative ceiling clouds offered in convenient, ready-to-assemble kits. Compositions allow you to create a custom look, accentuate an area or make a unique design statement. The suspension system, trim and suspension wire is pre-cut and ready-to-assemble.
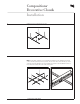
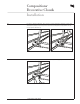
Compositions Decorative Clouds Installation ™ 5 Install all cross tees except perimeter cross tees. 6 Install the perimeter tees followed by the tee brace. Be sure the system is level while installing the tee braces. NOTE: It is important to install the cross tees first and then install the tee brace by fitting it onto the web of the tee and then positioning it on the top surface of the tee. Fasten the tee brace with 1/8" pop rivets or 7/16" pan head screws through the four holes provided.
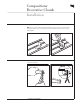
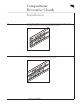
Compositions Decorative Clouds Installation ™ 7 Install the attachment clips onto the Compässo™ Trim. NOTE: USG recommends leaving the installed trim attachment clips unlocked in the trim channels until the system is ready to receive the ceiling tiles. This allows the installer to position the tees as needed during installation. 8 Prior to installing the perimeter trim snip off the cross tee clips by cutting them through the middle of the hour-glassed shaped hole.
Compositions Decorative Clouds Installation ™ 9 Install the trim onto the suspension system by starting with an end cap. 10 For cross tees, once the proper location of the attachment clips has been determined, fasten the clip with two pop rivets installed through the cross tee clip holes.
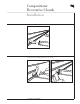
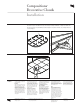
Compositions Decorative Clouds Installation ™ 11 For main tees, adjust the attachment clips to the proper location by aligning them against the override feature and temporarily clamping it. Use a hole punch to create rivet holes through the tee aligned with the two top holes through the attachment clip. 12 Once the holes are punched, fasten the attachment clip to the tee with two pop rivets.
Compositions Decorative Clouds Installation ™ 13 Prior to installing the straight trim pieces be sure to first slide the splice plates in the integral trim channels flush with the edge of the trim so they do not extend beyond the end of the trim. 14 Install the straight sides next and position in place. Extend the splice plates to connect the trim pieces with the splice plates installed slightly offset of the center of the connection.
Compositions Decorative Clouds Installation ™ 15 Install the remaining end caps and check the system for squareness. At this point the attachment clips may be locked into place. The attachment clips are locked by inserting a flat-blade or straight screwdriver into the vertical slot in the clip and twisting clockwise keying the clip into the trim. Be sure all hanger wires are securely wrapped. 16 Install ceiling panels after checking for system squareness.