® SHEETROCK Brand Gypsum Panels installation and finish guide
The best way to obtain smooth interior surfaces with SHEETROCK Brand Gypsum Panels is to properly plan the job— determining materials and application method, measuring surfaces and estimating quantities, obtaining and using the proper tools.
Planning the Job Selecting Materials 1 SHEETROCK® Brand Regular Gypsum Panels have long edges tapered on the face side to form a shallow recess to receive joint compound and tape. Made in four thicknesses: 5/8 , 1/2 , 3/8 and 1/4 . (The 1/4 thick panel should not be applied as a single layer but only to cover existing wall and ceiling surfaces.
Planning the Job Application Products Finishing Products 4 SHEETROCK® Brand Joint Tape is a Type W Bugle Head Screws attach singlelayer gypsum panels to wood framing. Screws provide greater holding power than wallboard nails, minimize popping and help prevent damage to the panel. high strength paper tape which is lightly precreased for corner application and designed specifically for use with SHEETROCK Brand Joint Compounds to provide optimum performance.
Repair Kit 8 The SHEETROCK® Brand Drywall Horizontal or Vertical Application Panels may be applied horizontally (long dimension across studs or joists) or vertically (long dimension parallel to studs or joists). Horizontal application using 12 panel lengths is ideal for walls because linear footage of joints is minimized. If possible, span the entire wall or ceiling from corner to corner. To minimize joints, use the longestlength panels available and offset all end joints in adjacent rows.
Planning the Job Tools Needed Measuring and Estimating Quantities • Fasteners To find out how many panels you will need, measure the length and height then multiply to determine square footage for each wall. Subtract the square footage of all large openings such as doorways and picture windows; don’t bother with small openings such as electrical boxes and pipe fittings. Do the same for the ceiling. Total the figures and use the table on page 7 to calculate the number of panels needed.
Gypsum Panel Coverage Calculator No. of Panels Size of Panels 4 x8 4 x10 4 x12 10 320 sq. ft. 400 sq. ft. 480 sq. ft.
Planning the Job To estimate the quantity of fasteners, compound and tape you will need, use the table below. Fastener/Compound/Tape Calculator With this amount of SHEETROCK Brand Use this amount of Or this amount of Gypsum Panels wallboard nails(1) Type W Screws(2) Use this amount of SHEETROCK Brand Joint Tape sq.ft lb. lb. ft. 100 0.6 0.3 200 1.1 0.6 74 300 1.6 0.9 111 400 2.1 1.2 148 500 2.7 1.4 185 600 3.2 1.6 222 700 3.7 1.9 259 800 4.2 2.2 296 900 4.8 2.
Preparing the Panels Use utility knife with sharp blade for scoring. Complete cutting by running knife through back paper for the length of the panel and snapping back to face. 1 Marking Place panel with light-colored face paper side up. Measure and mark panel size desired. 2 Cutting After cutting the panel, smooth the cut edge with sandpaper wrapped around a block of wood such as a piece of 2x4 lumber. Be sure to keep edge as square as possible. Always wear a dust mask when sanding.
Attaching The Panels 3 Cutouts 4 Framing For openings such as an electrical outlet or switch box, measure across from the point where the side edge of the panel will rest to the near and far sides of the installed box. Then measure from the point where the top or the bottom edge of the panel will fall to the top and bottom of the box. Prior to panel attachment, inspect framing to ensure that the face of the framing is straight. Warped or crooked framing should be repaired or replaced.
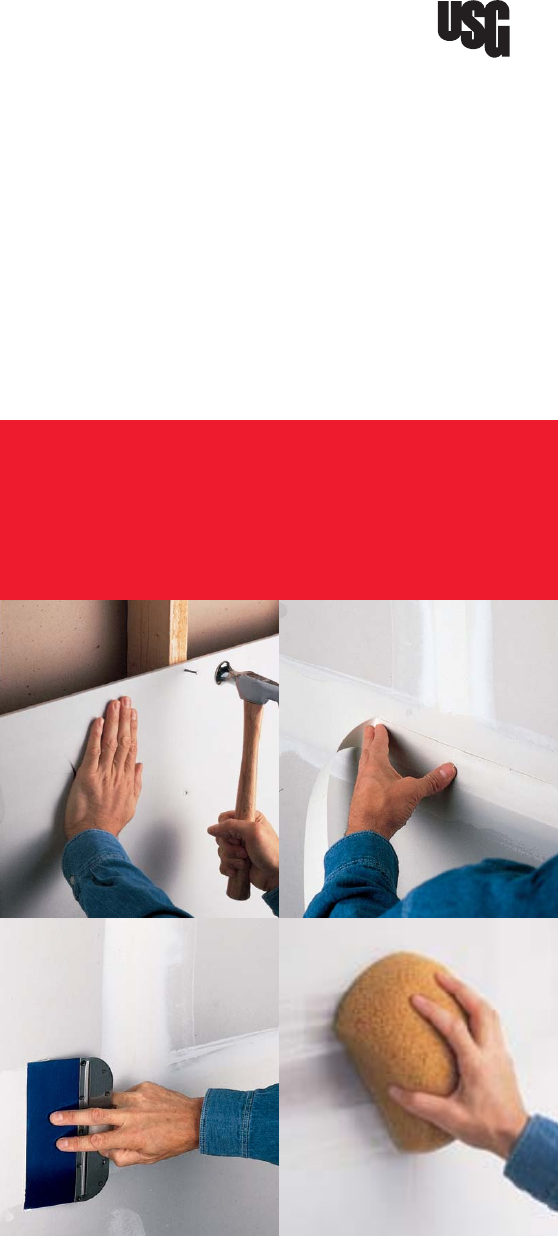
Double-nailing reduces the likelihood of nail pops. It is highly recommended for ceilings. Drive first nails 12 o.c. along framing in the field of the board and second nails about 2 from the first. Fasten the perimeter 7 o.c. for ceilings and 8 o.c. for walls. Tips For 1/4 , 3/8 and 1/2 thick panels, use 1-1/4 wallboard nails. For 5/8 panels, use 1-3/8 wallboard nails. Drive nails in straight, not at an angle. Do not overdrive or countersink nails.
Attaching The Panels Tip 8 Ceilings On 3/8 , 1/2 and 5/8 thick panels, use 1-1/4 Type W Bugle Head Screws for superior holding power and high resistance to popping due to wood shrinkage. Apply ceilings first. Because panels are difficult to maneuver over one’s head, it’s best to have a helper or two. Fasten panels to all joists and perimeter framing. Space nails maximum 7 apart along framing, screws 12 apart, starting in the center of the panel and working toward the perimeter.
9 Walls Tips Apply panels horizontally or vertically to framing. If applied horizontally, install top row first. Position first panel tight against the installed ceiling panel and fasten to studs. Space nails maximum 8 apart along framing, screws 16 apart, starting in the center of the panel and working toward the perimeter. Cut panels accurately so that they do not have to be forced into place. Continue around the room. Use a panel lifter tool to help install bottom panels.
Attaching The Panels Force bead onto corner being careful that the flanges don’t spread beyond 90° angle, making it hard to cover them with joint compound. 10 Corners a. Method 1—DUR-A-BEAD Corner Reinforcement Using DUR-A-BEAD Corner Reinforcement, apply it to all exterior corners of walls, soffits and window returns. Hold bead firmly against corner and nail bead through small holes every 9 on each flange. Make sure that nails penetrate framing members.
Be careful not to overthin compound. (For outside corners, extend compound approximately 2 or 50 mm from the corner on each side; for inside corners, extend 1-1/2 or 38 mm from the other corner on each side.) Using a 6 taping knife for outside corners (4 for inside corners), apply another coat of joint compound (EASY SAND, Topping, All-Purpose, or Lightweight All-Purpose). Keep this coat as smooth as possible.
Finishing the Panels To reinforce tapered joints, follow same procedure. Tape should overlap tape applied to butt joints. 11 First Coat, Flat Joints Start with butt joints. Apply an even coat of thinned joint compound for the length of the joint with a 5 finishing knife. Tips For best results, apply medium pressure and hold knife at a 45° angle to panel. Center and lightly press tape into wet joint compound with fingers. Draw 5 knife firmly along joint to tightly embed tape.
Keep the blade clean, especially of dried bits of compound, to avoid leaving scratches in the wet joint compound as you draw the knife over it. Discard any compound containing dried bits of material. Clean blade by drawing it over edge of pan. 12 First Coat, Inside Corners Use a 5 joint finishing knife to apply thin layer of joint compound on both sides of corner. Extend compound slightly beyond area to be covered by tape. Fold tape along center crease and lightly press into position with your fingers.
Finishing the Panels 13 First Coat, Fasteners 14 First Coat, Outside Corners and Metal Trim For each fastener depression, apply joint compound with 5 knife. Holding the blade almost flush with the panel, draw the joint compound across a fastener head and the dimple surrounding it. Apply joint compound with 8 knife onto one flange of the corner bead. Work down the entire length of the bead.
15 Second Coat, Flat Joints and Fasteners Apply a 7 -8 coat of joint compound to each side of butt joints and feather. Compound should extend beyond first coat for a total width of 14 . Allow first coat to dry overnight. Scrape off bumps, ridges and other imperfections with knife. Be careful not to damage surface. Apply a second coat to fasteners in same manner as first coat. Apply joint compound to tapered joints using an 8 knife the length of the joint.
Finishing the Panels 17 Second Coat, Outside Corners and Metal Trim Tips Do not sand unless it is necessary. If you do sand, use fine-grit sandpaper and be careful not to scuff the gypsum panel paper to minimize surface touch-up requirements. For best results, compound should be used as thickly as possible on fill coats and thinned with water for finish coats. Allow first coat to dry overnight. Apply second coat with 8 knife, feathering slightly beyond first coat.
When applying earlier coats, minor depressions and grooves were not a problem. However, do not leave any during the application of this final coat or they will mar the finished surface. 20 Sanding Allow third coat to dry overnight. Lightly sand imperfections in finished joints, corners and over fastener heads. Carefully remove sanding dust with damp sponge.
Finishing the Panels Decorating The Panels Wet Sanding When only minimal sanding is needed, try wet sanding with a sponge. It eliminates dust and does not scuff the surface paper. Use a small-celled polyurethane sponge similar in appearance to carpet padding. Saturate sponge and wring to prevent dripping. Rub joints to remove high spots, using as few strokes as possible. Clean the sponge frequently during use.
Repairing Damaged Panels c. To repair a popped nail, drive and dimple new nail 1-1/2 from popped nail. Drive and dimple popped nail. Cover with joint compound. Sand and prime when dry. When repairing damaged panels, the ideal products to use are EASY SAND 90 Joint Compound described on page 4 under “Finishing Products” and the SHEETROCK Brand Drywall Repair Kit described on page 5 under “Repair Kit.” 1 Patching Dents, Holes, Popped Nails and Cracks a.
Repairing Damaged Panels c. Embed tape in compound to bridge crack. Draw knife firmly over crack to tightly embed tape. Let compound harden. c. Apply coat of joint compound over taped area. Let harden and apply second coat. Sand and prime when dry. d. Apply compound over tape with knife. Let harden and apply second coat of compound if necessary. Sand and prime when dry. 3 Repairing Large Cracks (approx. 1/8 ) a. Trim any loose pieces from the damaged area using a knife and wipe it clean. b.
d. Remove tabs from each drywall repair clip. Apply compound and tape to all four section sides. Do not overlap tape. Apply second and third coats of joint compound, allowing each coat to harden before applying next coat and feathering out from previous coats. Sand and prime when dry. b. Slip drywall repair clips onto the edge of the damaged wall. Position screws about 3/4 in from the edge and centered between the tabs. This will line up the screws with perforations in the clips.
Trademarks The following trademarks used herein are owned by USG Corporation or its subsidiaries: SHEETROCK, USG, DUR-A-BEAD, DURABOND, QUIK & EASY, EASY SAND, FIRECODE and PLUS 3. Notice We shall not be liable for incidental and consequential damages, directly or indirectly sustained, nor for any loss caused by application of these goods not in accordance with current printed instructions or for other than the intended use. Our liability is expressly limited to replacement of defective goods.