GH-625B / GH-625M Outdoor GPS Wrist Device User Manual Version 1.
GH-625 Table of Content 1. Introduction and Features ............................................................................................ 4 1.1 Introduction ....................................................................................................................................... 4 1.2 Features ............................................................................................................................................ 4 2. Specifications..................................
GH-625 9. PC Software application ............................................................................................. 39 9.1 Install USB driver ............................................................................................................................ 39 9.2 How to use GS-Sport Training GYM ............................................................................................... 40 10. Maintenance ............................................................................
GH-625 Thank you for purchasing GS-Sport GH-625. We sincerely hope you to enjoy using this high technology GPS device. For fully understand the functions and features of GH-625, please read the user manual before you get started. 1. Introduction and Features 1.1 Introduction GS-Sport GH-625 is a stylish, fully-sealed, waterproof, wrist type GPS device with the features of “Tracking”, “Lap”, “GPS positioning”, “Time alert”, “Heart rate monitor (GH-625M only)”, etc.
GH-625 2. Specifications Electrical and Mechanical Parameters General Item GH-625B GH-625M Number of Waypoints 100 Tracking point 60000 Laps 6000 Display Size 24.9 x 39.88 (H x W in mm.) Display type Black & White LCD Pixels (H x W) 80 x 120 Unit Weight 72.87g Waterproof Standard IPX7 Unit Size 76.5 x 61.5 x 17.5 (L x D (Φ) x H in mm.) Backlit Display Single level Operating temperature -10 ° to 60 ° C Humidity 5% to 95% Non-condensing Voltage 3.
GH-625 GPS Parameters General GPS Chipset SiRF Star III LPx Frequency L1, 1575.42 MHz C/A code 1.023 MHz chip rate Channels 20 channel all-in-view tracking Antenna Type Built-in patch antenna 10 meters, 2D RMS Position 5 meters, 2D RMS, WAAS enabled Velocity 0.1 m/s Time 1 us synchronized to GPS time Default datum WGS-84 Reacquisition 0.1 sec., average Hot start 1 sec., average Warm start 38 sec., average Cold start 42 sec., average Altitude 18,000 meters (60,000 feet) max.
GH-625 3. Hardware Overview 3.1 Accessories Check the contents of your GH-625 packaging. If you find any accessories are missing or appear damaged, please contact your dealer immediately.
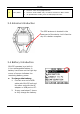
GH-625 Bike Holder Quick Guide 3.2 Viewing Buttons 1 4 2 5 3 6 Button Description 1. 2. ESC/LAP In Menu mode, press ESC button to escape from the current page and go back to the previous page. Press to split a lap when timer is running. Press 2 seconds to turn on/off GH-625. When GH-625 is on, quickly press this button will turn on/off the Power backlight. Press and hold this button for 14 seconds to do hardware reset if the system is halted. 3.
GH-625 5 OK / Enter Press to enter the highlighted item. Press to confirm data entry or feature selection in Menu mode. In Speedometer mode, press to start/stop the timer. 3.3 Antenna Introduction The GPS antenna is located in the lower part of the device. Let it face the sky for a better reception. 3.4 Battery Introduction GH-625 operates by a built-in Li-ion rechargeable battery. A battery icon shown on the right top corner of screen indicates the remaining battery power.
GH-625 Inside the USB socket, there is a small "bar" on the right side. There is a "groove" on the side of the column of USB connector. Aim the "groove" at the "bar" for plugging in the USB connector.
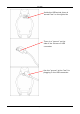
GH-625 3.5 Wear the Heart Rate Monitor (Only For GH-625M) Outer side Heart rate sensor Transmitter Heart rate sensor Inner side. Cling this side to your skin. You can wet the sensor to obtain a better reception of your pulse. 1. Put one end of the strap through the slot of the heart rate monitor first. 2. Wrap the heart rate monitor and strap around your chest. Adjust the heart rate monitor to be at the center of your chest. 3.
GH-625 How to take care of your chest belt 1. Wash the chest belt by suds, and then flush out with water. Let it dry it naturally, avoiding putting the chest belt under the environment of high temperature or touching the corrosive as strong acid or alkalis material. 2. Wetting the skin, where will contact the conductive area of the chest belt will improve the conduction and get more stable signal. 3. The physical condition of individual might affect the intensity of measured signal. 4.
GH-625 3.6 Mount the Bike Holder Buckle up the bike holder on the bike. Bind up the GH-625 strap. Test the stability by twisting the watch set.
GH-625 4. Getting Started 4.1 Starting the GH-625 Press the Power button for 2 seconds to turn on the device. You will see the welcome screen displayed. Allow the GH-625 a short time to track satellites for the first time you use it. Take your GH-625 to the outdoor open space with a clear view to the sky and it will be easy to acquire satellite signal with a few seconds. If the device can't get 3D fixed, you can still press PG button to exit the Locating screen.
GH-625 4.
GH-625 In Speedometer mode, press Up or Down button to switch different views. Information displayed in different views: SPEED: mile/hour, km/hour. AVG SPEED: the average speed. PACE: the time needed for one mile or one km. Sport Type: the sport type you set for calories calculation. Distance: shows how far you have traveled. Calories: shows how many calories you have burned. Time of Day: shows date, time and week day.
GH-625 4.3 Menu Structure - Main Menu This diagram presents all the available menu options for your quick look up.
GH-625 TIME ZONE SETUP TIME DAYLIGHT SAVING TIME FORMAT BEEPER SET SYSTEM LANGUAGE SLEEP MODE USER SETTING SET DISPLAY BACKLIGHT CONTRAST SET PAGE 1 SET CUST PAGE CONFIGURATION SET PAGE 2 SET PAGE 3 SET PAGE 4 USER PROFILE TURN PC-GPS ON/OFF DATA RECORDING GPS SETTING GPS OFF WAAS/ EGNOS HEART RATE CARDIO MODE SETTING SET TARGET ZONE FACTORY RESET SYSTEM UPGRADE ABOUT PRODUCT Page 18
GH-625 5. Activity 5.1 Activity Info [MAIN MENU] > [ACTIVITY] > [ACTIVITY INFO] 1. Use Up and Down button to scroll to the item you wish to display and press OK button. The all training data information will display 2. Use Up and Down to select the file you wish to check and press OK button, the training data information is shown on the screen. Information items are displayed: Date and Time, Show the date and the time Total distance of this training. Total calories as you have burned.
GH-625 5.2 Activity Setting 5.2-1 Auto hold [MAIN MENU] > [ACTIVITY > [ACTIVITY SETTING] > [AUTO HOLD] 1. The Auto Hold function allows you to pause the timer automatically when you stop moving or your speed falls below a certain value. 2. When the timer is paused, the data is not recorded. Thus the average speed and calories calculation could be more accurate.
GH-625 5.2-2 Alerts [MAIN MENU] > [ACTIVITY > [ACTIVITY SETTING] > [ALERTS] 1. [TIME/DIST ALERT] 2. [SPEED ALERT] 3. [HEART RATE ALREAT](GH-625M only) [TIME/DIST ALERT] 1. Use Up and Down button to select the item and press OK to modify it. 2. You can set the alarm to sound once when the specified time is reached, or repeat to sound on every specified time, or turn it off. 3.
GH-625 [MAIN MENU] > [ACTIVITY]> [ACTIVITY SETTING] > [CALORIES SETTING] 1. [SPORT TYPE] 2. [EXTRA WEIGHT] [SPORT TYPE] Select sport type from "Walking", "Hiking", "Running", "Biking" or "By Time" by press UP and Down button. [EXTRA WEIGHT] Confirm the extra weight you carry and then input to EXTRA WEIGHT Item. System will calculate the calories consumption depending on the specific sport type. 5.
GH-625 2. The speed unit can be set as Pace (min/m, min/K) or Speed (mph, kph). 3. The coordination unit can be set as Default (Deg°Min’) or GOOGLE (D° M’S”). 5.3 Delete All (Training data) [MAIN MENU] > [ACTIVITY] > [DELETE ALL] You can delete all the training data stored in the device. 5.4 Memory Capacity [MAIN MENU] > [ACTIVITY] > [MEMORY CAPACITY] 1. Display the remaining memory capacity. 2. You will see how many points left and the remaining time you can use.
GH-625 6.1 Navigation 6.1 Add / Remove Map Mode [MAIN MENU] > [NAVIGATION] > [ADD/REMOVE MAP MODE] You can use this feature to display or not display the map mode. However, while the Map Mode is off, and you execute "Return to start" or "GOTO" a waypoint, the Map Mode will be turn on again. 6.2 Routes [MAIN MENU] > [NAVIGATION] > [ROUTES] 1. [CREATE NEW ROUTE] 2. [LIST ALL] 3. [DELETE ALL] Record the route when you are exercising [CREATE NEW ROUTE] 1.
GH-625 3. In the top line of the screen, you could edit the route name. 4. When you are done with editing the route, press ESC button [LIST ALL] 1. Select the route you want to navigate, and select "FOLLOW?". You will be asked which point (start point or end point) to navigate. 2. Determine the destinations, the device will pop-up the message asking whether to start a record? 3. You will see your current position and destination point on the screen, and those nearby waypoints are also displayed.
GH-625 4. Press PG button to display the distance and time to reach destination on the right part of screen. The direction of destination waypoint is shown by the arrow sign of the compass. 5. If you want to stop the navigation, press [MAIN MENU] > [NAVIGATION] > [STOP ROUTE]. 6. Select the route you want to delete, and select "DELETE?". This route will be deleted immediately. [DELETE ALL] 1. A confirmation dialog box will pop up.
GH-625 6.3 Save a Waypoint [MAIN MENU] > [NAVIGATION] > [SAVE WAYPOINT] 1. 2. 3. 4. You can save the current position. If the GPS position is fixed, it shows the longitude, latitude and elevation on the screen. If the GPS position is not fixed (no GPS signal is received), the value will be zero. Use Up and Down button to scroll to the item you wish to modify and then use the OK button to select and confirm.
GH-625 screen, and those nearby waypoints are also displayed. Press Up and Down button to zoom out and zoom in the map view. 4. Press PG button display the distance and time for you to reach destination on the right part of screen. The direction of destination waypoint is shown by the arrow sign of the compass. 5. To stop the GOTO, press [MAIN MENU] > [NAVIGATION] > [STOP GOTO]. [DELETE WAYPOINT] 1. Use Up and Down button to scroll to the Waypoint you wish to delete and press OK. 2.
GH-625 6.5 Return to start (Stop Goto) [MAIN MENU] > [NAVIGATION] > [RETURN TO START / STOP GOTO] 1. You can use this feature to navigate you back to the start point of the latest saved training data. 2. The navigation screen is shown and you can follow the direction of arrow to go back to the start point. 3. If you want to stop the navigation, press [MAIN MENU] > [NAVIGATION] > [STOP GOTO]. 6.
GH-625 7. Connect to PC The Exercise Studio allows you to setup the pause, alarm and sport type for GH-625. 7.1 Connect to PC [MAIN MENU] > [CONNECT TO PC] 1. You can transfer the training data from GH-625 to your PC. 2. Refer to "GS-Sport Training GYM" chapter for more details. When USB connect to GH-625, the detected message will show on the screen.
GH-625 8. CONFIGURATION 8.1 User Setting 8.1-1 Setup Time [MAIN MENU] > [CONFIGURATION] > [USER SETTINGS] > [SETUP TIME] 1. [TIME ZONE] 2. [DAYLIHGT SAVING] 3. [TIME FORMAT] Use Up and Down button to select the item and press OK to set the function. [TIME ZONE] You have to select your country to set up the time zone [DAYLIHGT SAVING] You have to select your local time zone and enable Daylight Saving if necessary, so system will display the correct time for you.
GH-625 8.1-2 Setup system [MAIN MENU] > [CONFIGURATION] > [USER SETTINGS] > [SET SYSTEM] 1. [BEEPER] 2. [LANGUAGE] 3. [SLEEP MODE] [BEEPER] You can set the Beeper to sound or to be silent according to your need. [LANGUAGE] There are 5 languages of User Interface, including "English", "German", "French", "Italian" and "Spanish". [SLEEP MODE] There are 5 modes on sleep mode, if left watch unused arriving the set time the watch would power off automatically.
GH-625 8.1.3 Set backlight [MAIN MENU] > [CONFIGURATION] > [USER SETTINGS] > [SET DISPLAY] 1. [BACKLIGHT] 2. [CONTRAST] [BACKLIGHT] Set the backlight to stay on or automatically turn off after a period of time once you press Power button to activate the backlight. [CONTRAST] 1. Use Up and Down button to adjust the contrast of the screen display. 2. When you are satisfied with the contrast, press OK button to accept it. 8.1.
GH-625 4. User can customize PAGE 1 to 4 and modify each page that contains the item. Each page can contain maximum of four items.
GH-625 8.1-5 Use Profile [MAIN MENU] > [CONFIGURATION] > [USER SETTINGS] > [USER PROFILE] 1. You can input your personal information in the user profile. 2. The data fields include "username", "gender", "birth date", "weight" and "height". 3. The system will do the calories calculation base on the information you provide. Please input the correct value. 8.1-6 Turn PC-GPS On [MAIN MENU] > [CONFIGURATION] > [USER SETTINGS] > [TURN PC-GPS ON] You can use GH-625 as a G-mouse by connecting it to your PC. 1.
GH-625 8.1-7 Data Recording [MAIN MENU] > [CONFIGURATION] > [USER SETTINGS] > [DATA RECORDING] 1. System is default to record one point for every second. This will create the most accurate record for your training activity. However, you can set a different interval to record the points. 2. Set the longer interval means less data in a fixed period of time. But you can use the device for a longer time. 8.
GH-625 8.3 Heart Rate Setting [MAIN MENU] > [CONFIGURATION] > [HEART RATE SETTING] [CARDIO MODE] You have to turn on the HEART RATE MONITOR when you wore the heart rate monitor, and then you can see your current heart rate. You can also set the calculation of calory burning by heart rate. [SET TARGET ZONE] You can modify your HR target zone between 0 to Max HR, the max HR is calculated by person profile. 8.
GH-625 8.5 System Upgrade [MAIN MENU] > [CONFIGURATION] > [SYSTEM UPGRADE] 1. Allow you to upgrade the firmware of GH-625. 2. If you want to cancel the upgrade process, press Power + ESC button at the same time. 8.6 About Product (GH-625) [MAIN MENU] > [CONFIGURATION] > [ABOUT PRODUCT] Display the firmware version information.
GH-625 9. PC Software application 9.1 Install USB driver The USB driver is needed when you connect the GH-625 to PC. If the driver is not installed, your PC could not recognize GH-625. 1. Insert the CD into the CD-ROM drive, and the Autorun will start automatically. 2. Click on the "USB Driver" button to install the "PL-2303 USB-to-Serial" driver to your PC. 3. Follow the instruction to complete the installation. 9.
GH-625 9.1-3 Run the GS-Sport Training GYM You can run the GS-Sport Training GYM by double click on the "GH-625 GS-Sport Training GYM" icon from desktop. Or click from Start > All Programs > GlobalSat GS-Sport > GS-Sport Training GYM. 9.2 How to use GS-Sport Training GYM 9.2-1 Choose Device version When the device is connected to PC, please choose which model is used. 9.2-2 Add New User Create new user name by clicking the “New User” icon.
GH-625 Please connect to Internet before the software is opened. Please Choose “Data Transmission” and select which saved data will be downloaded.
GH-625 When the user connect PC and GH-625, GH-625 will pop-up a message asking if user want to connect to PC or user can select the “connect to PC” from GH-625.
GH-625 9.2-3 Section Description 1. 2. 3. 4. 5. 6. 7. Main Function Sub tool Bar Google Map, Track point data, Waypoint Data Statistics analysis tools, Play Meter Training data base saved by calendar Training list Training detail information 8.
GH-625 9.2-4 Menu Structure Import Activity Export Activity Capture Google Main Map Show on Google Map Export training information to KML, CSV, Text or GPX format. Capture current Google Map window as JPG format Show Training data on Google Map. Specify the folders for saving different format of files when you export the training information. Show on Google Show Training data on Google Earth. Quit the Earth application, you will be asked to save the document.
GH-625 9.2-5 Download Data from GH-625 Connect GH-625 to your PC with the USB cable. In GH-625, press [MAIN MENU] > [Connect to PC]. In GS-Sport Training GYM, click [Data Transmission] > [Trackpoints]> [Download from Device] or [Waypoint]> [Download from Device]. The downloaded training data will be stored in calendar. The downloaded Trackpoints details The training file will show in this panel. are displayed in this panel.
GH-625 9.2-6 Upload Data to GH-625 Connect GH-625 to your PC with the USB cable. In GH-625, press [MAIN MENU] > [Connect to PC]. In GS-Sport Training GYM, click [Data Transmission] > [Trackpoints]> [upload from Device] or [Waypoint]> [upload from Device].
GH-625 When GS-Sport Training Gym searches successful, there will be “Track File list” window pop-up. When the download procedure is processing, the progressing message will be displayed on screen. If the memory space is full, you need to delete some waypoints before you can make the uploading. Meanwhile, the waypoint or training data will overwrite the one with the same Location Name.
GH-625 9.2-7 Waypoint Add/Edition In GS-Sport Training GYM, click [Main] > [Planning Tool] There will display “Planning Tool” bar at the bottom of Google map. Key the address or coordinate in the column and click “Search”, the map will center the location. When the cursor moves on the map, this column will display the current latitude and longitude. Click the “AddWaypoint” button; window will pop up a message to inform user adding waypoint by clicking map.
GH-625 When click the map, the location you clicked will appear a green marker, and display a “Way Point Editor” window. User need to name the new point; For the customization, user can also specify the Icon Index, modify the Altitude, Latitude, Longitude and Remark manually, finally click “Save” button, the waypoint data will be stored in calendar.
GH-625 To edit the available waypoint data, select ‘Way Points” tab and select one waypoint to click right button on the mouse, it will appear the option for way point editor. 9.2-8 View statistic curve From statistics analysis area, check the kind of curve you want to view. (Or click the curve buttons from tool bar.
GH-625 9.2-9 Replay the training 9.2-10 View Track points in Google Earth 1. Click the Track Records on the section 6. 2. Double click the earth icon on section 8. The software will open Google Earth automatically if Google Earth has been installed in the computer. The Track points will be shown on Google Earth. (This feature requires Google Earth installed on your system.
GH-625 Page 52
GH-625 9.2-11 View Track points in Google Maps Click the Track Records from the training files area, and the training trace will appear on the Google Map. The Track-points will appear on the Map.
GH-625 9.2-12 View Track points information for details Select Track-points Bar 9.2-13 Firmware Upgrade Connect GH-625 to your PC with the USB cable. In GH-625, press [MAIN MENU] > [CONFIGURATION] > [SYSTEM UPGRADE]. Please follow the instruction list below. Note: Interruption of firmware update will cause GH-625 malfunction. 1. In GS-Sport Training GYM, click [Configuration] > [Firmware Upgrade] from menu bar.
GH-625 2. Browse for the firmware file (*.GHX). Click on the "Upgrade" button to start firmware upgrade process.
GH-625 3. Select the firmware version 4. Click the “Upgrade” button.
GH-625 5. Confirmation of firmware upgrade. If you decided to upgrade firmware, please click “OK”. 6. Upgrade processing Bar. Note: Interruption of firmware update will cause GH-625 malfunction. Do not unplug GH-625 or turn off the Software.
GH-625 7. Upgrade successful. GH-625 will shut down automatically. 9.
GH-625 10. Maintenance 10.1 Take care of you GH-625 Do not store your GH-625 in an extremely high or low temperature environment. Use a dampened cloth to clean your GH-625 and wipe dry. If necessary, apply mild detergent solution to the cloth. Do not use strong chemical solvents or it may damage the plastic surface.
GH-625 11. Glossary Relates to data being transmitted from GH-625. Activity is a history or log Activity of events. Activity data includes time or distance updates. Waypoints are sets of coordinates that identify a point in physical space. For the purposes of terrestrial navigation, these coordinates usually include Waypoint longitude and latitude, and sometimes altitude (particularly for air navigation). Trackpoint The current moving trace.
GH-625 11. Troubleshooting & FAQ 1. Why can’t GH-625M receive heart rate signal? Solution: (1). Check if you correctly wear the heart rate monitor or not. (2). Turn on the Heart Rate Alert function in GH-625M. (3). If it is still not working, check the battery of Heart Rate monitor. 2. Why does it show “PC com port error” when I download data? Solution: (1). Please check if the USB driver is installed or not. (2). Connect GH-625 to your PC with the USB cable. (3).
GH-625 (1). Please check if the USB driver is installed or not. (2). Connect GH-625 to your PC with the USB cable. (3). Double click the “GS-Sport Training Gym” icon from desktop to start the application. (4). From menu bar click “Configurations”/”COM Port Setting, and the application will auto re-scan Com Port, if failed, click “Scan” button. COM port will be automatically scanned. 6. Why can’t I upgrade GH-625/615 with new firmware? Solution: (1). Please check if the firmware file is correct. (2).
GH-625 http://www.globalsat.com.tw/eng/product_detail2_00000117.htm 10. How to import or export the training records from or to file? Solution: (1). User can use GS-Sport training gym to import/export the training records from/to specific file. (.ACT) Import Activity: [Menu Bar] -> [Main] -> [Import Activity] -> Choose one file you want to import. Export Activity: Choose one training file you want to export then follow below step.
GH-625 Upload: (4). Mark waypoints that you want and follow below step. [Menu Bar] -> [Data Transmission] -> [Way Points] -> [Upload to Device] (for GH-625 device, please enter CONFIGURATION > CONNECT TO PC). You can see the successful message that upload waypoint to device. 13.
GH-625 Technology\GS-Sport Training Gym\MySQL\data before you un-installing the GS-Sport Training Gym. (2). After GS-Sport Training Gym installing accomplished, try to input "net top mysql1" at COMMAND MODE to stop SQL services. (3). Copy and overwrite the database back to the corresponding folder. 16. What should I do when upgrade firmware fail? Solution: Note: Do not power down your GH-625 (1). Please follow the upgrade firmware procedure till the upgrade succeeded. 17.
GH-625 FCC Notices This device complies with part 15 of the FCC rules. Operation is subject to the following two conditions: (1) This device may not cause harmful interference, and (2) This device must accept any interference received, including interference that may cause undesired operation. FCC RF Exposure requirements: This device and its antenna(s) must not be co-located or operation in conjunction with any other antenna or transmitter.