Smart LED Flood Light User Guide
English Smart LED Flood Light User Guide Before installation, let’s know how the whole thing works. Voice Control Voice Control Step One: Install the smart flood light. Step Two: Fundamental set-up-Connect smart LED flood light to Smart Life App. Step Three & Four: Optional set-up - Connect Smart Life App to Amazon Alexa or Google Assistant. After completing Step Two, you can remote control the light on Smart Life App.
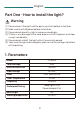
English Part One - How to install the light? Warning (1) Please check if the light and the parts are intact before installation. (2) Make sure to cut off power before installation. (3) Please do not place this light in corrosive conditions. (4) If there is any damage to the cord, please cut off the power and stop using it immediately. (5) Please do not retrofit the light within the warranty period. (6) To ensure the light works properly, please use the voltage indicated on the packing. 1.
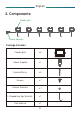
English 2.
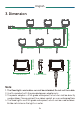
English 3. Dimension 3m/10ft 3m/10ft 3m/10ft 3m/10ft 3m/10ft 3m/10ft 12cm/4.7in 10cm/4.0in 3.2cm/1.26in 16cm/6.3in 14cm/5.5in Note: 1. The flood lights and cables can not be extended, Do not cut the cable. 2. Use this product with the provided power adapter only. 3. The power adapter is IP44 grade waterproof, which can not be directly used outdoor. Please connect to a indoor socket, or use a waterproof box. 4. The flood lights are IP66 grade waterproof, which can be used outdoor.
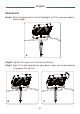
English 4. Installation Scenario 1: Step A: According to the spacing of two screw bits on the bracket, drill two holes on the mounting panel. A Note: Maximum mounting height is over 5m. Step B: Aim the bracket at the holes and fix it with two bolts (not included). Step C: Adjust the lighting direction up or down as per your need and plug in to power the light on.
English Scenario 2: Step A: Attach the ground stick to the Flood light, with the screw provided in the package. A Step B: Tighten the screw with the Hex Key Wrench. Step C: Adjust the lighting direction up or down as per your need and plug in to power the light on.
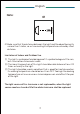
English Note: 01 01 Make sure that the distance between the light and the object being lits is more than 1 meter, so as to avoid high temperature caused by short distance. Limitation of Indoor and Outdoor Use (1) This light is waterproof and damp proof. It is protected against the rain, but it cannot be immersed in water. (2) The mounting position of this light should be able to bear at least 10 times as heavy as the light. (3) This light should be used in condition that is good for heat dissipation.
English Wireless Control Specification: Wireless Frequency Range: 2.412-2.472 GHz Wireless Communications Protocol: IEEE 802.11b/g/n Wireless Conducted Power: 13-16 dBm FCC ID: 2AWONUT88875 Federal Communication Commission(FCC)Statement for Users Warning: Changes or modifications not expressly approved by the party responsible for compliance could void the user’s authority to operate the equipment. This device complies with part 15 of the FCC Rules.
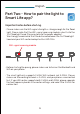
English Part Two - How to pair the light to Smart Life app? Important notes before starting: - Please make sure the WiFi signal strength is strong enough for the flood light. Please note that the WiFi signal receiving module is built into the first flood light head (the one close to the power adapter). We strongly recommend that the distance between the first flood light head and your WiFi router be kept within 65ft/20m.
English Step A : Smart Life app installation Please choose either way below to download and install the app. (1) As per your phone system, choose the QR code to scan. (2) Search keyword ‘Smart Life’ in Apple Store or Google Play. Step B: Create an account on Smart Life and login. Note: Please keep your account and password in mind for Alexa or Google Assistant App pairing later. Step C : Add the light to Smart Life App 1. Tap ‘+’ button on top right corner to add devices.
English 2. Power on the light with your own switch. Repeatedly turn on-off-on-off -on-off-on switch (3 times) to activate the light into rapid blinking status (about 0.5s per blink). Please make sure to keep an interval over 2 seconds between each turn-on and turn-off. Then click the ‘Next’ button on this page. Find the lighting devices and click ‘+’. 3. Choose your WiFi network, enter your password, and tap the ‘Next’ button. Then give a name to the light and tap the ‘Done’ button.
English Step D : Give a name to the light. - A simple name is recommended for easier voice recognition with Alexa or Google Assistant. - The name given to the light will be the same for voice control on Alexa or Google Assistant. Step E : Control the lights. The named light will be shown on the app homepage. Now you can control the light (turn on/off, change colors, adjust brightness ect) with Smart Life on the setting page.
English Tips: ① This botton sets the number of flood lights, please click and set to ‘ 6 ’ . ② Click the ‘ ’ botton, and select the color in the color plate, the color of all the flood lights will be changed at the same time. ③ Click the ‘ ’ botton, select the color in the color plate, and select the flood light you want, the color will be changed separately. ④ Click the ‘ ’ botton, and select the flood light, the flood light will be turn off separately.
English How to group the lights? Make sure all the lights have been paired to “smart life” app, then group the lights by following these steps. 1. Choose any light on the app, click the edit button on the top right corner, then click “Create Group” . 2. Choose the lights you want to group from the device list and rename the group. Now you can control the lights and sync with the music, the colors will be synchronized in the group.
English Part Three — How to control the light with Amazon Alexa? Please make sure that your Alexa app is connected to Echo, and both work well under your WiFi network. Step A: Log in your Alexa App, tap top left corner, and tap ‘Skills’. Step B : Type ‘Smart Life’, find ‘Smart Life’ from the search result and tap it to enable the skill.
English Step C: Enter your Smart Life App account and password. Tap ‘Link Now’, then tap ‘Authorize’ on the next page to bind Smart Life account to Alexa. Step D : When your Smart Life account is bound to Alexa, tap ‘DISCOVER DEVICES’ to detect the light. Step C Step D Same account and password as Smart Life App Step E : When the named light is paired to Alexa from Smart Life, it will show on the device page (see the ‘smart light’ example).
English Step F: Now you can control the light with Alexa App on the setting page. To turn on or off the light, simply tap the bulb icon. Step G : You can also voice control the light with Alexa by giving these commands: “Alexa, turn on ‘device name’”,“Alexa, set ‘device name’ to ‘color’”, “Alexa, set ‘device name’ to ‘number’”. Device name is the one you give to the light. The light is named ‘smart light’ in this user guide.
English Part Four — How to control the light with Google Assistant? Step A: Login Google Assistant App, tap ‘Home Control’ on the left side bar page. Step B : Tap ‘+’ button on the bottom right to enter next page. Step C: Find ‘Smart Life’ from side bar list.
English Step D: Enter your Smart Life App account and password to bind Smart Life account to Google Assistant. Step E : You will find the named light shows on the Home Control page. Now you can control the light on Google Assistant App, or voice control it by giving these commands: “ok Google, turn on ‘device name’”, “ ok Google, set ‘device name’ ‘to color’”, “ ok Google, set ‘device name’ to ‘number’”. Device name is the one you give to the light. The light is named ‘smart light’ in this user guide.
English Contact Us Have some issue? No worries! Please reach us via these channels. Our customer services team is more than happy to help. www.ustellar.com support@ustellar.com Manufacturer: Shenzhen Ustellar Technology Ltd.
Step 1: Scan the QR code Step 2: Click E-manual PDF file Step 3: Read file online or download Go paper-free, make life easier, and do something good for the environment. Manual Version: UT88875-RGBW / V1.