LED Flood Light User Guide Thank you for ordering from stellar. Set-up is easy and takes only a few minutes by following the Instructions. A Warning (1) Please check if the light and the parts are intact before installation. (2) Make sure to cut off power before installation. (3) Please do not place this light in corrosive conditions. {4 If there Is any damage to the cord, please cut off the power and stop using It Immediately. (5) Please do not retrofit the light within the warranty period.
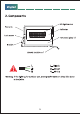
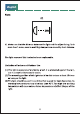
2. Components ~ LED light source Heat sink » Reflector Lock screw + Tempered glass lid Bracket + BAWL 3x0.824mm? L L—Black : @ Negress AR N N—White Warning: if the lighting for outdoor use, waterproof treatment should be done at the joints.
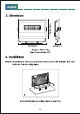
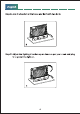
3, Dimension ugo/uwIEgT ‘Weight: Max Projected Area: 50m 4. Installation Step A: According to the spacing of two screw bits on the bracket, drill two holes on the mounting panel. Note: Maximum mounting height Is over 5m.
Step B: Aim the bracket at the holes and fix it with two bolts. Step C: Adjust the lighting direction up or down as per your need and plug Into power the light on.
01 Make sure that the distance between the light and the object being Fits ls more than 1 meter, so as to avoid high temperature caused by short distance. The light source of this luminary is not replaceable. Limitation of Indoor and Outdoor Use (1) This light is waterproof and damp proof. It Is protected against the rain, but it cannot be immersed In water. (2) The mounting position of this light should be able ta bear at least 10 times as heavy as the light.
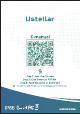
Stellar E-manual DE step: Scan the QR code Step 37 lick E-manual PDF file Step 3: Read fle online or download £5 Go pentagon, mas He case, i 4D SOUTHEAST OOK for TR TINES.