
Specifications


FAX Operation (Advanced)
OPERATION GUIDE 4-25
4
Cancelling the Forwarding Settings
To cancel the memory forwarding, follow the steps below.
1
Press the System Menu key.
2
Press [FAX] and then [Change] of Forward Setting.
3
Press [Off] and then [OK].
4
To exit from this setup, press [Close] several times until the System Menu
default screen is displayed.
Forwarding Detail Settings
With the forwarding settings, you can change the following detail settings.
Enable Time Setting
Register the times when the preset requirements become enabled and
disabled.
1
Follow steps 1 to 3 of Registration of Forwarding Settings (Forward All) on
page 4-18.
2
Press [Change] of Activating Time.
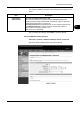
3
Select [All Day] or
[Preset Time].
To forward received
originals all day,
select [All Day],
press [OK] and then
go to step 5.
To set the forwarding
time, select [Preset
Time] and go to the
next step.
4
Press [+]/[-] to enter Start Time and End Time, and then press [OK].
NOTE: Enter the time on the 24 hours system.
5
Press [OK].
6
To exit from this setup, press [Close] several times until the System Menu
default screen is displayed.
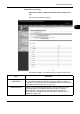
Status
Requirement :FAX C - Activating Time
Specify the time for activating the requirements.
Print or f orward the faxes received during the preset
time according to the requirements.
Cancel OK
10/10/2007 10:00
All Day
Preset Time
Start Ti me
:
:
0 0
0 0
End Tim e