
User's Manual


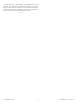
Table Of Contents

UTC. All Rights Reserved. 4 P/N 0000000 – Rev. A – 06 Nov 12
extend test time, fire the tester at the sensor at least once a
minute.
D. The control panel will beep and display the number of RF
packets received.
E. At the control panel, exit sensor test mode.
Sensor Test Mode - To put the sensor in sensor test mode, do the
following:
A. The tester has a different setting for each type of glass. Set the
tester for tempered or laminated glass unless you are certain
that all the glass to be protected is plate glass.
B. Hold the tester near the surface of the glass to be protected
and aim the speaker at the sensor. Be sure the tester is at the
point on the glass farthest from the detector. If closed drapes
or curtains are present, hold the tester behind them.
Press the test button on the tester. The LED on the sensor should stay
on for 4 seconds to indicate the glass is within detection range of the
sensor. If the LED does not stay on for 4 seconds, move the sensor and
retest.
If the sensor will not activate within its stated range of coverage, check
for battery strength in the tester. A new tester battery will likely restore
range. You may need to use additional sensors to achieve adequate
coverage.
The sensor will automatically change from test mode to normal mode
approximately one minute after it last hears the tester. In normal mode
the LED does not blink unless it hears a loud sound. In normal mode,
the sensor will not trip to the tester, unless the tester is held next to the
sensor. Each time the sensor alarms, it also goes into test mode for one
minute.
Room acoustics can artificially extend the range of a glass break
sensor. The specified range of the sensor has been established for
worst-case conditions. While the sensor will likely function at additional
range, it may miss a minimum output break, or room acoustics may
change at some future time, bringing the sensor range back into
normal 20 ft. (6 m) conditions. Do not exceed the rated range of the
sensor, regardless of what the tester shows.
8. Defaulting the Detector
This step should only be performed by a qualified service technician.
A. Remove the top cover from the product.
B. Remove the battery.
C. Press the enrollment switch in the RF circuit inside the product
and hold until you replace the batteries.
D. Replace the battery while still pressing the enrollment switch
then release the switch. The RF Module LED flashes three times
to signal the product is defaulted and not paired with a control
panel.
E. Replace the top cover.
9. Viewing Zone Event History
To view event history:
A. Tap the Security widget on the Home screen.
B. Tap the History tab. The Zone Event History shows the event
history.
10. Disabling Zones
The system can bypass a zone, so the zone is not monitored when the
system is armed. This is useful when a sensor is being repaired. You
can only change the Bypass state of a zone when the system is
disarmed.
The system continues to log the activity of bypassed zones in the Event
History (see “View Zone Event History,” above).
To bypass a zone:
A. With the system disarmed, tap the Security app on the Home
screen.
B. Tap the Turn Zone Off button for the smoke alarm. The Turn Zone
Off button changes to Turn Zone On.
C. When the system is disarmed, the Security Status header shows
that some zones have been bypassed.
11. Deleting the Product from the Control Panel
Deleting a sensor from the premises removes it from being monitored
by the customer’s system. This is not the same as disabling (bypassing)
a sensor. You should delete a sensor only:
o If the product is being removed from the premises
o To reset the product to factory default settings by deleting the
product and re-adding it immediately.
To delete a product from the system:
A. Contact Customer Care to obtain the Premise Passphrase for
the current customer account.
B. Perform steps A through D in Step 6, “Adding to the Control
Panel.”
C. When the Technician Settings menu appears, select Sensors
& Zones > Delete a Sensor/Zone. The Premise Passphrase
keyboard appears.
+
RF LED