
Installation Guide


NX-1700E Card Reader
9
LED1 on any enabled readers will begin to flash. Scan the card designated for the entered user. If the
user card is not already in the system, it will be added and mapped to the entered user number and
LED1 will stop flashing. If the card is already in the system, the reader will triple beep and LED1 will
continue flashing. After about 40 seconds, all the readers in the system will be updated with the new user
card information.
ADDING USER W/AUTO-INCREMENT
To add multiple users, enter [CANCEL] followed by the 3-digit “user number” of the first user to be
entered if control is programmed for 4-digit user codes or followed by [0]-[0] and the 3-digit “user
number” of the first user to be entered if control is programmed for 6-digit user codes. A total of 4 or 6
digits must be entered depending on the programming of the control panel; the first being the [CANCEL]
key, the last three being the “user number” of the first user to be entered. If a valid user number is
entered, LED1 on any enabled readers will begin to flash. Scan the card designated for the entered user.
If the user card is not already in the system, it will be added and mapped to the entered user number and
LED1 will continue flashing indicating that the next user card can be scanned for the next user number. If
the card is already in the system, the reader will triple beep and LED1 will continue flashing; the user
number is not incremented in this case. After about 40 seconds of no cards being scanned, all the
readers in the system will be updated with the new user card information.
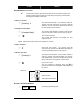
DELETE ONE USER
To delete a single user, enter [EXIT] followed by the 3-digit “user number” if control
is programmed for 4-digit user codes or followed by [0]-[0] and the 3-digit “user
number” if control is programmed for 6-digit user codes. A total of 4 or 6 digits must
be entered depending on the programming of the control panel; the first being the
[EXIT] key, the last three being the “user number”. If a valid user number is entered,
LED1 on any enabled readers will begin to flash. Scan any card. The user card
information for the entered user number will be cleared and LED1 will stop flashing.
After about 40 seconds, all the readers in the system will be updated with the new
user card information.
VIII. PROGRAMMING LOCATIONS
LOCATION 0PROGRAMMING THE SCAN FUNCTIONS
(3 segments of binary data) Location 0 is used to select the particular function(s) that are activated when
a card is scanned. More than one function may be selected. If more than one function is selected, they
will execute in order from function 1 to function 8.
Segment 1 Single Scan Function
Program the functions that are performed when a card is scanned once.
LED 1 - "On" to send Code Entry function to the control panel. (Default is “On”)
LED 2 - "On" to activate the Armed Away mode.
LED 3 - "On" to activate the Armed Stay mode.
LED 4 - "On" to send the Disarm function to the control panel.
LED 5 - "On" to send Auxiliary Function #1 to the control panel.
LED 6 - "On" to send Auxiliary Function #2 to the control panel.
LED 7 - "On" to broadcast an X-10 function (see Location 241 for programming).
LED 8 - "On" to activate the relay driver output.
Segment 2 Double Scan Function
Program the functions that are performed when a card is scanned twice within the 2 Scan Hold Time
(Location 244, Segment 1). The descriptions of the options are the same as for Single Scan Function.
(Default is 1)
If an
individual
keeps the
card,itcan
still be
deleted.