
User manual


5BChapter 6: Configuring the live mode display
42 TruVision DVR 60 User Manual
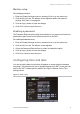
Table 13: Description of the Time screen
Option Description
Time zone Select the time zone of the DVR from the drop-down list.
Date/time format Select the date format from the drop-down list. Default format is DD-MM-
YYYY.
Date/time Select the date and time to be displayed on-screen and saved on
recordings.
Click the date icon on the right of the date list box. A calendar appears.
Click the required date.
In the time row select the correct time to be displayed.
Menu timeout This is the length of time a menu is displayed on-screen. Only available for
the main monitor. Default is five minutes.
Select the required timeout period.
Enable DST Click the check box to enable or disable daylight savings time (DST).
From / to Set the duration of DST.
Enter the start and end dates and time for daylight savings.
DST BIAS Set the amount of time to move DST forward from the standard time.
Default is 60 minutes.
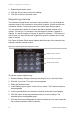
To set up the system time and date:
1. Enter the Display Settings screen by selecting Display in the main menu.
2. Click the Time tab. The Time screen appears. Modify the required settings.
3. Click the Apply button to immediately implement the changes.
4. Click OK to save the changes and return to the main menu.
Changing the instant playback time
You can quickly replay the last few minutes of recorded video. Use this menu to
set the exact replay period. The time options are between one to five minutes
from actual time. Default is one minute.
To change the instant playback time:
1. Enter the Display Settings screen by selecting Display in the main menu.
2. Click the Time tab. The Time screen appears.
3. In the Instant Playback box select the desired replay period.
4. Click OK to return to the main menu.
Configuring display options
Use this screen to set up the different monitors as well as the multiscreen, and
dwell time options. You can also enable audio output.