
Installation Guide
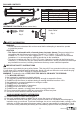
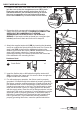

1.
Using a flathead screwdriver (not included), carefully pry off the
plastic cap that covers the “Power-In” port on the end of the
fixture.
2.
WARNING: DO NOT plug the power cord into the power supply
before completing the installation. The power cord (D) has a
grounded plug at one end and a connector plug at the other
end. FIRST: Insert the connector plug into the power port
located near the on/off switch at the end of the fixture (A). The
cord connector plug will ONLY fit into this power port. When
fully inserted, the catch on the top of the connector plug will
click into the power port. SECOND: Plug in the power cord into
an outlet. Installation is complete.
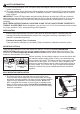
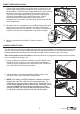
2.
Use a nail or awl to dimple the surface to help guide the wood
screws (AA). Either drive the screws directly into the surface or
drill two 1/16 in. pilot holes to make installing the screws easier.
The screws must be driven in straight. Tighten until 3/8 in. of the
screws are protruding below the surface. Place the large end of
the keyhole slots over the screw and slide until the screws are
engaged in the narrow ends of the slots. If the fixture is loose,
remove it and incrementally tighten until the fixture is secure.
Direct Wire Installation Only: Do not complete mounting
installation until the wiring steps are completed.
DIRECT WIRE INSTALLATION
PLUG-IN INSTRUCTIONS
Hardware Used
Wood Screw x 2
AA
15. Do not use an extension cord. Use power strip with integral overcurrent protection to supply
power to the fixture.
16. The total wattage of ALL the fixtures linked together in one chain should NOT exceed 360 watts.
Exceeding the total wattage will result in a hazardous situation. Fixture wattage can be found on
back of fixture.
IMPORTANT: These LED light heads use light emitting diodes to provide light. LEDs are electronic
semiconductors and do not have a filament that can burn out like an ordinary light bulb. As such, the
LED light heads can last up to 50,000 hours when used intermittently, and therefore, never need
replacing.
SAVE THESE INSTRUCTIONS IN A LOCATION CLOSE TO THE LIGHT FIXTURE TO REFER TO
THEM AT A LATER TIME. Before installation, plug in fixture to a 120 V, 60 Hz electrical outlet to check
for proper operation. Then, unplug and begin the installation.
1.
Locate the mounting keyhole slots on the back of the fixture. Measure the center-to-center
distance to determine the distance the wood screws need to be installed. Measure and mark the
corresponding placement on the mounting surface. NOTE: The wire compartment cover can be
opened on the fixture and trace the perimeter of keyhole slots.
TRADITIONAL MOUNTING INSTALLATION
1
2
A
D
AA
1.
Disconnect power to the electrical box and remove the old fixture. If more than two wire leads are
present, keep track of which wires were connected together. WARNING: DISCARD THE POWER
CORD to avoid a dangerous situation.
Locate the fixture position and drill pilot holes at this time for direct wire installation.
3/8”
2
Lowes.com
4