
Installation Guide

The first fixture is now fully installed and powered. It is now possible to link additional fixtures to this
first unit. An 18 inch linking cord (E) has been provided with each fixture. Ensure that the distance
between additional fixtures does not exceed the length of the connector cord (18 inches).
Shut off the power to the first fixture, either direct wired or plugged-in to house electrical system,
prior to installing the linking cord.
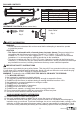
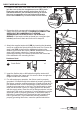
1. Using a flathead screwdriver, carefully pry off the plastic cover
that protects the “Power-In” port on the fixture being added.
Carefully pry off the plastic cover that protects the “Power-Out”
port on the the fixture it is being linked to.
3.
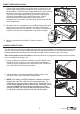
NOTE: The linking cord (E) is fitted with a distinct connector
plug at each end. The cord can only connect one way. Try
inserting one end of the linking cord into the “Power-Out” port
on the fixture installed ahead of the this one. If that fails, try the
other end. DO NOT force the plugs into either port. When
correctly inserted, the plug will insert smoothly and the catch
on top of the connector plug will click and lock into place.
2. Using the same mounting installation method used on the
previous fixture, mount the fixture being linked.
LINKING INSTRUCTIONS
DIRECT WIRE INSTALLATION
1
3
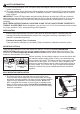
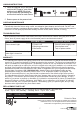
7. Connect the supply leads from flexible whip or NM cable to the
fixture leads using the pre-installed push-in connectors as per
the illustration. Insert the black supply lead into the open hole in
the push-in connector pre-attached to the black fixture wire.
Insert the white supply lead into the open hole in the push-in
connector pre-attached to the white fixture wire. All wire
connections should be made and stowed inside wire
compartment of the fixture. Carefully push all the wires into the
wire compartment.
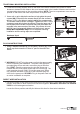
8. Re-attach the wire compartment cover (B) by hinging the back
edge of the cover with the channel in the back of the fixture
chassis and lowering it into position. Push both locking tabs (C)
inward to lock the wire compartment cover back into place.
9. Mount to predetermined location. Restore power to
fixture.
8
C
E
7
B
B
Lowes.com
6