
Installation Guide


EXISTING CONSTRUCTION (JOIST/ABOVE CEILING ACCESS APPLICATION) INSTALLATION
INSTRUCTIONS
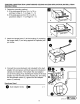
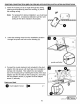
14. Strip 1/2 in.
of
insulation from wire ends. Grip the wire
firmly and push the stripped end
of
the wire into the
open port
of
two-port quick connect (GG) or three-port
quick connect (HH). Use only one stripped end
of
the
wire per port. Verify the stripped end
of
the wire is fully
inserted
to
the back
of
two-port quick connect (GG) or
three-port quick connect (HH).
Hardware Used
G Two-port Quick Connect
~
x3
~
Three-port Quick
Connect~
x 1
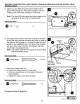
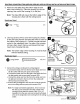
15. Install the previously removed wire housing cover
(J)
into the housing (A) and secure using the wire housing
screw (FF). Ensure all
of
the wiring connections are
inside
of
the housing (A) or under the wire housing
cover (J).
Hardware Used
48
Wire Housing Screw
~
X 1
Proceed to FINAL INSTALLATION INSTRUCTIONS
on
page 18.
house
wires
0
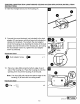
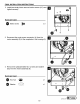
EXISTING CONSTRUCTION (BELOW CEILING APPLICATION) INSTALLATION INSTRUCTIONS
1. Perform one
of
the following steps based on the
installation type:
a.
If
there is an existing fan
in
place, remove the existing
fan and ensure that the opening
in
the ceiling is large
enough for the new fan. Use the template (G)
provided to determine
if
the existing hole in the ceiling
is large enough for this new
fan
to
be installed. You
may
be
required
to
make the hole larger
to
match the
size
of
the template (G) provided.
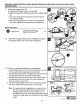
Note:
If
the existing hole from the previous fan is
larger than the template (G), the hole must
be
made smaller
to
match the template (G)
provided.
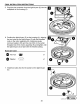
b.
lfthere
is not an existing fan
in
place, choose the
location
in
the ceiling and cut an opening according
to
the size
of
the template (G). Ensure that one edge
of
the opening aligns with the edge
of
the joist.
15
joist
......
...
...
·~
__________
..._
...
~
UTILI
TECH'
]
L
o
w
es
.
co
m
~
-·-: