
Installation Guide


EXISTING CONSTRUCTION (JOIST/ABOVE CEILING ACCESS APPLICATION) INSTALLATION
INSTRUCTIONS
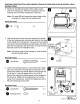
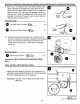
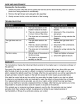
4. Place two clips (BB) along the bottom edge
of
each
side
of
the
housing (A). Place the housing (A) into the
opening, then
mount
the housing (A) to
the
joist.
Note:
The
clips (BB) will ensure
the
bottom edge
of
the
housing (A) is flush with
the
ceiling board.
Hardware Used
QD
Clip
~
x4
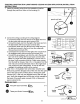
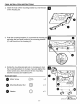
5.
Use long
screws
(AA) to
screw
the housing (A) directly
to the
joist
using keyhole
mounting
tab
holes
or
the
holes
on
the
inside
of
the housing (A). One side
of
the housing
(A)
has
four
holes and keyhole mounting slots, the
other
side
of
the housing (A)
has
three holes. Choose the side
that
best
works
for
the installation area.
Note: The bottom edge
of
the housing (A)
must
be flush
with the finished ceiling.
Hardware Used
• Long
Screw
OJ)j))))\)))))\))))llllllll)ll>
x 3
or
4
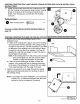
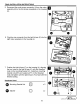
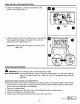
6. Loosen
the
housing
screws
(JJ)
and
extend the
hanger
bars (D) to
the
joist.
If
the
joist
space
is less than 15 in.,
connect
the inside
and
outside pieces
of
the
hanger
bar
(D) at hole A.
If
the
joist
space is from 15. to
20
in.,
connect
the inside
and
outside pieces
of
the
hanger
bar
(D) at hole
B.
Tighten the housing
screws
(JJ) on the
inside
of
the
housing
(A). Secure
the
hanger
bars (D)
to
the
joist
using long
screws
(AA).
Hardware Used
• Long
Screw
fD
Housing
Screw
~DJ))J
ll))l
II
I))
I
II
I
I)
I I
I)
I}Jl>
@miD
x2
x2
11
•
hole A
~
4 holes
hole B
I
"
3
holes
~
UTILI
TECH'
]
Low
es.com
l!l)
-·-: