
Installation Guide


PREPARATION
Before beginning assembly
of
the product, make sure all parts are present. Compare parts with the
package contents list and hardware contents list.
If
any part is missing
or
damaged, do not attempt to
assemble the product.
Estimated Installation Time:
30
to 60 minutes
Tools Required for Assembly (not included): Phillips screwdriver, Hammer, Nails, Duct tape, Saw,
Measuring tape, Pencil, Ruler
INITIAL INSTALLATION INSTRUCTIONS
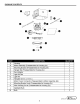
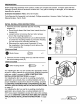
1. Remove the
motor
assembly (B) and mounting
bracket (C):
a. Remove and discard the three foam inserts from the
housing (A).
b.
Loosen but do not remove the two motor screws
(CC)
in
the mounting bracket (C).
c. Turn the mounting bracket lock
(J) counterclockwise
to unlock the mounting bracket (C) from the housing
(A) and remove the mounting bracket (C).
d. Disconnect the motor power connector (I) from
the receptacle in the housing (A) and remove the
motor assembly (B).
Hardware Used
(D Motor Screw
x2
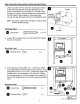
2. Remove the wire housing screw (II) and then remove
the wire housing
cover
(K).
Hardware Used
• Wire Housing Screw
X 1
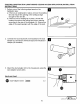
For installing the fan in a new construction application where
drywall or ceiling material
is
not previously installed (exposed
joists are visible), proceed to
NEW CONSTRUCTION
INSTALLATION INSTRUCTIONS on page 7.
For installing the fan to a joist in an existing construction
application (you already have a ceiling installed and have
proper installation access from above the ceiling), proceed
to
EXISTING CONSTRUCTION (JOIST/ABOVE CEILING
ACCESS APPLICATION) INSTALLATION INSTRUCTIONS
on page 10.
For installing the fan to a joist in an existing construction
application (you already have a ceiling installed and DO
NOT
have proper installation access from above the ceiling),
proceed to
EXISTING CONSTRUCTION (BELOW CEILING
APPLICATION) INSTALLATION INSTRUCTIONS on page
13.
6
~
UTILI
TECH"
J
Lowes .com
~
-·-