
Operating Guide


4
Before beginning assembly of product, make sure all parts are present. Compare parts with package
contents list. If any part is missing or damaged, do not attempt to assemble the product.
Estimated Assembly Time: 5 minutes
No Tools Required for Assembly.
PREPARATION
INSTALLATION INSTRUCTIONS
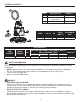
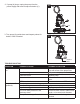
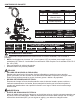
2. Attach 1-1/4 in. pipe or tting (not included)
to pump (A) discharge, or screw the garden
hose adapter/check valve (B) into the pump
discharge.
NOTE: Be sure the garden hose adapter/check
valve is installed with the word ‘Top’ facing up.
Discharge
1-1/4 in.
Pipe
2
B
A
For best performance, use discharge hose of 50 ft. or less. If the discharge runs up hill, or is extra
long, use larger diameter discharge hose or rigid pipe.
NOTE: Large diameter, short discharge hoses or pipe will provide better water ow rates than small
diameter, long discharge hoses or pipe.
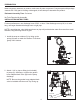
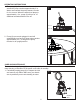
1. Install the snap-on strainer (C) by lining up the
pump (A) base to match the strainer. Push down
gently until it latches.
Base
1
A
C