ITEM #0955642 UTILITY TRANSFER PUMP MODEL #148007 Español p. 10 ATTACH YOUR RECEIPT HERE Serial Number Purchase Date SW1112 C Questions, problems, missing parts? Before returning to your retailer, call our customer service department at 1-866-994-4148, 7:30 a.m. - 5:00 p.m., EST, Monday - Friday.
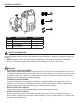
PACKAGE CONTENTS B A C D PART A B C D DESCRIPTION Pump Garden Hose Adapters Hose Strainer Motor Brushes QUANTITY 1 2 1 2 SAFETY INFORMATION Please read and understand this entire manual before attempting to assemble, operate or install the product. • NOTE: Pumps with the “UL” Mark and pumps with the “US” mark are tested to UL Standard UL778. CSA certified pumps are certified to CSA Standard C22.2 No. 108. (CUS.) • • • • DANGER ELECTRICAL SHOCK HAZARD. This pump is non-submersible.
• • • • • • • • • • • WARNING ELECTRICAL SHOCK ALERT. Before installing this product, have the electrical circuit checked by an electrician to ensure proper grounding. All electrical installations must conform to the National Electric Code and all local codes. ELECTRICAL SHOCK ALERT. Connect this product to a properly-grounded 115 volt circuit equipped with a Ground Fault Circuit Interrupter (GFCI) device. ELECTRICAL SHOCK ALERT.
CAUTION • PERSONAL INJURY OR PRODUCT DAMAGE MAY RESULT. This pump operates on 115 volts. Make certain that the power source conforms to the requirements of your equipment. • PRODUCT DAMAGE MAY RESULT. The maximum temperature of the pumped liquid must not exceed 120°F (40°C). The minimum allowable temperature is 40°F (4°C). • PRODUCT DAMAGE MAY RESULT. Be sure the water source and piping are clear of sand, dirt, and scale. Debris will clog the pump and void the warranty.
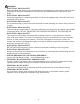
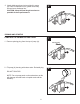
LOCATION 1. Pump (A) should be located within 15 ft. of the water source, and strainer (C) should be used at the end of the inlet line. 1 A NOTE: Make sure the inlet hose is NOT coiled or kinked above or below water level. The inlet line may be galvanized pipe, plastic pipe, or reinforced hose. Be sure there are no leaks in the inlet line, as this may reduce pump efficiency or prevent priming. Inlet line should be the same diameter as the discharge line, or larger.
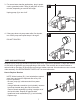
2. Attach discharge hose (not provided) to pump (A) outlet. A standard 3/4 in. garden hose may be used as a discharge line. CAUTION: Keep the total length as short as possible for best performance. 2 In A Out PRIMING AND STARTUP PUMP MUST BE PRIMED BEFORE USING! 1 1. Remove priming plug from the top of pump (A). Priming Plug A 2. Fill pump (A) housing with clean water. Reinstall plug. 2 DO NOT RUN DRY.
3. For normal water transfer applications, plug in power cord to grounded outlet. Pump (A) will prime in a few minutes, depending on suction line length. 3 Unplug pump (A) to turn it off. A 4. If the pump does not pump water after five minutes, turn off the pump and repeat steps 1 through 3. 4 DO NOT RUN DRY. A CARE AND MAINTENANCE Brushes (D) for pump (A) should be inspected after every 100 hours of operation. Pumps with excess of 100 hours of operation may stop operating or fail to start.
TROUBLESHOOTING PROBLEM Pump will not begin pumping or retain prime after operating, or stops pumping water. POSSIBLE CAUSE 1. Air leak in suction line. 2. Fittings are not tight. 3. Hose is kinked or looped. ump will not start P or run. 4. 5. 6. 7. 8. 9. 1. I nlet hose is out of the water. Clogged inlet. Inlet lift too high. Impeller blocked. Worn seal. Collapsed inlet hose. Blown fuse or circuit breaker. 2. Low line voltage. 3. W orn brushes. 4. Impeller blocked. 5. Defective motor.
WARRANTY This product is warranted for one year from the date of purchase. Subject to the conditions hereinafter set forth, the manufacturer will repair or replace to the original consumer, any portion of the product which proves defective due to defective materials or workmanship. This warranty does not cover replacement parts for failure due to normal wear and tear. To obtain warranty service, contact the dealer from whom the product was purchased.
ARTÍCULO #0955642 BOMBA DE TRANSFERENCIA PARA USO GENERAL MODELO #148007 ADJUNTE SU RECIBO AQUÍ Fecha de compra ¿Preguntas, problemas, piezas faltantes? Antes de volver a la tienda, llame a nuestro Departamento de Servicio al Cliente al 1- 866-994-4148, de lunes a viernes de 7:30 a.m. a 5:00 p.m., hora estándar del Este.
CONTENIDO DEL PAQUETE B A C D PIEZA A B C D DESCRIPCIÓN Bomba Adaptadores de manguera para jardín Tensor de manguera Cepillos de motor CANTIDAD 1 2 1 2 INFORMACIÓN DE SEGURIDAD Lea y comprenda completamente este manual antes de intentar ensamblar, usar o instalar el producto. • NOTA: Las bombas con la marca “UL” y con la marca “US” se prueban para cumplir con los estándares UL778 de UL. Las bombas con certificación CSA cumplen con el estándar CSA C22.2 No. 108. (CUS.
• • • • • • • • • • • ADVERTENCIA ALERTA DE DESCARGA ELÉCTRICA. Antes de instalar este producto, haga que un electricista revise su circuito para asegurarse de que la puesta a tierra sea adecuada. Todas las instalaciones eléctricas deben cumplir con el Código Nacional de Electricidad (NEC, por sus siglas en inglés) y con todos los códigos locales. ALERTA DE DESCARGA ELÉCTRICA.
PRECAUCIÓN • PODRÍAN PRODUCIRSE LESIONES PERSONALES O DAÑOS AL PRODUCTO. Esta bomba funciona con 115 voltios. Asegúrese de que la fuente de alimentación cumpla con los requisitos de su equipo. • SE PODRÍAN PROVOCAR DAÑOS EN EL PRODUCTO. La temperatura máxima del líquido bombeado no debe exceder los 40 °C (120 °F). La temperatura mínima permitida es 4 °C (40 °F). • SE PODRÍAN PROVOCAR DAÑOS EN EL PRODUCTO. Asegúrese de que el suministro de agua y la tubería no tengan arena, suciedad ni sarro.
UBICACIÓN 1. La bomba (A) se debe ubicar dentro de los 4,57 metros de la fuente de agua y el colador (C) se debe usar al final de la tubería de entrada. 1 NOTA: asegúrese de que la manguera de entrada NO esté enroscada ni torcida por encima del nivel del agua ni por debajo de este. Utilice únicamente tubos rígidos o mangueras reforzadas en la entrada de la bomba A C La tubería de entrada puede ser un tubo galvanizado, un tubo plástico o una manguera reforzada.
2. Fije la manguera de descarga (no se proporciona) a la salida de la bomba (A). Se puede usar una manguera para jardín estándar de 3/4 cm como tubería de descarga. 2 PRECAUCIÓN: Mantenga el largo total lo más corto posible para obtener un mejor rendimiento. Entrada A Salida CEBADO Y ARRANQUE ¡DEBE CEBAR LA BOMBA ANTES DE UTILIZARLA! 1 1. Retire de la parte superior de la bomba (A). Tapón de cebado A 2. Llene la carcasa de la bomba (A) con agua limpia. Vuelva a instalar el tapón.
3. Para las aplicaciones de transferencia de agua normales, conecte el cable de alimentación a un tomacorriente con conexión a tierra. La bomba (A) se cebará en unos minutos según el largo del tubo de succión. 3 Para apagar la bomba (A), desenchúfela. A 4. Si la bomba no bombea agua después de cinco minutos, apague la bomba y repita los pasos del 1 al 3. 4 NO HAGA FUNCIONAR LA BOMBA EN SECO.
SOLUCIÓN DE PROBLEMAS PROBLEMA CAUSA POSIBLE La bomba no 1. Hay una fuga de aire en el tubo de empieza a succión. bombear ni retiene el cebado luego del funcionamiento o deja de bombear 2. Los conectores no están apretados. agua. 3. L a manguera está torcida o tiene un bucle. 4. La manguera de entrada no tiene agua. 5. La entrada está obstruida. 6. La elevación de entrada es demasiado alta. 7. El impulsor está bloqueado. 8. El sello está gastado. 9. Manguera de entrada contraída.
GARANTÍA Este producto está garantizado durante un año desde la fecha de compra. Sujeto a las condiciones establecidas en el presente, el fabricante reparará o reemplazará, para el consumidor original, cualquier parte del producto que se compruebe que está defectuosa debido a defectos en los materiales o la mano de obra. Esta garantía no cubre las piezas de repuesto por falla debido a desgaste normal. Para obtener los servicios de garantía, póngase en contacto con el distribuidor donde adquirió el producto.