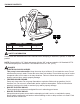
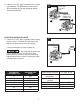
ITEM #0955585 BOOSTER UTILITY PUMP MODEL #148008 Español p. 12 ATTACH YOUR RECEIPT HERE Serial Number Purchase Date SW1116 B Questions, problems, missing parts? Before returning to your retailer, call our customer service department at 1-866-994-4148, 7:30 a.m. - 5:00 p.m., EST, Monday - Friday.
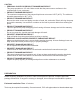
PACKAGE CONTENTS A PART A B DESCRIPTION Pump Garden Hose Adapters B QUANTITY 1 2 SAFETY INFORMATION Please read and understand this entire manual before attempting to assemble, operate, or install the product. NOTE: Pumps with the “UL” Mark and pumps with the “US” mark are tested to UL Standard UL778. CSA certified pumps are certified to CSA Standard C22.2 No. 108. (CUS.) • • • • DANGER ELECTRICAL SHOCK HAZARD. This pump is non-submersible. Keep the motor dry at all times. Do not wash the motor.
• • • • • • • • • • • WARNING ELECTRICAL SHOCK ALERT. Before installing this product, have the electrical circuit checked by an electrician to ensure proper grounding. All electrical installations must conform to the National Electric Code and all local codes. ELECTRICAL SHOCK ALERT. Connect this product to a properly-grounded 115 volt circuit equipped with a Ground Fault Circuit Interrupter (GFCI) device. ELECTRICAL SHOCK ALERT.
CAUTION • PERSONAL INJURY OR PRODUCT DAMAGE MAY RESULT. This pump operates on 115 volts. Make certain that the power source conforms to the requirements of your equipment. • PRODUCT DAMAGE MAY RESULT. The maximum temperature of the pumped liquid must not exceed 120°F (40°C). The minimum allowable temperature is 40°F (4°C). • PRODUCT DAMAGE MAY RESULT. Be sure the water source and piping are clear of sand, dirt, and scale. Debris will clog the pump and void the warranty.
GENERAL PUMP INFORMATION This pump is designed to sprinkle lawns and small gardens from lakes, ponds, or rivers, empty or fill stock tanks, remove standing water from flooded areas, transfer water or boost water pressure. Flammable liquids such as gasoline, chemicals, or corrosive liquids should never be used with this pump. The pump is NOT designed to operate underwater. SETUP 1. Before installing pump (A), have the electrical circuit checked by an electrician to ensure proper grounding.
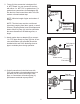
2. Pump (A) inlet connection is designed for 1 in. NPT thread. You can connect to the inlet with either 1 in. NPT PVC or garden hose. For garden hose connections, thread adapter (B) into the inlet. Seal connections with PVC-safe sealant or thread sealant tape. 2 Inlet with 1-in. NPT PVC NOTE: Minimize length of pipe and number of fittings. B A NOTE: The inlet hose must be a reinforced type when pumping from lakes, ponds, or small streams.
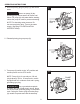
5. Connect 1 in. NPT pipe or garden hose to pump (A) discharge. For garden hose connections, thread adapter (B) into the discharge before connecting the hose. 5 Outlet with 1 in. NPT PVC Outlet with adapter and garden hose B A A BOOSTING WATER PRESSURE 6. C onnect 1 in. NPT pipe or garden hose to pump (A) as in step 2. Connect the other end of the inlet line to water supply such as a spigot. 6 Connect outlet pipe or hose to pump (A). Outlet Do not run pump (A) with outlet pipe or nozzle closed.
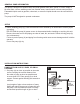
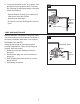
OPERATING INSTRUCTIONS 1. Remove priming plug on pump (A) and fill with water. 1 Never run pump (A) dry. Running pump without water will cause seal failure. Fill pump (A) with water before starting, unless the pump is used for pressure boosting. s Priming Port NOTE: For boosting water pressure: Do not remove priming plug. Turn on the water supply. (See Step 6 in INSTALLATION INSTRUCTIONS). A IL1858 2. Reinstall priming plug on pump (A). 2 Priming Plug A 3.
4. Turn pump (A) switch to the “on” position. If the pump does not pump water within 5 minutes, turn off pump (A) and repeat steps 1 through 4. Check the following: 4 Outlet - Vertical distance of pump (A) to water level must not be more than 20 feet. - Inlet line must be airtight. Inlet - All valves in inlet and discharge line must be open. A Maximum 20 ft. vertical distance Water source CARE AND MAINTENANCE Maintain adequate ventilation for the pump motor.
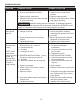
TROUBLESHOOTING PROBLEM Motor will not run. POSSIBLE CAUSE 1. Disconnect switch is off. 2. Fuse or circuit breaker is blown. CORRECTIVE ACTION 1. Be sure switch is on. 2. R eplace fuse or reset circuit breaker. 3. Starting switch is defective. 3. Replace starting switch. 4. W ires at motor are loose, disconnected 4. R efer to wiring instructions. Check or wired incorrectly. and tighten all wiring. Capacitor voltage may be hazardous.
WARRANTY This product is warranted for one year from the date of purchase or two years from the date of manufacture, whichever occurs first. Subject to the conditions hereinafter set forth, the manufacturer will repair or replace to the original consumer, any portion of the product which proves defective due to defective materials or workmanship. This warranty does not cover replacement parts for failure due to normal wear and tear.
ARTÍCULO #0955585 BOMBA REFORZADORA PARA USO GENERAL MODELO #148008 ADJUNTE SU RECIBO AQUÍ Fecha de compra ¿Preguntas, problemas, piezas faltantes? Antes de volver a la tienda, llame a nuestro Departamento de Servicio al Cliente al 1- 866-994-4148, de lunes a viernes de 7:30 a.m. a 5:00 p.m., hora estándar del Este.
CONTENIDO DEL PAQUETE A PIEZA A B DESCRIPCIÓN Bomba Adaptadores de manguera para jardín CANTIDAD 1 2 B INFORMACIÓN DE SEGURIDAD Lea y comprenda completamente este manual antes de intentar ensamblar, usar o instalar el producto. NOTA: Las bombas con la marca “UL” y con la marca “US” se prueban para cumplir con los estándares UL778 de UL. Las bombas con certificación CSA cumplen con el estándar CSA C22.2 No. 108. (CUS.) • • • • PELIGRO PELIGRO DE DESCARGA ELÉCTRICA. Esta bomba no es sumergible.
• • • • • • • • • • • • ADVERTENCIA ALERTA DE DESCARGA ELÉCTRICA. Antes de instalar este producto, haga que un electricista revise su circuito para asegurarse de que la puesta a tierra sea adecuada. Todas las instalaciones eléctricas deben cumplir con el Código Nacional de Electricidad (NEC, por sus siglas en inglés) y con todos los códigos locales. ALERTA DE DESCARGA ELÉCTRICA.
PRECAUCIÓN • PODRÍAN PRODUCIRSE LESIONES PERSONALES O DAÑOS EN EL PRODUCTO. Esta bomba funciona con 115 voltios. Asegúrese de que la fuente de alimentación cumpla con los requisitos de su equipo. • PODRÍAN PRODUCIRSE DAÑOS EN EL PRODUCTO. La temperatura máxima del líquido bombeado no debe exceder los 40 °C (120 °F). La temperatura mínima permitida es 4 °C (40 °F). • PODRÍAN PRODUCIRSE DAÑOS EN EL PRODUCTO. Asegúrese de que el suministro de agua y la tubería no tengan arena, suciedad ni sarro.
INFORMACIÓN GENERAL DE LA BOMBA Esta bomba está diseñada para rociar céspedes y jardines pequeños desde lagos, estanques o ríos, vaciar o llenar tanques de acopio, retirar el agua estancada de áreas inundadas, transferir agua o aumentar la presión del agua. Nunca se deben usar líquidos inflamables como gasolina, químicos o líquidos corrosivos con esta bomba. La bomba NO fue diseñada para usarse bajo el agua. INSTALACIÓN 1.
2. La conexión de entrada de la bomba (A) está diseñada para una rosca NPT de 1 pulgada. Puede conectarla a la entrada con el PVC NPT de 1 pulgada o la manguera para jardín. Para las conexiones de la manguera para jardín, coloque un adaptador roscado (B) en la entrada. Selle las conexiones con sellador para tubo seguro de PVC o cinta selladora para roscas. NOTA: minimice la longitud del tubo y la cantidad de conexiones.
5. Conecte el tubo NPT de 1 pulgada o la manguera para jardín a la descarga de la bomba (A). Para las conexiones de la manguera para jardín, coloque un adaptador roscado (B) a la descarga antes de conectar la manguera. 5 Salida con PVC NPT de 1 pulgada Salida con adaptador y manguera para jardín B A A AUMENTO DE LA PRESIÓN DEL AGUA 6. C onecte el tubo NPT de 1 pulgada o la manguera para jardín a la bomba (A), como en el paso 2.
INSTRUCCIONES DE FUNCIONAMIENTO 1. Retire el tapón de cebado de la bomba (A) y llene con agua. 1 Nunca haga funcionar la bomba (A) en seco. Si hace funcionar la bomba sin agua, se puede producir una falla en el sellado. Llene la bomba (A) con agua antes de arrancarla, a menos que se use para aumentar la presión. NOTA: para aumentar la presión del agua: no retire el tapón de cebado. Abra el suministro de agua (consulte el paso 6 en INSTRUCCIONES DE INSTALACIÓN). 2.
4. Coloque el interruptor de la bomba (A) en la posición de encendido. Si la bomba no bombea agua dentro de los 5 minutos, apague la bomba (A) y repita los pasos 1 a 4. Revise lo siguiente: 4 Salida - La distancia vertical de la bomba (A) al nivel del agua no debe superar los 6,09 metros. Entrada - La tubería de entrada debe estar cerrada herméticamente. - Todas las válvulas en la tubería de entrada y de descarga deben estar abiertas.
SOLUCIÓN DE PROBLEMAS PROBLEMA CAUSA POSIBLE ACCIÓN CORRECTIVA El motor no funciona. 1. E l interruptor de desconexión está apagado. 2. El fusible o el interruptor de circuito están fundidos. 3. El interruptor de arranque está dañado. 1. Asegúrese de que el interruptor esté encendido. 2. Reemplace el fusible o restablezca el interruptor circuito. 3. Reemplace el interruptor de arranque. 4. Los cables del motor están sueltos, de4.
GARANTÍA Este producto cuenta con una garantía de un año a contar de la fecha de compra, o de dos años a contar de la fecha de fabricación, lo que ocurra primero. Sujeto a las condiciones establecidas en el presente, el fabricante reparará o reemplazará, para el consumidor original, cualquier parte del producto que se compruebe que está defectuosa debido a defectos en los materiales o la mano de obra. Esta garantía no cubre las piezas de repuesto por falla debido a desgaste normal.