ITEM #0689347 IR CARBON FIBER UTILITY HEATER MODEL #PHB-1500 Français p. 14 Español p. 27 US ATTACH YOUR RECEIPT HERE Serial Number Purchase Date Questions, problems, missing parts? Before returning to your retailer, call our customer service department at 1-866-994-4148, 8 a.m. - 6 p.m., EST, Monday - Thursday, 8 a.m. - 5 p.m., EST, Friday. AB15495 Lowes.
NOTE SAFETY INFORMATION This product can be freestanding or wall mounted. SPECIFICATION Voltage Rating Power Consumption Unit Size Unit Weight 120 V (60 Hz) 1,500 W 16.3 in. (W) x 25.8 in. (D) x 14.8 in. (H) 11.7 lbs. SAFETY INFORMATION Please read and understand this entirely before attempting to assemble,operate or install the product.
PACKAGE CONTENTS HARDWARE CONTENTS (shown actual size) AA BB M6x30 Screws Qty:10 ST4x35 Screws Qty:2 CC Diameter 8 (mm) Wall anchors Qty:2 DD Hexagonal screwdriver Qty:1 PREPARATION Before beginning assembly of product, make sure all parts are present. Compare parts with package contents list and hardware contents list. If any part is missing or damaged, do not attempt to assemble the product. Estimated Assembly Time: freestanding assembly, 10 minutes; wall-mounted assembly, 3 minutes.
ASSEMBLY INSTRUCTIONS - FREESTANDING 1. Attach the top tube (F), the connecting tube (B) and two bottom tubes (D) to one of the support tubes (A) with four M6x30 screws (AA). Tighten the screws using the hexagonal screwdriver (DD). Hardware Used AA M6x30 Screws Hardware Used AA x4 M6x30 Screws x1 3 1 2. Turn over the assembly from Step 1. Slide the rubber connector (E) to the middle of the top tube (F).
ASSEMBLY INSTRUCTIONS - FREESTANDING ASSEMBLY INSTRUCTIONS - WALL-MOUNTED 5. Remove the two middle pre-assembled screws from the back of the heater (C) by phillips screwdriver (not included). Attach the heater to the connecting tube (B) using these two screws by phillips screwdriver (not included). 1. Remove the four pre-assembled screws from the back of heater (C), then attach the handle (I) and the wall mount (J) to the heater (C) using these four screws.
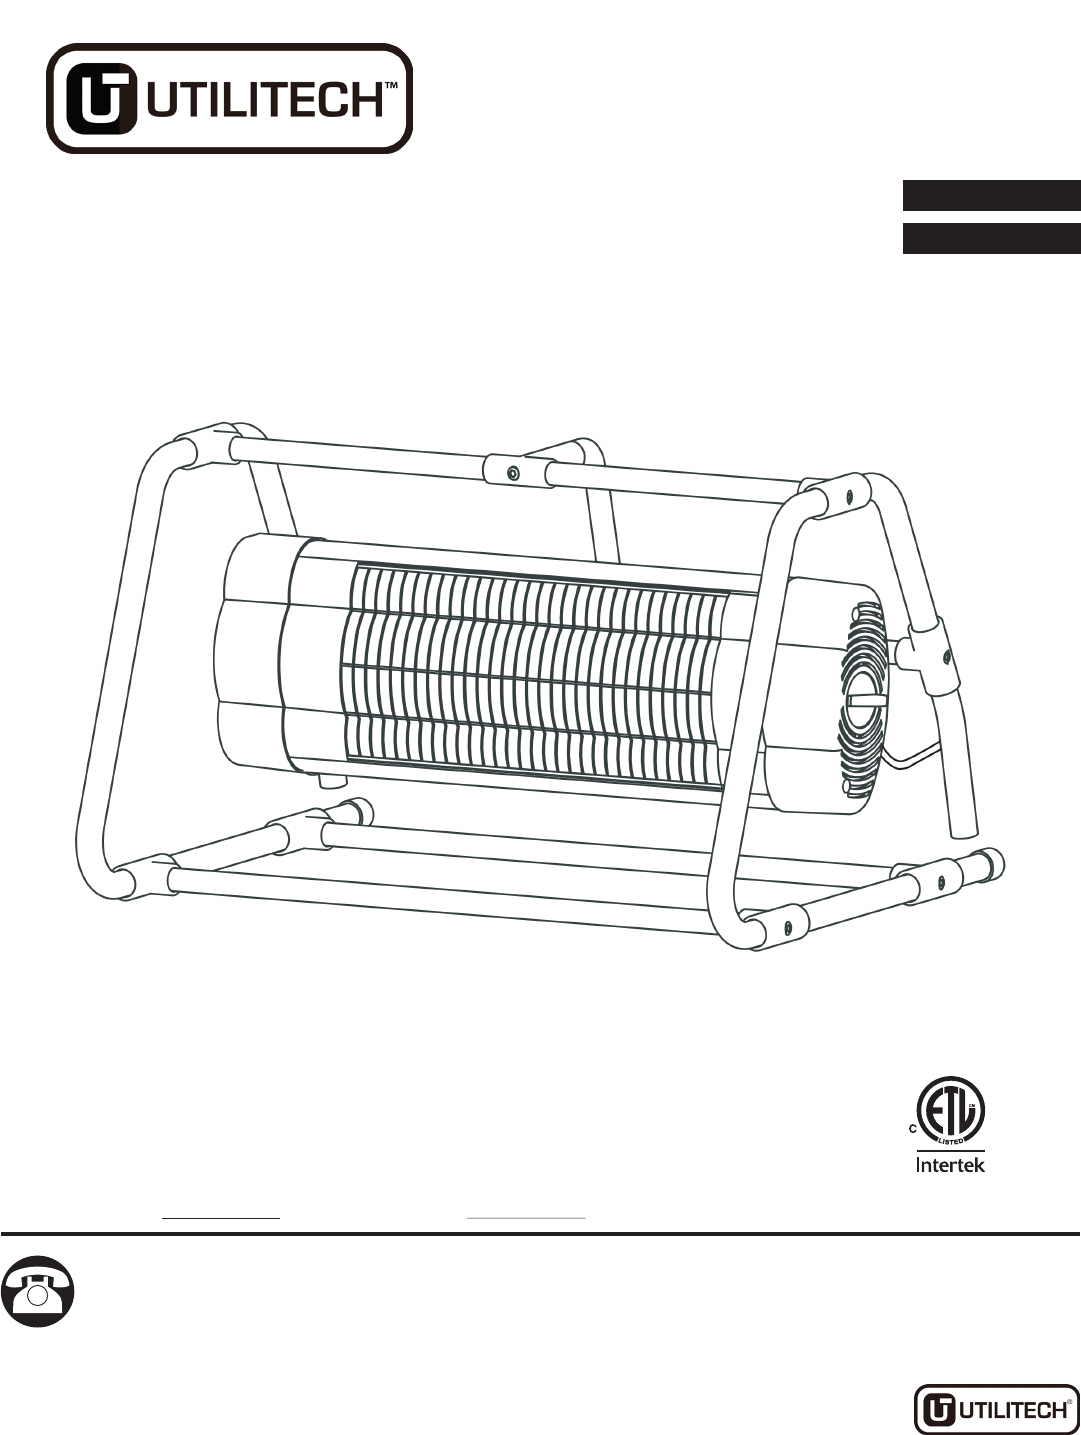
After assembly, the product should appear like this: TROUBLESHOOTING PROBLEM POSSIBLE CAUSE The heater does not 1.The power cord is not plugged in. turn on. 2.The electricity at the main fuse box is not working. 3.The thermostat on the heater is set lower than the room temperature. CORRECTIVE ACTION 1.Plug the power cord into an electrical outlet. 2.Check the electricity at the main fuse box. 3.Increase the thermostat temperature on the heater for a higher heat setting.
WARRANTY REPLACEMENT PARTS LIST • Use on extension cords/timers/surge protectors/GFCI • Outdoor applications • Normal wear/tear/weathering • Pet/consumer accidents The manufacturer shall not be liable for any loss due to use (or misuse) of the heater or other incidental or consequential costs, expense or damages without irrefutable foundations. Under no circumstances shall the manufacturer or any of its representatives be held liable for injury to any person or damage to any property, however arising.
ARTICLE #0689347 RADIATEUR INFRAROUGE EN FIBRE DE CARBONE À USAGE GÉNÉRAL MODÈLE #PHB-1500 US JOIGNEZ VOTRE REÇU ICI Numéro de série Date d’achat Des questions, des problèmes, des pièces manquantes? Avant de retourner l’article au détaillant, appelez notre service à la clientèle au 1 866 994-4148, entre 8 h et 18 h (HNE), du lundi au jeudi, ou entre 8 h et 17 h (HNE) le vendredi. Lowes.
REMARQUE CONSIGNES DE SÉCURITÉ Ce produit peut être autoportant ou fixé à un mur. CARACTÉRISTIQUES Tension nominale Consommation d’énergie Volume de l’article Poids de l’article 120 V (60 Hz) 1 500 W 41,4 cm (l) x 65,53 cm (P) x 37,59 cm (H) 5,3 kg CONSIGNES DE SÉCURITÉ Assurez-vous de lire et de comprendre l’intégralité des informations suivantes avant de tenter d’assembler, d’installer ou d’utiliser l’article.
disponible. NE CONTOURNEZ PAS CETTE MESURE DE SÉCURITÉ DE LA FICHE DE MISE À LA TERRE. QUINCAILLERIE INCLUSE (grandeur réelle) AVERTISSEMENT : Il est tout à fait normal que le cordon d’alimentation soit chaud au toucher. Toutefois, si la fiche n’est pas correctement enfoncée dans la prise, elle peut surchauffer. Si cela se produit, tentez de brancher la fiche sur une autre prise. Faites appel à un électricien qualifié afin de vérifier si la prise est abîmée.
INSTRUCTIONS POUR L’ASSEMBLAGE – MONTAGE AUTOPORTANT 1. Fixez le tube supérieur (F), le tube de jonction (B) et les deux tubes inférieurs (D) à l’un des tubes de soutien (A) à l’aide de quatre vis M6 de 30 mm (AA). Serrez les vis à l’aide du tournevis hexagonal (DD). 3. Retournez de nouveau l’ensemble. Fixez le côté long du tube de poignée (G) au tube supérieur (F) à l’aide d’une vis M6 de 30 mm (AA). Serrez la vis à l’aide du tournevis hexagonal (DD).
INSTRUCTIONS POUR L’ASSEMBLAGE – MONTAGE AUTOPORTANT INSTRUCTIONS POUR L’ASSEMBLAGE – MONTAGE MURAL 5. Retirez les deux vis préassemblées au milieu de l’arrière du radiateur (C) à l’aide d’un tournevis cruciforme (non inclus). Fixez le radiateur au tube de jonction (B) à l’aide de ces deux vis, au moyen d’un tournevis cruciforme (non inclus). 1.
Une fois l’assemblage terminé, l’article devrait ressembler à ceci : DÉPANNAGE PROBLÈME Le radiateur ne s’allume pas. CAUSE POSSIBLE 1. Le cordon d’alimentation n’est pas branché. 2. L’alimentation électrique de la boîte à fusibles principale ne fonctionne pas. 3. Le thermostat du radiateur est réglé à une température inférieure à celle de la pièce. MESURE CORRECTIVE 1. Branchez le cordon d’alimentation sur une prise. 2. Vérifiez l’alimentation électrique de la boîte à fusibles principale. 3.
GARANTIE LISTE DES PIÈCES DE RECHANGE • l’utilisation du radiateur avec des rallonges électriques, des minuteries, des parasurtenseurs et des disjoncteurs différentiels; • l’usage à l’extérieur; • l’usure normale ou le vieillissement; • les accidents causés par des personnes ou des animaux. Le fabricant n’est pas responsable de toute perte liée à l’utilisation du radiateur ou à un usage inapproprié de celui-ci ni des coûts, des dépenses ou des dommages accessoires ou consécutifs sans preuve irréfutable.
ARTICLE #0689347 CALENTADOR INFRARROJO PARA USO GENERAL DE FIBRA DE CARBONO MODELO #PHB-1500 US ADJUNTE SU RECIBO AQUÍ Número de serie Fecha de compra ¿Preguntas, problemas, piezas faltantes? Antes de volver a la tienda, llame a nuestro Departamento de Servicio al Cliente al 1-866-994-4148, de lunes a jueves de 8 a.m. a 6 p.m. hora estándar del este y los viernes de 8 a.m. a 5 p.m., hora estándar del este. AB15495 Lowes.
NOTA INFORMACIÓN DE SEGURIDAD Este producto se puede instalar de forma independiente o en una pared. ESPECIFICACIONES Clasificación de voltaje Consumo de energía Tamaño de la unidad Peso de la unidad 120 V (60 Hz) 1,500 vatios 41,40 cm (ancho) x 65,53 cm (profundidad) x 37,59 cm (alto) 5,3 kg INFORMACIÓN DE SEGURIDAD Lea y comprenda este manual por completo antes de intentar ensamblar, usar o instalar el producto.
CONTENIDO DEL PAQUETE ADITAMENTOS (se muestran en tamaño real) AA Tornillos M6x30 Cantidad: 10 BB CC To r n i l l o s ST4x35 Cantidad: 2 DD Anclas de expansión de pared de 8 mm de diámetro Cantidad: 2 Destornillador hexagonal Cantidad: 1 PREPARACIÓN Antes de comenzar a ensamblar el producto, asegúrese de tener todas las piezas. Compare las piezas con la lista del contenido del paquete y la lista del contenido de aditamentos.
INSTRUCCIONES DE ENSAMBLAJE: INDEPENDIENTE 1. Conecte el tubo superior (F), el tubo de conexión (B) y los dos tubos inferiores (D) a uno de los tubos de soporte (A) con cuatro tornillos M6x30 (AA). Apriete los tornillos con el destornillador hexagonal (DD). 3. Gire nuevamente el ensamblaje. Fije el lado largo del tubo de manejo (G) en el tupo superior (F) con un tornillo M6x30 (AA). Apriete el tornillo con el destornillador hexagonal (DD).
INSTRUCCIONES DE ENSAMBLAJE: INDEPENDIENTE INSTRUCCIONES DE ENSAMBLAJE: MONTAJE EN PARED 5. Retire los dos tornillos centrales preensamblados de la parte posterior del calentador (C) con un destornillador Phillips (no se incluye). Conecte el calentador al tubo de conexión (B) con estos dos tornillos con un destornillador Phillips (no se incluye). 1.
Después del ensamblaje, el producto debe verse así: SOLUCIÓN DE PROBLEMAS PROBLEMA El calentador no enciende. CAUSA POSIBLE ACCIÓN CORRECTIVA 1. El cable de alimentación no está 1. Enchufe el cable de alimentación en enchufado. un tomacorriente. 2. No hay electricidad en la caja de 2. Verifique que haya electricidad en fusibles principal. la caja de fusibles principal. 3. El termostato del calentador está 3.
GARANTÍA LISTA DE PIEZAS DE REPUESTO • Deficiencias en los requisitos eléctricos (tomacorriente dedicado de 15 A a 20 A) • Uso con extensiones eléctricas/temporizadores/protectores de corriente/Interruptores de circuito por falla a tierra (GFCI, por sus siglas en inglés) • Aplicaciones en exteriores • Uso, desgaste o deterioro normales • Accidentes causados por mascotas o consumidores El fabricante no será responsable de ninguna pérdida debido al uso (o uso indebido) del calentador u otros costos, gastos