ITEM #0739430 ROPE LIGHT MODEL #UCL48A Français p. 8 Español p. 15 E232083 ATTACH YOUR RECEIPT HERE Purchase Date Questions, problems, missing parts? Before returning to your retailer, call our customer service department at 1-866-994-4148, 8 a.m. - 6 p.m., EST, Monday - Thursday, 8 a.m. 5 p.m., EST, Friday.
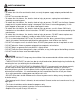
PACKAGE CONTENTS PART DESCRIPTION QUANTITY A Rope Light 1 B Power Cord 1 A B HARDWARE CONTENTS (shown actual size) AA BB Screw Mounting Clip Qty. 16 Qty. 16 SAFETY INFORMATION READ AND SAVE THESE INSTRUCTIONS. DANGER • For your protection and safety, carefully read and understand the information provided in this manual completely before attempting to assemble, install or operate this product.
SAFETY INFORMATION WARNING • To reduce the risk of fire and electric shock, use only the power supply adapter provided with the fixture. • DO NOT use an extension cord. • To reduce the risk of burns, fire, electric shock or injury to persons, unplug from outlet before attaching or removing parts.
PREPARATION Before beginning assembly of product, make sure all parts are present. Compare parts with package contents list and hardware contents list. If any part is missing or damaged, do not attempt to assemble the product. Estimated Assembly Time: 15 minutes Tools Required for Assembly (not included): Phillips Screwdriver, Flathead Screwdriver, Safety Glasses. Helpful Tools (not included): Stepladder ASSEMBLY INSTRUCTIONS 1. Carefully remove all parts from the packaging. Uncoil the rope light (A).
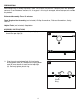
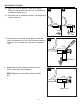
ASSEMBLY INSTRUCTIONS 3a. Determine the approximate location for the rope light (A). Temporarily place mounting clips (AA) against the mounting surface and mark the location of the screw holes using a pencil or marker (not included). Attach mounting clips (AA) to mounting surface with screws (BB). 3b. Attach rope light (A) to the mounting surface with mounting clips (AA). 3a AA BB 3b BB AA AA Hardware Used A AA Mounting Clip x 16 BB Screw x 16 4. Plug power cord (B) into wall outlet.
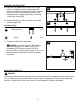
REPLACING THE FUSE 1a. Open fuse cover on plug by sliding cover toward blades. (It may be necessary to use a small flathead screwdriver to open cover.) 1b 1a 1b. One spare fuse is located in the plug. Turn plug over to remove spare fuse. Plug Cover Spare Fuse 2. Remove old fuse carefully. Gently pry the metal end nearest the blade with a very small flathead screwdriver to loosen, then turn plug over to remove. Discard old fuse. 2 Plug Old Fuse 3.
CARE AND MAINTENANCE • Wipe fixture with soft, damp cloth. Do not use an abrasive cleaner on fixture. TROUBLESHOOTING WARNING: Before beginning work, shut off the power supply to avoid electrical shock. PROBLEM Light does not come on initially or no longer comes on. POSSIBLE CAUSE 1. Power is OFF. 2. Fixture is not plugged in. CORRECTIVE ACTION 1. Make sure power supply is ON. 2. Plug fixture into outlet.