
Installation Guide


4
SAFETY INFORMATION
PREPARATION
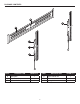
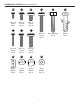
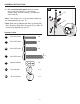
Before beginning assembly of product, make sure all parts are present. Compare parts with package
contents list and hardware contents list. If any part is missing or damaged, do not attempt to
assemble the product.
Estimated Assembly Time: 30 minutes
Tools Required for Assembly (not included): Drill with 7/32 in. and 3/8 in. drill bits, stud nder, socket
wrench, pencil, Phillips screwdriver, hammer, hex wrench.
Please read and understand this entire manual before attempting to assemble, operate or install the
product.
WARNING
• FAILURE TO READ, THOROUGHLY UNDERSTAND, AND FOLLOW ALL INSTRUCTIONS CAN
RESULT IN SERIOUS PERSONAL INJURY, DAMAGE TO PERSONAL PROPERTY, OR VOIDING
OF FACTORY WARRANTY.
• Do not attempt to install or assemble this product if the product or hardware is damaged or missing.
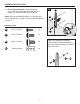
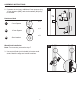
The included hardware is designed for use on vertical walls constructed of wood studs or solid
concrete. A wood stud wall is dened as consisting of a minimum of 2x4 wooden studs (2 in. wide
by 4 in. deep) with a maximum of 5/8 in. drywall. The included hardware is not designed for use with
metal studs or cinderblock walls. If you are uncertain about the construction of your wall, please
consult a qualied contractor or installer for assistance. For safe installation, the wall selected for
mounting must support 4 times the weight of the total load. If not, the surface must be reinforced
to meet this standard. The installer is responsible for verifying that the wall structure and hardware
used in any installation method will safely support the total load.
CAUTION
• The maximum loading weight is 175 lbs. Use with products heavier than the maximum weight
indicated may result in instability and possible personal injury.
• Max screen size: 90 in.
KEEP THESE INSTRUCTIONS FOR FUTURE REFERENCE.