
Instructions Manual


10
Copyright © 2011 Star Water Systems. All rights reserved.
11
Copyright © 2011 Star Water Systems. All rights reserved.
ASSEMBLY INSTRUCTRIONS
IL1172
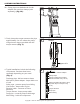
Torque
Arrestor
Approx. 4 ft.
2b
3
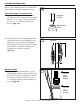
2b. Clamp pipe onto barbed end of male
adaptor with two hose clamps (sold
separately). (Fig. 2b)
3. Firmly clamp the torque arrestor to the pipe
approximately 2 to 4 ft. above the pump,
using the two clamps provided with the
torque arrestor. (Fig. 3)
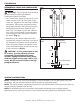
4. Typical installations include the following
components. Purchase these items
separately depending on your need.
(Fig. 4)
Discharge pipe - delivers water to home
Well seal or pitless adapter - keeps debris out
of well
Safety rope - prevents pump from falling
Check valve - keeps water in pipe
Electrical cable - connects to house
electricity
Torque arrestor - keeps pump stable
Drop pipe - connects pump to discharge
Well casing - holds all components
Discharge Pipe
Spring-Loaded Check Valve
(Recommended every 100 ft.)
Safety Rope
Well Seal or Pitless Adapter
Well Casing
Torque Arrestor
Drop Pipe
Electrical Cable (Secured to drop
pipe with tape or clamps every
10 ft.)
4