
User guide


32
Chapter 4 Web-based Management
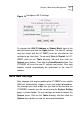
6 Enter the appropriate
IP Address
,
Subnet Mask
and
Default Gateway
address as instructed by your ISP. Your
ISP should have provided these IP settings to you.
7 If you are instructed to use enable
Default Route
by your
ISP, click the
Enabled
radio button. This setting specifies
that this PVC (from the list of seven) on your UT-300R2 be
used to define the default route to the Internet for your LAN.
Whenever a computer on your LAN attempts to access the
Internet, the UT-300R2 will use this PVC to direct packets
to the Internet, and this PVC will become the default
gateway to the Internet for your LAN.
8 When you are satisfied that all the WAN settings are
configured correctly, click on the Apply button.
9 The new settings must be saved and the UT-300R2 must
be restarted for the settings to go into effect. To manually
save and reboot the UT-300R2, click on the
Tools
directory tab and then click the System menu button. On
the menu that appears, click he
Save & Restart
button.
The UT-300R2 will save the new settings and restart.
Upon restarting the UT-300R2 will automatically establish
the bridged WAN connection.
DHCP Configuration
To display the
DHCP Server
menu, click the
DHCP
button in
the
Home
directory. Active DHCP Clients appear listed in the
DHCP Client Table
below the configuration menu. Information
about DHCP clients includes the IP address, MAC address,
host name and lease time are displayed in the list.