
Installation Sheet

ASSEMBLY AND INSTALLATION INSTRUCTIONS
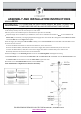
STYLE
#:
22195
Carefully unpack all lamp parts from carton.We suggest a licensed electrician for all fixture installations.
1
.
Take the lamp carefully out of the Carton,and place on a flat surface.
2
. Be sure power to the installation point is OFF.Follow the steps below for assembly.
3
. Adjust the length of wire needed for your installation, remove excess. Determine the number of
Rods
to be assembled to the
Fixture Body
as needed for your hanging height.Pull the Supply Wire with Ground Wire through the selected
Rods
and
Swivel
.
Thread the
Rods
& connect
Nipple
. Hand tighten.
4.
Pass the supply wire through the
Universal Bar
assembly,secure the
Universal Bar
to the Outlet Box with Outlet Box Screws
.
5
. Connect the wire as shown.
a
.Connect the House Ground Wire to the Fixture Ground Wire, secure with wire nut.
b.
Connect the House White (or Ribbed) Wire to the Fixture Supply Wire (White or Ribbed Side),secure with wire nut.
c.
Connect the House Black (or Red) Wire to the Fixture Supply Wire (Black or Smooth Side),secure with wire nut.
d.
Carefully stuff all of the connected wires into the Outlet Box.
6
. Place the
Canopy
over the
Mounting Screws
and secure with
Mounting Balls
. Hand-tighten until snug.
7
. Slide
Glass Shade
over socket and thread
Metal Sleave #1
then
Metal Sleave #2
onto
Socket
. Then use
Plastic Wrench
to
lock
the
Socket Collar
onto the socket to secure the
Glass Shade
. Tighten until snug.
8
. Install the correct Bulb(
Edison Bulb
Included) into the
Socket
until snug.
Your installation is completed now. Restore electricity.
PO BOX 558/3325 GRASSY HILL RD. ROCKY MOUNT, VIRGINIA 24151
www.uttermost.com
WARNING:
TO AVOID RISK OF ELECTRICAL SHOCK, BE SURE TO SHUT OFF
POWER BEFORE INSTALLING OR SERVICING THIS FIXTURE.
Universal Bar
Socket Collar
Plastic Wrench