BioDoc-It® Imaging System Installation and User Instructions UVP, LLC 2066 W. 11th Street Upland, CA 91786 Phone: (800) 452-6788 / (909) 946-3197 Fax: (909) 946-3597 Ultra-Violet Products Ltd. Unit 1, Trinity Hall Farm Estate Nuffield Road, Cambridge CB4 1TG UK Phone: +44(0)1223-420022 Fax: +44(0)1223-420561 Web Site: www.uvp.
BioDoc-It Imaging System 2 System Introduction BioDoc-It® Imaging System The BioDoc-It Imaging System enables simple documentation of fluorescent and non-fluorescent gels, membranes, blots, film plates and assays with the ability to save images to a USB storage device for later quantitative analysis or enhancement for publication. Images are saved in 8-bit TIFF or JPEG formats, allowing saved images to be read by most PC or MAC programs.
BioDoc-It Imaging System 3 System Components BioDoc-It Components Refer to the packing slip and pictured components for parts included with the system.
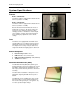
BioDoc-It Imaging System System Specifications Camera BioDoc-It 220 Models: The BioDoc-It 220 is equipped with a FluorCam 220 Camera (resolution of 1.3MP). BioDoc-It 210 Models: The BioDoc-It 210 is equipped with a FluorCam 210 Camera (resolution of 0.3MP). Both the FluorCam 220 and FluorCam 210 use a USB 2.0 PC connection. All camera settings are factory pre-set for optimum performance when viewing gels, films, or membranes under low light level conditions.
BioDoc-It Imaging System 5 Darkroom Darkroom features include: UV gel viewer window Overhead white light Wide access door with UV safety interlock switch Transilluminator A transilluminator is included with the BioDoc-It system. UVP offers a variety of transilluminators, from benchtop models with 8-watt, single wavelength and single intensity to models with multiple wavelengths and high/low intensities. UVP also offers the high-end FirstLight®, a highly uniform, 302nm UV transilluminator.
BioDoc-It Imaging System 6 Optional Equipment Refer to the Replacement Parts and Accessories section of this manual for optional equipment part numbers. Thermal Printer The Thermal Printer provides archive quality, 256 grayscale prints and five optional cost-effective print sizes. Thermal Printer Converter Plates The UV/White Converter Plate allows imaging of non-fluorescent stained media with an ultraviolet transilluminator.
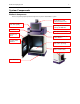
BioDoc-It Imaging System 7 Setup Instructions Components BioDoc-It Darkroom CCD Camera and Zoom Lens Camera/Lens Mounting Bracket and Hardware Power, Jumper and USB Cables Transilluminator USB Storage Device (1GB minimum) WARNING: DO NOT ATTEMPT TO CONNECT ANY WIRING WHILE THE EQUIPMENT IS CONNECTED TO THE POWER SUPPLY! CAUTION: Do not install the system in places with high moisture, dust, or high temperatures. Do not use any oil or petroleum based cleaners on the cabinet.
BioDoc-It Imaging System 3. 4. Using the four brass thumb screws provided, secure the bracket to the base. Slide the camera and lens assembly into the camera bracket. Slide the lens through the center hole in the gasket on the base and use the gasket to form a light-tight seal around the lens. 8 Camera bracket Black thumb screw Camera USB cable Camera and lens assembly Brass thumb screws secure the bracket to the base 5.
BioDoc-It Imaging System 9 Using the System Powering Up the System 1. Ensure that the main power cord is connected from the back of the darkroom to a surge-protected power outlet. 2. Power up the system by pressing once on the Main Power button located on the right side of the unit. All internal components will now have power and the TS software will automatically load. 3. To power down the system, push the Main Power button. Adjusting the Screen Angle 1.
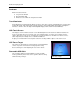
BioDoc-It Imaging System 10 Operating the TS Software Once the Main Power button is pressed, the system will go through the boot-up process. Upon completion, the LCD monitor will display the TS software screen similar to the one below: To shut down the TS software, touch the X on the bottom left corner of the screen. To turn the system off, press the Main Power button or power down from the Windows icon on the bottom right corner of the screen.
BioDoc-It Imaging System 11 Image Focusing Prior to capturing any images, prepare the image focus capabilities of the system: 1. Turn on the transilluminator and place the UVP Focus Target on the transilluminator surface. NOTE: The BioDoc-It darkroom has a UV safety switch that turns the transilluminator off when the door is open. After closing the door, be sure the overhead white light switch is turned OFF. 2. Press the LIVE button on the TS software screen.
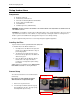
BioDoc-It Imaging System 12 Touch Screen Interface Setting User Preferences on the TS Software Before capturing images, set up the user preferences by touching the PREF (preferences) button on the main screen. Select from the following tabs: Capture Postprocessing Saving Capture Tab Active Camera: The name of the attached camera will be shown. Bit Depth: Select the bit depth. 16 bpp (bits per pixel) is shown for the Gel HR Camera. Display Time Stamp: Turn the time stamp on or off.
BioDoc-It Imaging System 13 Saving Tab NOTE: If the auto save function is enabled, the image will automatically save when the SNAP button is pressed. If the auto save function is not enabled, press the SAVE button to save an image. A pop up screen will allow the user to save to the USB Drive or a different location with Prompt for Location function. Save Images To: Select the location where images are to be saved. White highlight indicates which button is activated.
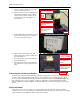
BioDoc-It Imaging System 14 Identifying the Touch Screen Functions and Tools Using the software touch screen allows convenient selection of image capture, save, print and other functions of the system. Callouts are provided below to briefly describe the buttons.
BioDoc-It Imaging System 15 5. To snap (capture) the image, touch the SNAP button. NOTE: When using the SNAP button, if the Auto Save function is enabled, the image will automatically be saved. 6. Touch the SAVE button to save the image to the location specified in the Preferences. The file name is assigned automatically by the software as UVP#####mmddyyyy.* NOTE: Once an image is saved, the user cannot open the image with the software.
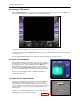
BioDoc-It Imaging System 16 Connecting to a Network Network Connectivity The TS System has built-in networkability. While it is fairly simple to connect the device to the network, it is highly recommend to obtain assistance from your network administrator. Follow the Microsoft or local standard network protocols for network configuration. To exit the TS software interface and go to Microsoft Windows, touch the WINDOWS ICON located at the bottom right corner of the main screen.
BioDoc-It Imaging System 17 Service Procedures Return Procedure A Returned Goods Authorization (RGA) number must be obtained from UVP Customer Service before returning any product. Replacement Parts and Accessories To order accessories or replacement parts for the BioDoc-It Imaging System, contact UVP’s offices.
BioDoc-It Imaging System 18 Touch Screen Not Accurate 1. If touching or clicking on the buttons becomes inaccurate, the touch screen may need to be recalibrated. Please follow all instructions in the touch screen calibration instructions included in the TS software CD. Error Messages Appear on the Screen 1. An error message that is related to the TS software interface or Microsoft Windows may appear on the screen.